Shadertoy Tutorial Part 12 - Fresnel and Rim Lighting
Greetings, friends! Welcome to Part 12 of my Shadertoy tutorial series. In this tutorial, we'll learn how to add rim lighting around a sphere using fresnel reflection.
Initial Setup
We'll start with a basic ray marching template.
const int MAX_MARCHING_STEPS = 255;
const float MIN_DIST = 0.0;
const float MAX_DIST = 100.0;
const float PRECISION = 0.001;

float sdSphere(vec3 p, float r )
{
  vec3 offset = vec3(0, 0, -2);
  return length(p - offset) - r;
}

float sdScene(vec3 p) {
  return sdSphere(p, 1.);
}

float rayMarch(vec3 ro, vec3 rd) {
  float depth = MIN_DIST;

  for (int i = 0; i < MAX_MARCHING_STEPS; i++) {
    vec3 p = ro + depth * rd;
    float d = sdScene(p);
    depth += d;
    if (d < PRECISION || depth > MAX_DIST) break;
  }

  return depth;
}

vec3 calcNormal(vec3 p) {
    vec2 e = vec2(1.0, -1.0) * 0.0005;
    return normalize(
      e.xyy * sdScene(p + e.xyy) +
      e.yyx * sdScene(p + e.yyx) +
      e.yxy * sdScene(p + e.yxy) +
      e.xxx * sdScene(p + e.xxx));
}

void mainImage( out vec4 fragColor, in vec2 fragCoord )
{
  vec2 uv = (fragCoord-.5*iResolution.xy)/iResolution.y;
  vec3 backgroundColor = vec3(0.1);
  vec3 col = vec3(0);

  vec3 ro = vec3(0, 0, 3);
  vec3 rd = normalize(vec3(uv, -1));

  float d = rayMarch(ro, rd);

  if (d > MAX_DIST) {
    col = backgroundColor;
  } else {
    vec3 p = ro + rd * d;
    vec3 normal = calcNormal(p);
    vec3 lightPosition = vec3(4, 4, 7);
    vec3 lightDirection = normalize(lightPosition - p);

    float diffuse = clamp(dot(normal, lightDirection), 0., 1.);
    vec3 diffuseColor = vec3(0, 0.6, 1);

    col = diffuse * diffuseColor;
  }

  fragColor = vec4(col, 1.0);
}
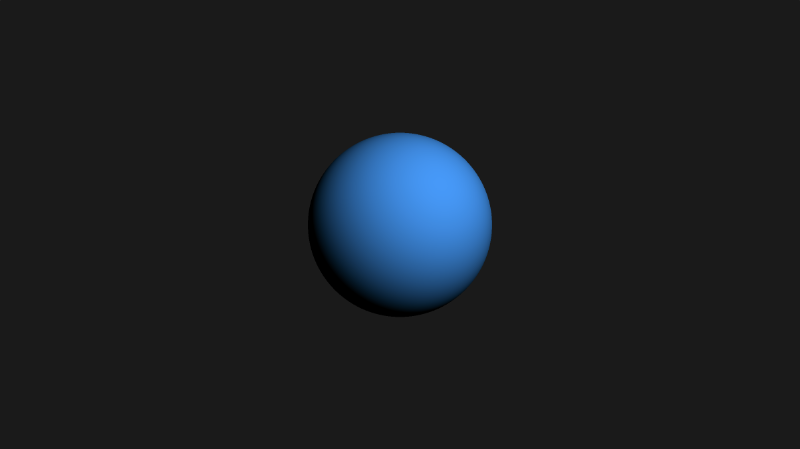
When you run this code, you should see a blue sphere with only diffuse (Lambertian) reflection.
Fresnel Reflection
The Fresnel equations describe the reflection and transmission of light when it is incident on an interface between two different optical media. In simpler terms, this means that objects can be lit a bit differently when you look at them from grazing angles.
The term, optical media, refers to the type of material light passes through. Different materials tend to have different refractive indices which makes it appear that light is bending.

Air is a type of medium. It typically has an index of refraction of about 1.000293. Materials such as diamonds have a high index of refraction. Diamond has an index of refraction of 2.417. A high index of refraction means light will appear to bend even more.
The Fresnel equations can get pretty complicated. For computer graphics, you will typically see people use the Schlick's approximation for approximating the Fresnel contribution of reflection.
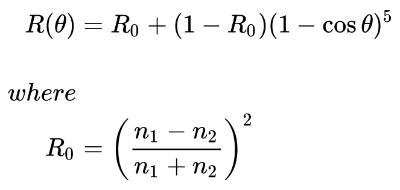
The above equation calculates the Fresnel contribution to reflection, R where R0 is the reflection coefficient for light incoming parallel to the normal (typically when θ equals zero).
The value of cos θ is equal to the dot product between the surface normal and the direction the incident light is coming from. In our code, however, we'll use the ray direction, rd.
For the purposes of our examples, we will assume that the refractive index of air and the sphere are both equal to one. This will help simplify our calculations. This means that R0 is equal to zero.
n1 = 1
n2 = 1

R0 = ((n1 - n2)/(n1 + n2)) ^ 2
R0 = ((1 - 1)/(1 + 1)) ^ 2
R0 = 0
With R0 equal to zero, we can simplify the Fresnel reflection equation even more.
R = R0 + (1 - R0)(1 - cosθ)^5

Since R0 = 0,
R = (1 - cosθ)^5
In GLSL code, this can be written as:
float fresnel = pow(1. - dot(normal, -rd), 5.);
However, we clamp the values to make sure we keep the range between zero and one. We also use -rd. If you used positive rd, then you might not see the color only being applied to the rim of the sphere.
float fresnel = pow(clamp(1. - dot(normal, -rd), 0., 1.), 5.);
We can multiply this fresnel value by a color value, so we can apply a colored rim around our blue sphere. Below is the finished code:
const int MAX_MARCHING_STEPS = 255;
const float MIN_DIST = 0.0;
const float MAX_DIST = 100.0;
const float PRECISION = 0.001;

float sdSphere(vec3 p, float r )
{
  vec3 offset = vec3(0, 0, -2);
  return length(p - offset) - r;
}

float sdScene(vec3 p) {
  return sdSphere(p, 1.);
}

float rayMarch(vec3 ro, vec3 rd) {
  float depth = MIN_DIST;

  for (int i = 0; i < MAX_MARCHING_STEPS; i++) {
    vec3 p = ro + depth * rd;
    float d = sdScene(p);
    depth += d;
    if (d < PRECISION || depth > MAX_DIST) break;
  }

  return depth;
}

vec3 calcNormal(vec3 p) {
    vec2 e = vec2(1.0, -1.0) * 0.0005;
    return normalize(
      e.xyy * sdScene(p + e.xyy) +
      e.yyx * sdScene(p + e.yyx) +
      e.yxy * sdScene(p + e.yxy) +
      e.xxx * sdScene(p + e.xxx));
}

void mainImage( out vec4 fragColor, in vec2 fragCoord )
{
  vec2 uv = (fragCoord-.5*iResolution.xy)/iResolution.y;
  vec3 backgroundColor = vec3(0.1);
  vec3 col = vec3(0);

  vec3 ro = vec3(0, 0, 3);
  vec3 rd = normalize(vec3(uv, -1));

  float d = rayMarch(ro, rd);

  if (d > MAX_DIST) {
    col = backgroundColor;
  } else {
    vec3 p = ro + rd * d;
    vec3 normal = calcNormal(p);
    vec3 lightPosition = vec3(4, 4, 7);
    vec3 lightDirection = normalize(lightPosition - p);

    float diffuse = clamp(dot(normal, lightDirection), 0., 1.);
    vec3 diffuseColor = vec3(0, 0.6, 1);

    float fresnel = pow(clamp(1. - dot(normal, -rd), 0., 1.), 5.);
    vec3 rimColor = vec3(1, 1, 1);

    col = diffuse * diffuseColor + fresnel * rimColor; // add the fresnel contribution
  }

  fragColor = vec4(col, 1.0);
}
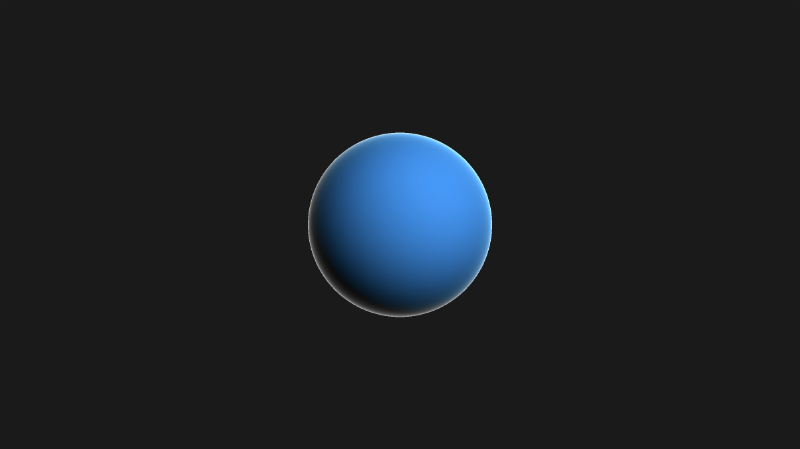
If you run this code, you should see a thin white rim of our blue sphere. This simulates the effect of light hitting a grazing angle of our sphere.
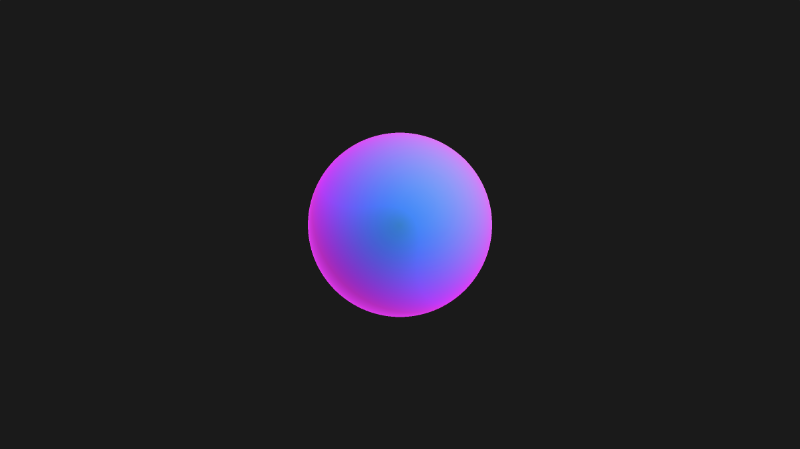
You can play around with the exponent and the rim color to get a "force field" like effect.
float fresnel = pow(clamp(1. - dot(normal, -rd), 0., 1.), 0.5);
vec3 rimColor = vec3(1, 0, 1);

col = diffuse * diffuseColor + fresnel * rimColor;
Conclusion
In this article we learned how to add rim lighting around objects by applying fresnel reflection. If you're dealing with objects that mimic glass or plastic, then adding fresnel can help make them a bit more realistic.