Shadertoy Tutorial Part 13 - Shadows
Greetings, friends! Welcome to Part 13 of my Shadertoy tutorial series. In this tutorial, we'll learn how to add shadows to our 3D scene.
Initial Setup
Our starting code for this tutorial is going to be a bit different this time. We're going to go back to rendering scenes with just one color and we'll go back to using a basic camera with no lookat point. I've also made the rayMarch function a bit simpler. It accepts two parameters instead of four. We weren't really using the last two parameters anyways.
const int MAX_MARCHING_STEPS = 255;
const float MIN_DIST = 0.0;
const float MAX_DIST = 100.0;
const float PRECISION = 0.001;
const float EPSILON = 0.0005;

float sdSphere(vec3 p, float r, vec3 offset)
{
  return length(p - offset) - r;
}

float sdFloor(vec3 p) {
  return p.y + 1.;
}

float scene(vec3 p) {
  float co = min(sdSphere(p, 1., vec3(0, 0, -2)), sdFloor(p));
  return co;
}

float rayMarch(vec3 ro, vec3 rd) {
  float depth = MIN_DIST;
  float d; // distance ray has travelled

  for (int i = 0; i < MAX_MARCHING_STEPS; i++) {
    vec3 p = ro + depth * rd;
    d = scene(p);
    depth += d;
    if (d < PRECISION || depth > MAX_DIST) break;
  }

  d = depth;

  return d;
}

vec3 calcNormal(in vec3 p) {
    vec2 e = vec2(1, -1) * EPSILON;
    return normalize(
      e.xyy * scene(p + e.xyy) +
      e.yyx * scene(p + e.yyx) +
      e.yxy * scene(p + e.yxy) +
      e.xxx * scene(p + e.xxx));
}

void mainImage( out vec4 fragColor, in vec2 fragCoord )
{
  vec2 uv = (fragCoord-.5*iResolution.xy)/iResolution.y;
  vec3 backgroundColor = vec3(0);

  vec3 col = vec3(0);
  vec3 ro = vec3(0, 0, 3); // ray origin that represents camera position
  vec3 rd = normalize(vec3(uv, -1)); // ray direction

  float sd = rayMarch(ro, rd); // signed distance value to closest object

  if (sd > MAX_DIST) {
    col = backgroundColor; // ray didn't hit anything
  } else {
    vec3 p = ro + rd * sd; // point discovered from ray marching
    vec3 normal = calcNormal(p); // surface normal

    vec3 lightPosition = vec3(cos(iTime), 2, sin(iTime));
    vec3 lightDirection = normalize(lightPosition - p);

    float dif = clamp(dot(normal, lightDirection), 0., 1.); // diffuse reflection clamped between zero and one

    col = vec3(dif);
  }

  fragColor = vec4(col, 1.0);
}
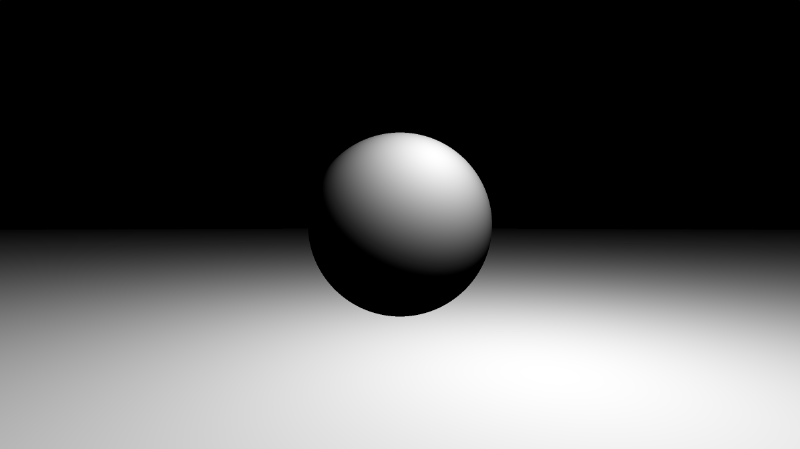
After running the code, we should see a very basic 3D scene with a sphere, a floor, and diffuse reflection. The color from the diffuse reflection will be shades of gray between black and white.
Basic Shadows
Let's start with learning how to add very simple shadows. Before we start coding, let's look at the image below to visualize how the algorithm will work.
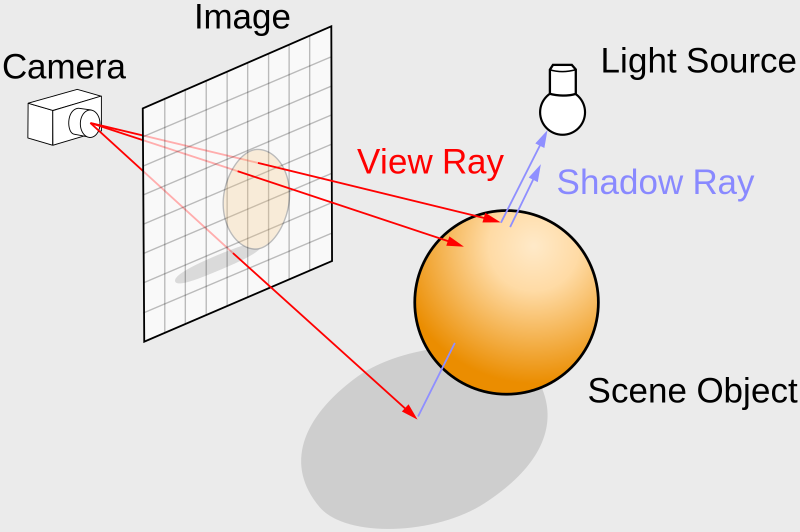
Our rayMarch function implements the ray marching algorithm. We currently use it for discovering a point in the scene that hits the nearest object or surface. However, we can use it a second time to generate a new ray and point this ray toward our light source in the scene. In the image above, there are "shadow rays" that are casted toward the light source from the floor.
In our code, we will perform ray marching a second time, where the new ray origin is equal to p, the point on the sphere or floor we discovered from the first ray marching step. The new ray direction will be equal to lightDirection. In our code, it's as simple as adding three lines underneath the diffuse reflection calculation.
float dif = clamp(dot(normal, lightDirection), 0., 1.); // diffuse reflection clamped between zero and one

vec3 newRayOrigin = p;
float shadowRayLength = rayMarch(newRayOrigin, lightDirection); // cast shadow ray to the light source
if (shadowRayLength < length(lightPosition - newRayOrigin)) dif *= 0.; // if the shadow ray hits the sphere, set the diffuse reflection to zero, simulating a shadow
However, when you run this code, the screen will appear almost completely black. What's going on? During the first ray march loop, we fire off rays from the camera. If our ray hits a point, p, that is closer to the floor than the sphere, then the signed distance value will equal to the length from the camera to the floor.
When we use this same p value in the second ray march loop, we already know it's closer to the floor than the surface of the sphere. Therefore almost everything will seem like it's in the shadow, causing the screen to go black. We need to choose a value very close to p during the second ray march step, so we don't have this issue occurring.
A common approach is to add the surface normal, multiplied by a tiny value, to the value of p, so we get a neighboring point. We will use the PRECISION variable as the tiny value that will slightly nudge p to a neighboring point.
vec3 newRayOrigin = p + normal * PRECISION;
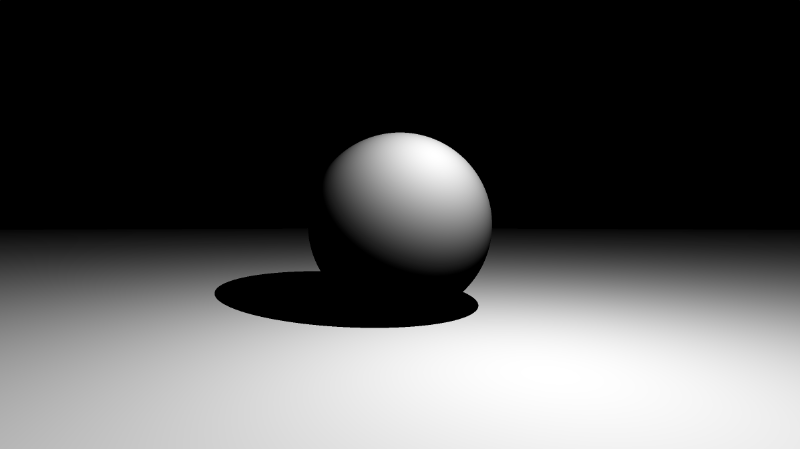
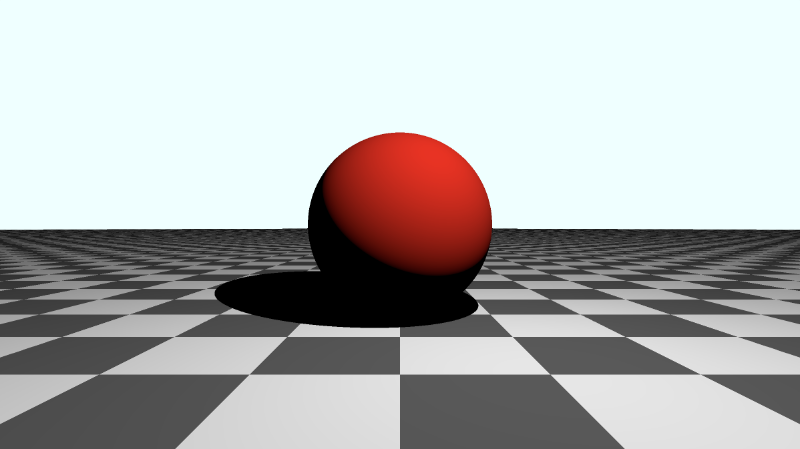
When you run the code, you should now see a shadow appear below the sphere. However, there's a strange artifact near the center of the sphere.

We can multiply the precision value by two to make it go away.
vec3 newRayOrigin = p + normal * PRECISION * 2.;
When adding shadows to your scene, you may need to keep adjusting newRayOrigin by multiplying by different factors to see what works. Making realistic shadows is not an easy task, and you may find yourself playing around with values until it looks good.
You finished code should look like the following:
const int MAX_MARCHING_STEPS = 255;
const float MIN_DIST = 0.0;
const float MAX_DIST = 100.0;
const float PRECISION = 0.001;
const float EPSILON = 0.0005;

float sdSphere(vec3 p, float r, vec3 offset)
{
  return length(p - offset) - r;
}

float sdFloor(vec3 p) {
  return p.y + 1.;
}

float scene(vec3 p) {
  float co = min(sdSphere(p, 1., vec3(0, 0, -2)), sdFloor(p));
  return co;
}

float rayMarch(vec3 ro, vec3 rd) {
  float depth = MIN_DIST;
  float d; // distance ray has travelled

  for (int i = 0; i < MAX_MARCHING_STEPS; i++) {
    vec3 p = ro + depth * rd;
    d = scene(p);
    depth += d;
    if (d < PRECISION || depth > MAX_DIST) break;
  }

  d = depth;

  return d;
}

vec3 calcNormal(in vec3 p) {
    vec2 e = vec2(1, -1) * EPSILON;
    return normalize(
      e.xyy * scene(p + e.xyy) +
      e.yyx * scene(p + e.yyx) +
      e.yxy * scene(p + e.yxy) +
      e.xxx * scene(p + e.xxx));
}

void mainImage( out vec4 fragColor, in vec2 fragCoord )
{
  vec2 uv = (fragCoord-.5*iResolution.xy)/iResolution.y;
  vec3 backgroundColor = vec3(0);

  vec3 col = vec3(0);
  vec3 ro = vec3(0, 0, 3); // ray origin that represents camera position
  vec3 rd = normalize(vec3(uv, -1)); // ray direction

  float sd = rayMarch(ro, rd); // signed distance value to closest object

  if (sd > MAX_DIST) {
    col = backgroundColor; // ray didn't hit anything
  } else {
    vec3 p = ro + rd * sd; // point discovered from ray marching
    vec3 normal = calcNormal(p); // surface normal

    vec3 lightPosition = vec3(cos(iTime), 2, sin(iTime));
    vec3 lightDirection = normalize(lightPosition - p);

    float dif = clamp(dot(normal, lightDirection), 0., 1.); // diffuse reflection clamped between zero and one

    vec3 newRayOrigin = p + normal * PRECISION * 2.;
    float shadowRayLength = rayMarch(newRayOrigin, lightDirection);
    if (shadowRayLength < length(lightPosition - newRayOrigin)) dif *= 0.;

    col = vec3(dif);
  }

  fragColor = vec4(col, 1.0);
}
Adding Shadows to Colored Scenes
Using the same technique, we can apply shadows to the colored scenes we've been working with in the past few tutorials.
const int MAX_MARCHING_STEPS = 255;
const float MIN_DIST = 0.0;
const float MAX_DIST = 100.0;
const float PRECISION = 0.001;
const float EPSILON = 0.0005;

struct Surface {
    float sd; // signed distance value
    vec3 col; // color
};

Surface sdFloor(vec3 p, vec3 col) {
  float d = p.y + 1.;
  return Surface(d, col);
}

Surface sdSphere(vec3 p, float r, vec3 offset, vec3 col) {
  p = (p - offset);
  float d = length(p) - r;
  return Surface(d, col);
}

Surface opUnion(Surface obj1, Surface obj2) {
  if (obj2.sd < obj1.sd) return obj2;
  return obj1;
}

Surface scene(vec3 p) {
  vec3 floorColor = vec3(0.1 + 0.7 * mod(floor(p.x) + floor(p.z), 2.0));
  Surface co = sdFloor(p, floorColor);
  co = opUnion(co, sdSphere(p, 1., vec3(0, 0, -2), vec3(1, 0, 0)));
  return co;
}

Surface rayMarch(vec3 ro, vec3 rd) {
  float depth = MIN_DIST;
  Surface co; // closest object

  for (int i = 0; i < MAX_MARCHING_STEPS; i++) {
    vec3 p = ro + depth * rd;
    co = scene(p);
    depth += co.sd;
    if (co.sd < PRECISION || depth > MAX_DIST) break;
  }

  co.sd = depth;

  return co;
}

vec3 calcNormal(in vec3 p) {
    vec2 e = vec2(1, -1) * EPSILON;
    return normalize(
      e.xyy * scene(p + e.xyy).sd +
      e.yyx * scene(p + e.yyx).sd +
      e.yxy * scene(p + e.yxy).sd +
      e.xxx * scene(p + e.xxx).sd);
}

void mainImage( out vec4 fragColor, in vec2 fragCoord )
{
  vec2 uv = (fragCoord-.5*iResolution.xy)/iResolution.y;
  vec3 backgroundColor = vec3(0.835, 1, 1);

  vec3 col = vec3(0);
  vec3 ro = vec3(0, 0, 3); // ray origin that represents camera position
  vec3 rd = normalize(vec3(uv, -1)); // ray direction

  Surface co = rayMarch(ro, rd); // closest object

  if (co.sd > MAX_DIST) {
    col = backgroundColor; // ray didn't hit anything
  } else {
    vec3 p = ro + rd * co.sd; // point discovered from ray marching
    vec3 normal = calcNormal(p);

    vec3 lightPosition = vec3(cos(iTime), 2, sin(iTime));
    vec3 lightDirection = normalize(lightPosition - p);

    float dif = clamp(dot(normal, lightDirection), 0., 1.); // diffuse reflection

    vec3 newRayOrigin = p + normal * PRECISION * 2.;
    float shadowRayLength = rayMarch(newRayOrigin, lightDirection).sd; // cast shadow ray to the light source
    if (shadowRayLength < length(lightPosition - newRayOrigin)) dif *= 0.0; // shadow

    col = dif * co.col;

  }

  fragColor = vec4(col, 1.0); // Output to screen
}
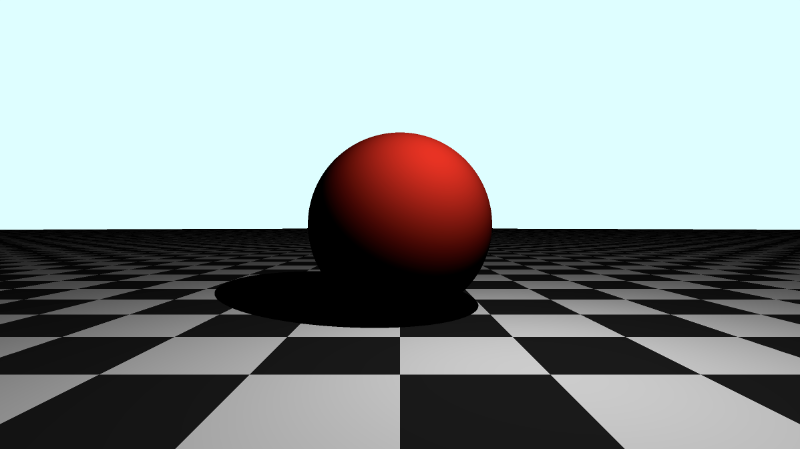
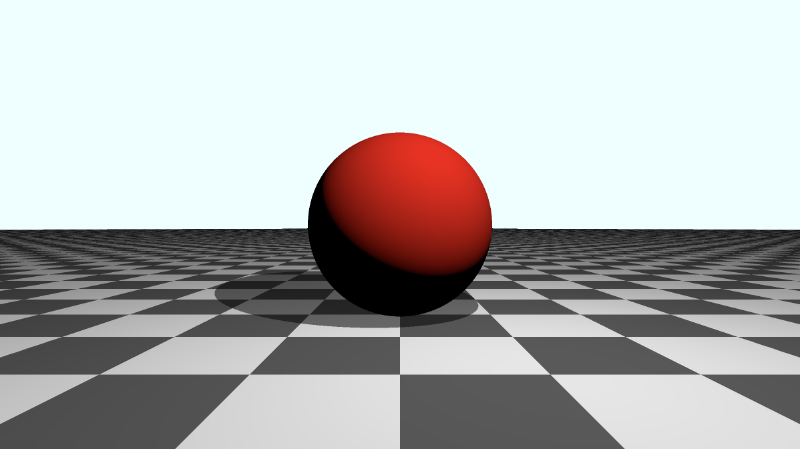
If you run this code, you should see a red sphere with a moving light source (and therefore "moving" shadow), but the entire scene appears a bit too dark.
Gamma Correction
We can apply a bit of gamma correction to make the darker colors brighter. We'll add this line right before we output the final color to the screen.
col = pow(col, vec3(1.0/2.2)); // Gamma correction
Your mainImage function should now look like the following:
void mainImage( out vec4 fragColor, in vec2 fragCoord )
{
  vec2 uv = (fragCoord-.5*iResolution.xy)/iResolution.y;
  vec3 backgroundColor = vec3(0.835, 1, 1);

  vec3 col = vec3(0);
  vec3 ro = vec3(0, 0, 3); // ray origin that represents camera position
  vec3 rd = normalize(vec3(uv, -1)); // ray direction

  Surface co = rayMarch(ro, rd); // closest object

  if (co.sd > MAX_DIST) {
    col = backgroundColor; // ray didn't hit anything
  } else {
    vec3 p = ro + rd * co.sd; // point discovered from ray marching
    vec3 normal = calcNormal(p);

    vec3 lightPosition = vec3(cos(iTime), 2, sin(iTime));
    vec3 lightDirection = normalize(lightPosition - p);

    float dif = clamp(dot(normal, lightDirection), 0., 1.); // diffuse reflection

    vec3 newRayOrigin = p + normal * PRECISION * 2.;
    float shadowRayLength = rayMarch(newRayOrigin, lightDirection).sd; // cast shadow ray to the light source
    if (shadowRayLength < length(lightPosition - newRayOrigin)) dif *= 0.; // shadow

    col = dif * co.col;

  }

  col = pow(col, vec3(1.0/2.2)); // Gamma correction
  fragColor = vec4(col, 1.0); // Output to screen
}
When you run the code, you should see the entire scene appear brighter.
The shadow seems a bit too dark still. We can lighten it by adjusting how much we should scale the diffuse reflection by. Currently, we're setting the diffuse reflection color of the floor and sphere to zero when we calculate which points lie in the shadow.
We can change the "scaling factor" to 0.2 instead:
if (shadowRayLength < length(lightPosition - newRayOrigin)) dif *= 0.2; // shadow
Now the shadow looks a bit better, and you can see the diffuse color of the floor through the shadow.
Soft Shadows
In real life, shadows tend to have multiple parts, including an umbra, penumbra, and antumbra. We can add a "soft shadow" that tries to copy shadows in real life by using algorithms found on Inigo Quilez's website.
Below is an implementation of the "soft shadow" function found in the popular Shadertoy shader, Raymarching Primitives Commented. I have made adjustments to make it compatible with our code.
float softShadow(vec3 ro, vec3 rd, float mint, float tmax) {
  float res = 1.0;
  float t = mint;

  for(int i = 0; i < 16; i++) {
    float h = scene(ro + rd * t).sd;
      res = min(res, 8.0*h/t);
      t += clamp(h, 0.02, 0.10);
      if(h < 0.001 || t > tmax) break;
  }

  return clamp( res, 0.0, 1.0 );
}
In our mainImage function, we can remove the "hard shadow" code and replace it with the "soft shadow" implementation.
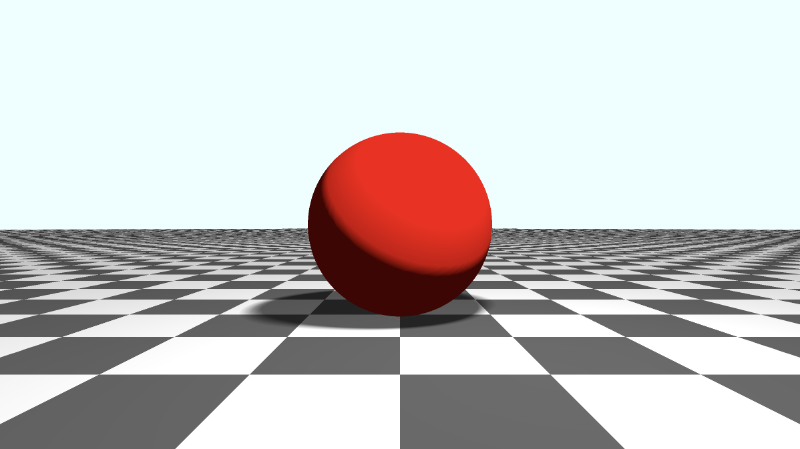
float softShadow = clamp(softShadow(p, lightDirection, 0.02, 2.5), 0.1, 1.0);
col = dif * co.col * softShadow;
We can clamp the shadow between 0.1 and 1.0 to lighten the shadow a bit, so it's not too dark.

Notice the edges of the soft shadow. It's a smoother transition between the shadow and normal floor color.
Applying Fog
You may have noticed that the color of the sphere not facing the light appears too dark still. We can attempt to lighten it by adding 0.5 to the diffuse reflection, dif.
float dif = clamp(dot(normal, lightDirection), 0., 1.) + 0.5; // diffuse reflection
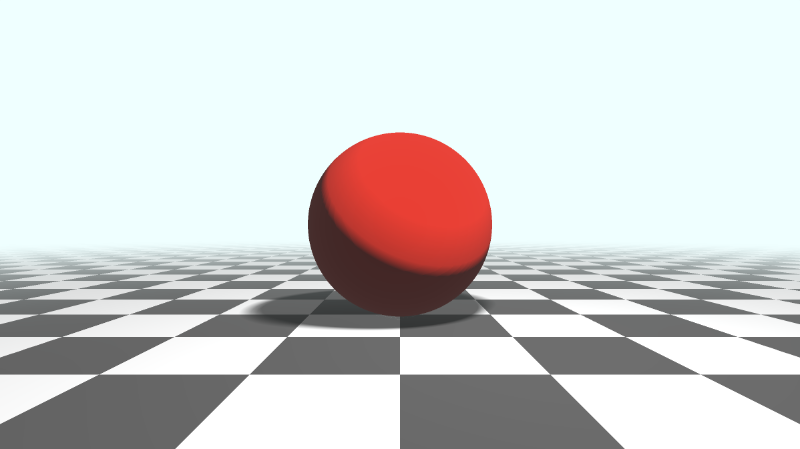
When you run the code, you'll see that the sphere appears a bit brighter, but the back of the floor in the distance looks kinda weird.
You may commonly see people hide any irregularities of the background by applying fog. Let's apply fog right before the gamma correction.
col = mix(col, backgroundColor, 1.0 - exp(-0.0002 * co.sd * co.sd * co.sd)); // fog
Now, the scene looks a bit more realistic!
You can find the finished code below:
/* The MIT License
** Copyright © 2022 Nathan Vaughn
** Permission is hereby granted, free of charge, to any person obtaining a copy of this software and associated documentation files (the "Software"), to deal in the Software without restriction, including without limitation the rights to use, copy, modify, merge, publish, distribute, sublicense, and/or sell copies of the Software, and to permit persons to whom the Software is furnished to do so, subject to the following conditions: The above copyright notice and this permission notice shall be included in all copies or substantial portions of the Software. THE SOFTWARE IS PROVIDED "AS IS", WITHOUT WARRANTY OF ANY KIND, EXPRESS OR IMPLIED, INCLUDING BUT NOT LIMITED TO THE WARRANTIES OF MERCHANTABILITY, FITNESS FOR A PARTICULAR PURPOSE AND NONINFRINGEMENT. IN NO EVENT SHALL THE AUTHORS OR COPYRIGHT HOLDERS BE LIABLE FOR ANY CLAIM, DAMAGES OR OTHER LIABILITY, WHETHER IN AN ACTION OF CONTRACT, TORT OR OTHERWISE, ARISING FROM, OUT OF OR IN CONNECTION WITH THE SOFTWARE OR THE USE OR OTHER DEALINGS IN THE SOFTWARE.
**
** Example on how to create a shadow, apply gamma correction, and apply fog.
** Visit my tutorial to learn more: https://inspirnathan.com/posts/63-shadertoy-tutorial-part-16/
**
** Resources/Credit:
** Primitive SDFs: https://iquilezles.org/articles/distfunctions
** Soft Shadows: https://iquilezles.org/articles/rmshadows/
*/

const int MAX_MARCHING_STEPS = 255;
const float MIN_DIST = 0.0;
const float MAX_DIST = 100.0;
const float PRECISION = 0.001;
const float EPSILON = 0.0005;

struct Surface {
    float sd; // signed distance value
    vec3 col; // color
};

Surface sdFloor(vec3 p, vec3 col) {
  float d = p.y + 1.;
  return Surface(d, col);
}

Surface sdSphere(vec3 p, float r, vec3 offset, vec3 col) {
  p = (p - offset);
  float d = length(p) - r;
  return Surface(d, col);
}

Surface opUnion(Surface obj1, Surface obj2) {
  if (obj2.sd < obj1.sd) return obj2;
  return obj1;
}

Surface scene(vec3 p) {
  vec3 floorColor = vec3(0.1 + 0.7*mod(floor(p.x) + floor(p.z), 2.0));
  Surface co = sdFloor(p, floorColor);
  co = opUnion(co, sdSphere(p, 1., vec3(0, 0, -2), vec3(1, 0, 0)));
  return co;
}

Surface rayMarch(vec3 ro, vec3 rd) {
  float depth = MIN_DIST;
  Surface co; // closest object

  for (int i = 0; i < MAX_MARCHING_STEPS; i++) {
    vec3 p = ro + depth * rd;
    co = scene(p);
    depth += co.sd;
    if (co.sd < PRECISION || depth > MAX_DIST) break;
  }

  co.sd = depth;

  return co;
}

vec3 calcNormal(in vec3 p) {
    vec2 e = vec2(1, -1) * EPSILON;
    return normalize(
      e.xyy * scene(p + e.xyy).sd +
      e.yyx * scene(p + e.yyx).sd +
      e.yxy * scene(p + e.yxy).sd +
      e.xxx * scene(p + e.xxx).sd);
}

float softShadow(vec3 ro, vec3 rd, float mint, float tmax) {
  float res = 1.0;
  float t = mint;

  for(int i = 0; i < 16; i++) {
    float h = scene(ro + rd * t).sd;
      res = min(res, 8.0*h/t);
      t += clamp(h, 0.02, 0.10);
      if(h < 0.001 || t > tmax) break;
  }

  return clamp( res, 0.0, 1.0 );
}

void mainImage( out vec4 fragColor, in vec2 fragCoord )
{
  vec2 uv = (fragCoord-.5*iResolution.xy)/iResolution.y;
  vec3 backgroundColor = vec3(0.835, 1, 1);

  vec3 col = vec3(0);
  vec3 ro = vec3(0, 0, 3); // ray origin that represents camera position
  vec3 rd = normalize(vec3(uv, -1)); // ray direction

  Surface co = rayMarch(ro, rd); // closest object

  if (co.sd > MAX_DIST) {
    col = backgroundColor; // ray didn't hit anything
  } else {
    vec3 p = ro + rd * co.sd; // point discovered from ray marching
    vec3 normal = calcNormal(p);

    vec3 lightPosition = vec3(cos(iTime), 2, sin(iTime));
    vec3 lightDirection = normalize(lightPosition - p);

    float dif = clamp(dot(normal, lightDirection), 0., 1.) + 0.5; // diffuse reflection

    float softShadow = clamp(softShadow(p, lightDirection, 0.02, 2.5), 0.1, 1.0);

    col = dif * co.col * softShadow;
  }

  col = mix(col, backgroundColor, 1.0 - exp(-0.0002 * co.sd * co.sd * co.sd)); // fog
  col = pow(col, vec3(1.0/2.2)); // Gamma correction
  fragColor = vec4(col, 1.0); // Output to screen
}
Conclusion
In this tutorial, you learned how to apply "hard shadows," "soft shadows," gamma correction, and fog. As we've seen, adding shadows can be a bit tricky. In this tutorial, I discussed how to add shadows to a scene with only diffuse reflection, but the same principles apply to scenes with other types of reflections as well. You need to make sure you understand how your scene is lit and anticipate how shadows will impact the colors in your scene. What I've mentioned in this article is just one way of adding shadows to your scene. As you dive into the code of various shaders on Shadertoy, you'll find completely different ways lighting is set up in the scene.