Shadertoy Tutorial Part 11 - Phong Reflection Model
Greetings, friends! Welcome to Part 11 of my Shadertoy tutorial series. In this tutorial, we'll learn how to make our 3D objects a bit more realistic by using an improved lighting model called the Phong reflection model.
The Phong Reflection Model
In Part 6 of this tutorial series, we learned how to color 3D objects using diffuse reflection aka Lambertian reflection. We've been using this lighting model up until now, but this model is a bit limited.
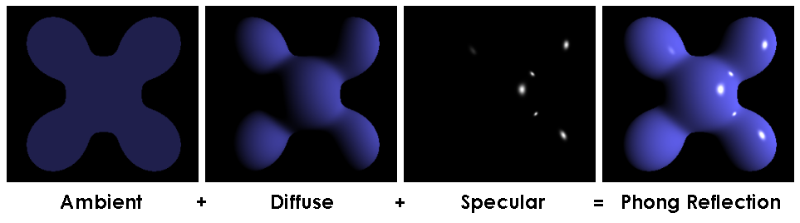
The Phong reflection model, named after the creator, Bui Tuong Phong, is sometimes called "Phong illumination" or "Phong lighting." It is composed of three parts: ambient lighting, diffuse reflection (Lambertian reflection), and specular reflection.
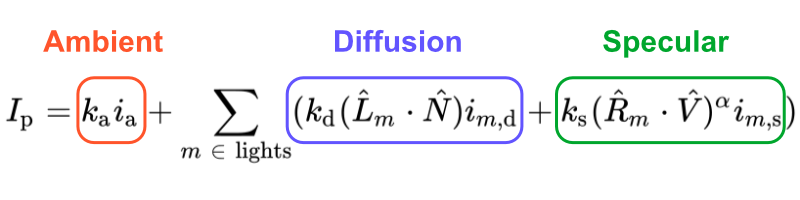
The Phong reflection model provides an equation for computing the illumination on each point on a surface, I_p.

This equation may look complex, but I'll explain each part of it! This equation is composed of three main parts: ambient, diffuse, and specular. The subscript, "m," refers to the number of lights in our scene. We'll assume just one light exists for now.
The first part represents the ambient light term. In GLSL code, it can be represented by the following:
float k_a = 0.6; // a value of our choice, typically between zero and one
vec3 i_a = vec3(0.7, 0.7, 0); // a color of our choice

vec3 ambient = k_a * i_a;
The k_a value is the ambient reflection constant, the ratio of reflection of the ambient term present in all points in the scene rendered. The i_a value controls the ambient lighting and is sometimes computed as a sum of contributions from all light sources.
The second part of the Phong reflection equation represents the diffusion reflection term. In GLSL code, it can be represented by the following:
vec3 p = ro + rd * d; // point on surface found by ray marching
vec3 N = calcNormal(p); // surface normal
vec3 lightPosition = vec3(1, 1, 1);
vec3 L = normalize(lightPosition - p);

float k_d = 0.5; // a value of our choice, typically between zero and one
vec3 dotLN = dot(L, N);
vec3 i_d = vec3(0.7, 0.5, 0); // a color of our choice

vec3 diffuse = k_d * dotLN * i_d;
The value, k_d, is the diffuse reflection constant, the ratio of reflection of the diffuse term of incoming light Lambertian reflectance. The value, dotLN, is the diffuse reflection we've been using in previous tutorials. It represents the Lambertian reflection. The value, i_d, is the intensity of a light source in your scene, defined by a color value in our case.
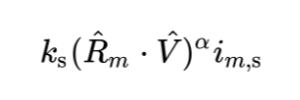
The third part of the Phong reflection equation is a bit more complex. It represents the specular reflection term. In real life, materials such as metals and polished surfaces have specular reflection that look brighter depending on the camera angle or where the viewer is facing the object. Therefore, this term is a function of the camera position in our scene.
In GLSL code, it can be represented by the following:
vec3 p = ro + rd * d; // point on surface found by ray marching
vec3 N = calcNormal(p); // surface normal
vec3 lightPosition = vec3(1, 1, 1);
vec3 L = normalize(lightPosition - p);

float k_s = 0.6; // a value of our choice, typically between zero and one

vec3 R = reflect(L, N);
vec3 V = -rd; // direction pointing toward viewer (V) is just the negative of the ray direction

vec3 dotRV = dot(R, V);
vec3 i_s = vec3(1, 1, 1); // a color of our choice
float alpha = 10.;

vec3 specular = k_s * pow(dotRV, alpha) * i_s;
The value, k_s, is the specular reflection constant, the ratio of reflection of the specular term of incoming light.
The vector, R, is the direction that a perfectly reflected ray of light would take if it bounced off the surface.
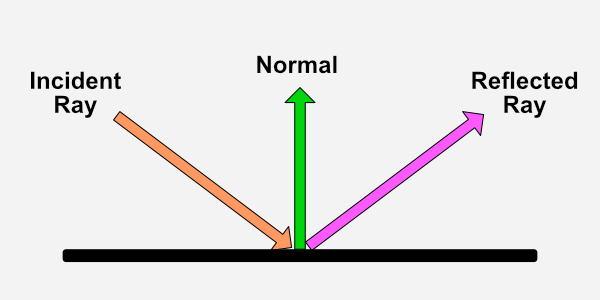
According to Wikipedia, the Phong reflection model calculates the reflected ray direction using the following formula.

As mentioned previously, the subscript, "m," refers to the number of lights in our scene. The little hat, ^, above each letter means we should use the normalized version of each vector. The vector, L, refers to the light direction. The vector, N refers to the surface normal.
GLSL provides a handly function called reflect that calculates the direction of the reflected ray from the incident ray for us. This function takes two parameters: the incident ray direction vector, and the normal vector.
Internally, the reflect function is equal to I - 2.0 * dot(N, I) * N where I is the incident ray direction and N is the normal vector. If we multiplied this equation by -1, we'd end up with the same equation as the reflection equation on Wikipedia. It's all a matter of axes conventions.
The vector, V, in the code snippet for specular reflection represents the direction pointing towards the viewer or camera. We can set this equal to the negative of the ray direction, rd.
The alpha term is used to control the amount of "shininess" on the sphere. A lower value makes it appear shinier.
Putting it All Together
Let's put everything we've learned so far together in our code. We'll start with a simple sphere in our scene and use a lookat point for our camera model like we learned in Part 10.
const int MAX_MARCHING_STEPS = 255;
const float MIN_DIST = 0.0;
const float MAX_DIST = 100.0;
const float PRECISION = 0.001;

float sdSphere(vec3 p, float r )
{
  return length(p) - r;
}

float sdScene(vec3 p) {
  return sdSphere(p, 1.);
}

float rayMarch(vec3 ro, vec3 rd) {
  float depth = MIN_DIST;

  for (int i = 0; i < MAX_MARCHING_STEPS; i++) {
    vec3 p = ro + depth * rd;
    float d = sdScene(p);
    depth += d;
    if (d < PRECISION || depth > MAX_DIST) break;
  }

  return depth;
}

vec3 calcNormal(vec3 p) {
    vec2 e = vec2(1.0, -1.0) * 0.0005;
    return normalize(
      e.xyy * sdScene(p + e.xyy) +
      e.yyx * sdScene(p + e.yyx) +
      e.yxy * sdScene(p + e.yxy) +
      e.xxx * sdScene(p + e.xxx));
}

mat3 camera(vec3 cameraPos, vec3 lookAtPoint) {
    vec3 cd = normalize(lookAtPoint - cameraPos); // camera direction
    vec3 cr = normalize(cross(vec3(0, 1, 0), cd)); // camera right
    vec3 cu = normalize(cross(cd, cr)); // camera up

    return mat3(-cr, cu, -cd);
}

void mainImage( out vec4 fragColor, in vec2 fragCoord )
{
  vec2 uv = (fragCoord-.5*iResolution.xy)/iResolution.y;
  vec3 backgroundColor = vec3(0.835, 1, 1);
  vec3 col = vec3(0);

  vec3 lp = vec3(0); // lookat point (aka camera target)
  vec3 ro = vec3(0, 0, 3);

  vec3 rd = camera(ro, lp) * normalize(vec3(uv, -1)); // ray direction

  float d = rayMarch(ro, rd);

  if (d > MAX_DIST) {
    col = backgroundColor;
  } else {
      vec3 p = ro + rd * d;
      vec3 normal = calcNormal(p);
      vec3 lightPosition = vec3(2, 2, 7);
      vec3 lightDirection = normalize(lightPosition - p);

      float diffuse = clamp(dot(lightDirection, normal), 0., 1.);

      col = diffuse * vec3(0.7, 0.5, 0);
  }

  fragColor = vec4(col, 1.0);
}
When you run the code, you should see a simple sphere in the scene with diffuse lighting.
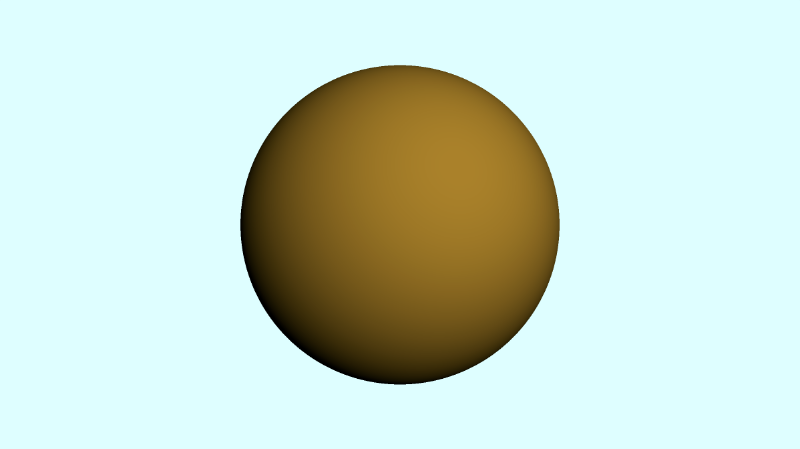
This is boring though. We want a shiny sphere! Currently, we're only coloring the sphere based on diffuse lighting, or Lambertian reflection. Let's add an ambient and specular component to complete the Phong reflection model. We'll also adjust the light direction a bit, so we get a shine to appear on the top-right part of the sphere.
void mainImage( out vec4 fragColor, in vec2 fragCoord )
{
  vec2 uv = (fragCoord-.5*iResolution.xy)/iResolution.y;
  vec3 backgroundColor = vec3(0.835, 1, 1);
  vec3 col = vec3(0);

  vec3 lp = vec3(0); // lookat point (aka camera target)
  vec3 ro = vec3(0, 0, 3);

  vec3 rd = camera(ro, lp) * normalize(vec3(uv, -1)); // ray direction

  float d = rayMarch(ro, rd);

  if (d > MAX_DIST) {
    col = backgroundColor;
  } else {
      vec3 p = ro + rd * d; // point on surface found by ray marching
      vec3 normal = calcNormal(p); // surface normal

      // light
      vec3 lightPosition = vec3(-8, -6, -5);
      vec3 lightDirection = normalize(lightPosition - p);

      // ambient
      float k_a = 0.6;
      vec3 i_a = vec3(0.7, 0.7, 0);
      vec3 ambient = k_a * i_a;

      // diffuse
      float k_d = 0.5;
      float dotLN = clamp(dot(lightDirection, normal), 0., 1.);
      vec3 i_d = vec3(0.7, 0.5, 0);
      vec3 diffuse = k_d * dotLN * i_d;

      // specular
      float k_s = 0.6;
      float dotRV = clamp(dot(reflect(lightDirection, normal), -rd), 0., 1.);
      vec3 i_s = vec3(1, 1, 1);
      float alpha = 10.;
      vec3 specular = k_s * pow(dotRV, alpha) * i_s;

      // final sphere color
      col = ambient + diffuse + specular;
  }

  fragColor = vec4(col, 1.0);
}
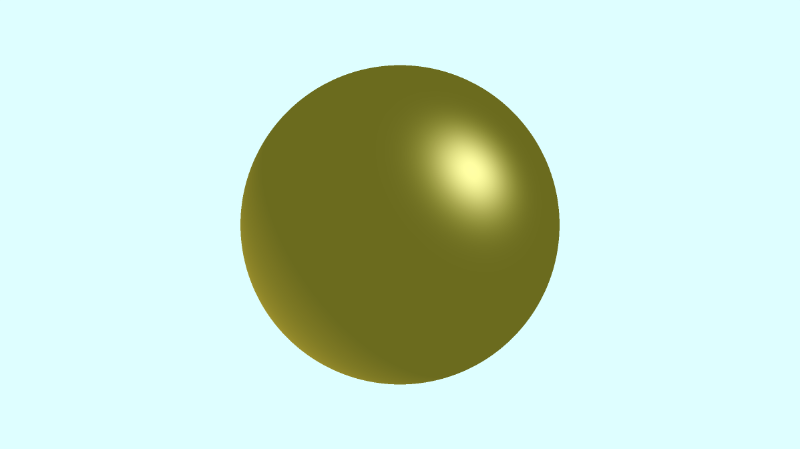
Like before, we clamp the result of each dot product, so that the value is between zero and one. When we run the code, we should see the sphere glisten a bit on the top-right part of the sphere.
Multiple Lights
You may have noticed that the Phong reflection equation uses a summation for the diffuse and specular components. If you add more lights to the scene, then you'll have a diffuse and specular component for each light.
To make it easier to handle multiple lights, we'll create a phong function. Since this scene is only coloring one object, we can place the reflection coefficients (k_a, k_d, k_s) and intensities in the phong function too.
const int MAX_MARCHING_STEPS = 255;
const float MIN_DIST = 0.0;
const float MAX_DIST = 100.0;
const float PRECISION = 0.001;

float sdSphere(vec3 p, float r )
{
  return length(p) - r;
}

float sdScene(vec3 p) {
  return sdSphere(p, 1.);
}

float rayMarch(vec3 ro, vec3 rd) {
  float depth = MIN_DIST;

  for (int i = 0; i < MAX_MARCHING_STEPS; i++) {
    vec3 p = ro + depth * rd;
    float d = sdScene(p);
    depth += d;
    if (d < PRECISION || depth > MAX_DIST) break;
  }

  return depth;
}

vec3 calcNormal(vec3 p) {
    vec2 e = vec2(1.0, -1.0) * 0.0005;
    return normalize(
      e.xyy * sdScene(p + e.xyy) +
      e.yyx * sdScene(p + e.yyx) +
      e.yxy * sdScene(p + e.yxy) +
      e.xxx * sdScene(p + e.xxx));
}

mat3 camera(vec3 cameraPos, vec3 lookAtPoint) {
    vec3 cd = normalize(lookAtPoint - cameraPos); // camera direction
    vec3 cr = normalize(cross(vec3(0, 1, 0), cd)); // camera right
    vec3 cu = normalize(cross(cd, cr)); // camera up

    return mat3(-cr, cu, -cd);
}

vec3 phong(vec3 lightDir, vec3 normal, vec3 rd) {
  // ambient
  float k_a = 0.6;
  vec3 i_a = vec3(0.7, 0.7, 0);
  vec3 ambient = k_a * i_a;

  // diffuse
  float k_d = 0.5;
  float dotLN = clamp(dot(lightDir, normal), 0., 1.);
  vec3 i_d = vec3(0.7, 0.5, 0);
  vec3 diffuse = k_d * dotLN * i_d;

  // specular
  float k_s = 0.6;
  float dotRV = clamp(dot(reflect(lightDir, normal), -rd), 0., 1.);
  vec3 i_s = vec3(1, 1, 1);
  float alpha = 10.;
  vec3 specular = k_s * pow(dotRV, alpha) * i_s;

  return ambient + diffuse + specular;
}

void mainImage( out vec4 fragColor, in vec2 fragCoord )
{
  vec2 uv = (fragCoord-.5*iResolution.xy)/iResolution.y;
  vec3 backgroundColor = vec3(0.835, 1, 1);
  vec3 col = vec3(0);

  vec3 lp = vec3(0); // lookat point (aka camera target)
  vec3 ro = vec3(0, 0, 3);

  vec3 rd = camera(ro, lp) * normalize(vec3(uv, -1)); // ray direction

  float d = rayMarch(ro, rd);

  if (d > MAX_DIST) {
    col = backgroundColor;
  } else {
      vec3 p = ro + rd * d; // point on surface found by ray marching
      vec3 normal = calcNormal(p); // surface normal

      // light #1
      vec3 lightPosition1 = vec3(-8, -6, -5);
      vec3 lightDirection1 = normalize(lightPosition1 - p);
      float lightIntensity1 = 0.6;

      // light #2
      vec3 lightPosition2 = vec3(1, 1, 1);
      vec3 lightDirection2 = normalize(lightPosition2 - p);
      float lightIntensity2 = 0.7;

      // final sphere color
      col = lightIntensity1 * phong(lightDirection1, normal, rd);
      col += lightIntensity2 * phong(lightDirection2, normal , rd);
  }

  fragColor = vec4(col, 1.0);
}
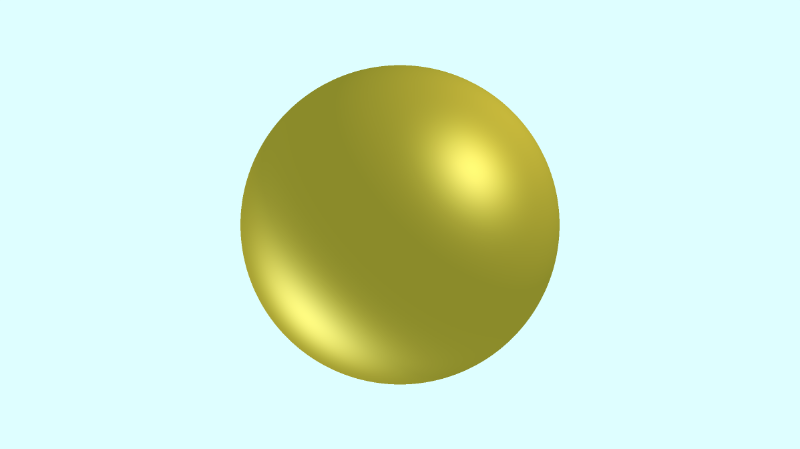
We can multiply the result of the phong function by light intensity values so that the sphere doesn't appear too bright. When you run the code, your sphere should look shinier!!!
Coloring Multiple Objects
Placing all the reflection coefficients and intensities inside the phong function isn't very practical. You could have multiple objects in your scene with different types of materials. Some objects could appear glossy and reflective while other objects have little to no specular reflectance.
It makes more sense to create materials that can be applied to one or more objects. Each material will have its own coefficients for ambient, diffuse, and specular components. We can create a struct for materials that will hold all the information needed for the Phong reflection model.
struct Material {
  vec3 ambientColor; // k_a * i_a
  vec3 diffuseColor; // k_d * i_d
  vec3 specularColor; // k_s * i_s
  float alpha; // shininess
};
Then, we could create another struct for each surface or object in the scene.
struct Surface {
  int id; // id of object
  float sd; // signed distance value from SDF
  Material mat; // material of object
}
We'll be creating a scene with a tiled floor and two spheres. First, we'll create three materials. We'll create a gold function that returns a gold material, a silver function that returns a silver material, and a checkerboard function that returns a checkerboard pattern. As you might expect, the checkerboard pattern won't be very shiny, but the metals will!
Material gold() {
  vec3 aCol = 0.5 * vec3(0.7, 0.5, 0);
  vec3 dCol = 0.6 * vec3(0.7, 0.7, 0);
  vec3 sCol = 0.6 * vec3(1, 1, 1);
  float a = 5.;

  return Material(aCol, dCol, sCol, a);
}

Material silver() {
  vec3 aCol = 0.4 * vec3(0.8);
  vec3 dCol = 0.5 * vec3(0.7);
  vec3 sCol = 0.6 * vec3(1, 1, 1);
  float a = 5.;

  return Material(aCol, dCol, sCol, a);
}

Material checkerboard(vec3 p) {
  vec3 aCol = vec3(1. + 0.7*mod(floor(p.x) + floor(p.z), 2.0)) * 0.3;
  vec3 dCol = vec3(0.3);
  vec3 sCol = vec3(0);
  float a = 1.;

  return Material(aCol, dCol, sCol, a);
}
We'll create a opUnion function that will act identical to the minWithColor function we used in previous tutorials.
Surface opUnion(Surface obj1, Surface obj2) {
  if (obj2.sd < obj1.sd) return obj2;
  return obj1;
}
Our scene will use the opUnion function to add the tiled floor and spheres to the scene:
Surface scene(vec3 p) {
  Surface sFloor = Surface(1, p.y + 1., checkerboard(p));
  Surface sSphereGold = Surface(2, sdSphere(p - vec3(-2, 0, 0), 1.), gold());
  Surface sSphereSilver = Surface(3, sdSphere(p - vec3(2, 0, 0), 1.), silver());

  Surface co = opUnion(sFloor, sSphereGold);
  co = opUnion(co, sSphereSilver);
  return co;
}
We'll add a parameter to the phong function that accepts a Material. This material will hold all the color values we need for each component of the Phong reflection model.
vec3 phong(vec3 lightDir, vec3 normal, vec3 rd, Material mat) {
  // ambient
  vec3 ambient = mat.ambientColor;

  // diffuse
  float dotLN = clamp(dot(lightDir, normal), 0., 1.);
  vec3 diffuse = mat.diffuseColor * dotLN;

  // specular
  float dotRV = clamp(dot(reflect(lightDir, normal), -rd), 0., 1.);
  vec3 specular = mat.specularColor * pow(dotRV, mat.alpha);

  return ambient + diffuse + specular;
}
Inside the mainImage function, we can pass the material of the closest object to the phong function.
col = lightIntensity1 * phong(lightDirection1, normal, rd, co.mat);
col += lightIntensity2 * phong(lightDirection2, normal , rd, co.mat);
Putting this all together, we get the following code.
const int MAX_MARCHING_STEPS = 255;
const float MIN_DIST = 0.0;
const float MAX_DIST = 100.0;
const float PRECISION = 0.001;

float sdSphere(vec3 p, float r )
{
  return length(p) - r;
}

struct Material {
  vec3 ambientColor; // k_a * i_a
  vec3 diffuseColor; // k_d * i_d
  vec3 specularColor; // k_s * i_s
  float alpha; // shininess
};

struct Surface {
  int id; // id of object
  float sd; // signed distance
  Material mat;
};

Material gold() {
  vec3 aCol = 0.5 * vec3(0.7, 0.5, 0);
  vec3 dCol = 0.6 * vec3(0.7, 0.7, 0);
  vec3 sCol = 0.6 * vec3(1, 1, 1);
  float a = 5.;

  return Material(aCol, dCol, sCol, a);
}

Material silver() {
  vec3 aCol = 0.4 * vec3(0.8);
  vec3 dCol = 0.5 * vec3(0.7);
  vec3 sCol = 0.6 * vec3(1, 1, 1);
  float a = 5.;

  return Material(aCol, dCol, sCol, a);
}

Material checkerboard(vec3 p) {
  vec3 aCol = vec3(1. + 0.7*mod(floor(p.x) + floor(p.z), 2.0)) * 0.3;
  vec3 dCol = vec3(0.3);
  vec3 sCol = vec3(0);
  float a = 1.;

  return Material(aCol, dCol, sCol, a);
}

Surface opUnion(Surface obj1, Surface obj2) {
  if (obj2.sd < obj1.sd) return obj2;
  return obj1;
}

Surface scene(vec3 p) {
  Surface sFloor = Surface(1, p.y + 1., checkerboard(p));
  Surface sSphereGold = Surface(2, sdSphere(p - vec3(-2, 0, 0), 1.), gold());
  Surface sSphereSilver = Surface(3, sdSphere(p - vec3(2, 0, 0), 1.), silver());

  Surface co = opUnion(sFloor, sSphereGold); // closest object
  co = opUnion(co, sSphereSilver);
  return co;
}

Surface rayMarch(vec3 ro, vec3 rd) {
  float depth = MIN_DIST;
  Surface co;

  for (int i = 0; i < MAX_MARCHING_STEPS; i++) {
    vec3 p = ro + depth * rd;
    co = scene(p);
    depth += co.sd;
    if (co.sd < PRECISION || depth > MAX_DIST) break;
  }

  co.sd = depth;

  return co;
}

vec3 calcNormal(vec3 p) {
    vec2 e = vec2(1.0, -1.0) * 0.0005;
    return normalize(
      e.xyy * scene(p + e.xyy).sd +
      e.yyx * scene(p + e.yyx).sd +
      e.yxy * scene(p + e.yxy).sd +
      e.xxx * scene(p + e.xxx).sd);
}

mat3 camera(vec3 cameraPos, vec3 lookAtPoint) {
    vec3 cd = normalize(lookAtPoint - cameraPos); // camera direction
    vec3 cr = normalize(cross(vec3(0, 1, 0), cd)); // camera right
    vec3 cu = normalize(cross(cd, cr)); // camera up

    return mat3(-cr, cu, -cd);
}

vec3 phong(vec3 lightDir, vec3 normal, vec3 rd, Material mat) {
  // ambient
  vec3 ambient = mat.ambientColor;

  // diffuse
  float dotLN = clamp(dot(lightDir, normal), 0., 1.);
  vec3 diffuse = mat.diffuseColor * dotLN;

  // specular
  float dotRV = clamp(dot(reflect(lightDir, normal), -rd), 0., 1.);
  vec3 specular = mat.specularColor * pow(dotRV, mat.alpha);

  return ambient + diffuse + specular;
}

void mainImage( out vec4 fragColor, in vec2 fragCoord )
{
  vec2 uv = (fragCoord-.5*iResolution.xy)/iResolution.y;
  vec3 backgroundColor = mix(vec3(1, .341, .2), vec3(0, 1, 1), uv.y) * 1.6;
  vec3 col = vec3(0);

  vec3 lp = vec3(0); // lookat point (aka camera target)
  vec3 ro = vec3(0, 0, 5);

  vec3 rd = camera(ro, lp) * normalize(vec3(uv, -1)); // ray direction

  Surface co = rayMarch(ro, rd); // closest object

  if (co.sd > MAX_DIST) {
    col = backgroundColor;
  } else {
      vec3 p = ro + rd * co.sd; // point on surface found by ray marching
      vec3 normal = calcNormal(p); // surface normal

      // light #1
      vec3 lightPosition1 = vec3(-8, -6, -5);
      vec3 lightDirection1 = normalize(lightPosition1 - p);
      float lightIntensity1 = 0.9;

      // light #2
      vec3 lightPosition2 = vec3(1, 1, 1);
      vec3 lightDirection2 = normalize(lightPosition2 - p);
      float lightIntensity2 = 0.5;

      // final color of object
      col = lightIntensity1 * phong(lightDirection1, normal, rd, co.mat);
      col += lightIntensity2 * phong(lightDirection2, normal , rd, co.mat);
  }

  fragColor = vec4(col, 1.0);
}
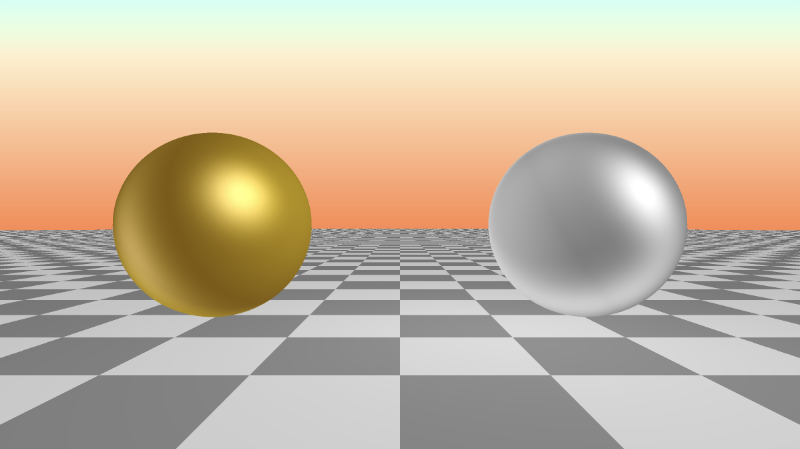
When we run this code, we should see a golden sphere and silver sphere floating in front of a sunset. Gorgeous!
Conclusion
In this lesson, we learned how the Phong reflection model can really improve the look of our scene by adding a bit of glare or gloss to our objects. We also learned how to assign different materials to each object in the scene by using structs. Making shaders sure is fun! 😃