Shadertoy Tutorial Part 8 - 3D Rotation
Greetings, friends! Welcome to Part 8 of my Shadertoy tutorial series. In this tutorial, we'll learn how to rotate 3D objects using transformation matrices.
Initial Setup
Let's create a new shader and use the code from the end of Part 7 of this Shadertoy series. However, we'll remove the spheres.
const int MAX_MARCHING_STEPS = 255;
const float MIN_DIST = 0.0;
const float MAX_DIST = 100.0;
const float PRECISION = 0.001;

struct Surface {
    float sd; // signed distance value
    vec3 col; // color
};

Surface sdFloor(vec3 p, vec3 col) {
  float d = p.y + 1.;
  return Surface(d, col);
}

Surface minWithColor(Surface obj1, Surface obj2) {
  if (obj2.sd < obj1.sd) return obj2;
  return obj1;
}

Surface sdScene(vec3 p) {
  vec3 floorColor = vec3(1. + 0.7*mod(floor(p.x) + floor(p.z), 2.0));
  Surface co = sdFloor(p, floorColor);
  return co;
}

Surface rayMarch(vec3 ro, vec3 rd, float start, float end) {
  float depth = start;
  Surface co; // closest object

  for (int i = 0; i < MAX_MARCHING_STEPS; i++) {
    vec3 p = ro + depth * rd;
    co = sdScene(p);
    depth += co.sd;
    if (co.sd < PRECISION || depth > end) break;
  }

  co.sd = depth;

  return co;
}

vec3 calcNormal(in vec3 p) {
    vec2 e = vec2(1.0, -1.0) * 0.0005; // epsilon
    return normalize(
      e.xyy * sdScene(p + e.xyy).sd +
      e.yyx * sdScene(p + e.yyx).sd +
      e.yxy * sdScene(p + e.yxy).sd +
      e.xxx * sdScene(p + e.xxx).sd);
}

void mainImage( out vec4 fragColor, in vec2 fragCoord )
{
  vec2 uv = (fragCoord-.5*iResolution.xy)/iResolution.y;
  vec3 backgroundColor = vec3(0.835, 1, 1);

  vec3 col = vec3(0);
  vec3 ro = vec3(0, 0, 3); // ray origin that represents camera position
  vec3 rd = normalize(vec3(uv, -1)); // ray direction

  Surface co = rayMarch(ro, rd, MIN_DIST, MAX_DIST); // closest object

  if (co.sd > MAX_DIST) {
    col = backgroundColor; // ray didn't hit anything
  } else {
    vec3 p = ro + rd * co.sd; // point on cube or floor we discovered from ray marching
    vec3 normal = calcNormal(p);
    vec3 lightPosition = vec3(2, 2, 7);
    vec3 lightDirection = normalize(lightPosition - p);

    float dif = clamp(dot(normal, lightDirection), 0.3, 1.); // diffuse reflection

    col = dif * co.col + backgroundColor * .2; // Add a bit of background color to the diffuse color
  }

  // Output to screen
  fragColor = vec4(col, 1.0);
}
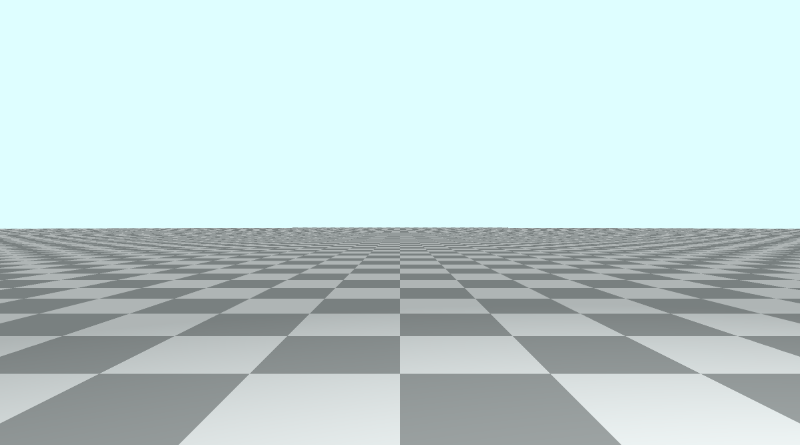
Once the code is run, you should see a tiled floor and light blue background color.
Adding a Cube
Next, we'll add a cube by leveraging a list of 3D SDFs from Inigo Quilez's website. Under the "Primitives" section, you will find an SDF labelled "Box - exact" which we will use to render a cube.
float sdBox( vec3 p, vec3 b )
{
  vec3 q = abs(p) - b;
  return length(max(q,0.0)) + min(max(q.x,max(q.y,q.z)),0.0);
}
To make this compatible with the code we learned in the previous tutorial and to add a unique color to the object, we need to return a value of type Surface instead of a float. We'll also add two parameters to the function: offset and color.
Surface sdBox( vec3 p, vec3 b, vec3 offset, vec3 col)
{
  p = p - offset;
  vec3 q = abs(p) - b;
  float d = length(max(q,0.0)) + min(max(q.x,max(q.y,q.z)),0.0);
  return Surface(d, col);
}
The first parameter, p, is the sample point, and the second parameter, b, is a vec3 variable that represents the boundaries of the box. Use the x,y, and z components to control the width, height, and depth of the box. If we make all three the same value, then we end up with a cube.
Let's insert a cube into our 3D scene:
Surface sdScene(vec3 p) {
  vec3 floorColor = vec3(1. + 0.7*mod(floor(p.x) + floor(p.z), 2.0));
  Surface co = sdFloor(p, floorColor);
  co = minWithColor(co, sdBox(p, vec3(1), vec3(0, 0.5, -4), vec3(1, 0, 0)));
  return co;
}
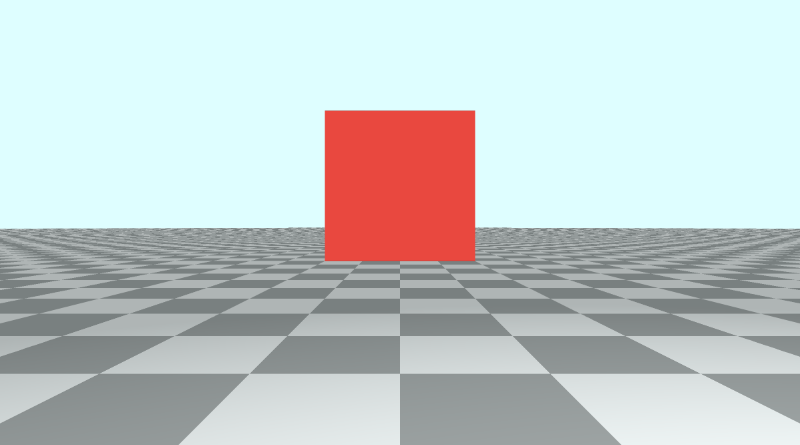
This cube will be 1x1x1 in dimensions, have the position, (0, 0.5, -4), and have the color, red.
Rotation Matrices
In linear algebra, transformation matrices are used to perform a variety of operations on 2D and 3D shapes: stretching, squeezing, rotation, shearing, and reflection. Each matrix represents an operation.
By multiplying points on a graph (or sample points in our GLSL code) by a transformation matrix, we can perform any of these operations. We can also multiply any of these transformation matrices together to create new transformation matrices that perform more than one operation.
Since matrix multiplication is non-commutative, the order by which we multiply the matrices together matters. If you rotate a shape and then shear it, you'll end up with a different result than if you sheared it first and then rotated it. Similarly, if you rotate a shape across the x-axis first and then the z-axis, you may end up with a different result had you reversed the order of these operations instead.
A rotation matrix is a type of transformation matrix. Let's take a look at the rotation matrices we'll be using in this tutorial.
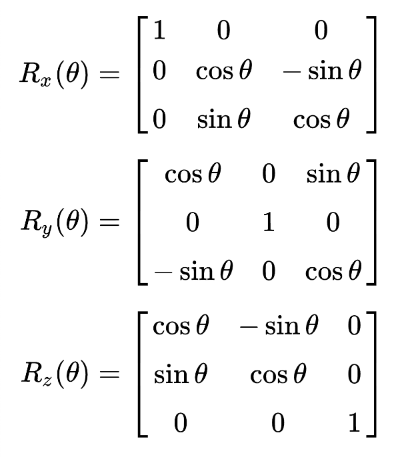
In the image above, we have three rotation matrices, one for each axis in 3D. These will let us spin a shape around an axis as if it were a gymnast swinging around a bar or pole.
At the top of our code, let's add functions for rotation matrices across each axis. We'll also add a function that returns an identity matrix so that we can choose not to perform any sort of transformation.
// Rotation matrix around the X axis.
mat3 rotateX(float theta) {
    float c = cos(theta);
    float s = sin(theta);
    return mat3(
        vec3(1, 0, 0),
        vec3(0, c, -s),
        vec3(0, s, c)
    );
}

// Rotation matrix around the Y axis.
mat3 rotateY(float theta) {
    float c = cos(theta);
    float s = sin(theta);
    return mat3(
        vec3(c, 0, s),
        vec3(0, 1, 0),
        vec3(-s, 0, c)
    );
}

// Rotation matrix around the Z axis.
mat3 rotateZ(float theta) {
    float c = cos(theta);
    float s = sin(theta);
    return mat3(
        vec3(c, -s, 0),
        vec3(s, c, 0),
        vec3(0, 0, 1)
    );
}

// Identity matrix.
mat3 identity() {
    return mat3(
        vec3(1, 0, 0),
        vec3(0, 1, 0),
        vec3(0, 0, 1)
    );
}
We now need to adjust the sdBox function to accept matrix transformations as another parameter. We will multiply the sample point by the rotation matrix. This transformation will be applied after the sample point is moved to a certain world coordinate defined by the offset.
Surface sdBox( vec3 p, vec3 b, vec3 offset, vec3 col, mat3 transform)
{
  p = (p - offset) * transform;
  vec3 q = abs(p) - b;
  float d = length(max(q,0.0)) + min(max(q.x,max(q.y,q.z)),0.0);
  return Surface(d, col);
}
We then need to modify the sdScene function to insert a new parameter inside the call to the sdBox function:
Surface sdScene(vec3 p) {
  vec3 floorColor = vec3(1. + 0.7*mod(floor(p.x) + floor(p.z), 2.0));
  Surface co = sdFloor(p, floorColor);
  co = minWithColor(co, sdBox(p, vec3(1), vec3(0, 0.5, -4), vec3(1, 0, 0), rotateX(iTime)));
  return co;
}
We can use between rotateX, rotateY, and rotateZ to rotate the cube across the x-axis, y-axis, and z-axis, respectively. The angle will be set to iTime, so we can see animate the cube rotation with time. The cube's pivot point will be its own center.
Here's an example of rotating the cube across the x-axis using rotateX(iTime) in the call to the sdBox function.
Here's an example of rotating the cube across the y-axis using rotateY(iTime) in the call to the sdBox function.
Here's an example of rotating the cube across the z-axis using rotateZ(iTime) in the call to the sdBox function.
To prevent any sort of rotation, we can call the identity function:
Surface sdScene(vec3 p) {
  vec3 floorColor = vec3(1. + 0.7*mod(floor(p.x) + floor(p.z), 2.0));
  Surface co = sdFloor(p, floorColor);
  co = minWithColor(co, sdBox(p, vec3(1), vec3(0, 0.5, -4), vec3(1, 0, 0), identity())); // By using the identity matrix, the cube's orientation remains the same
  return co;
}
You can also combine individual matrix transforms by multiplying them together. This will cause the cube to rotate across all of the axes simultaneously.
Surface sdScene(vec3 p) {
  vec3 floorColor = vec3(1. + 0.7*mod(floor(p.x) + floor(p.z), 2.0));
  Surface co = sdFloor(p, floorColor);
  co = minWithColor(co, sdBox(
      p,
      vec3(1),
      vec3(0, 0.5, -4),
      vec3(1, 0, 0),
      rotateX(iTime) * rotateY(iTime) * rotateZ(iTime) // Combine rotation matrices
  ));
  return co;
}
You can find an example of the completed code below:
// Rotation matrix around the X axis.
mat3 rotateX(float theta) {
    float c = cos(theta);
    float s = sin(theta);
    return mat3(
        vec3(1, 0, 0),
        vec3(0, c, -s),
        vec3(0, s, c)
    );
}

// Rotation matrix around the Y axis.
mat3 rotateY(float theta) {
    float c = cos(theta);
    float s = sin(theta);
    return mat3(
        vec3(c, 0, s),
        vec3(0, 1, 0),
        vec3(-s, 0, c)
    );
}

// Rotation matrix around the Z axis.
mat3 rotateZ(float theta) {
    float c = cos(theta);
    float s = sin(theta);
    return mat3(
        vec3(c, -s, 0),
        vec3(s, c, 0),
        vec3(0, 0, 1)
    );
}

// Identity matrix.
mat3 identity() {
    return mat3(
        vec3(1, 0, 0),
        vec3(0, 1, 0),
        vec3(0, 0, 1)
    );
}

const int MAX_MARCHING_STEPS = 255;
const float MIN_DIST = 0.0;
const float MAX_DIST = 100.0;
const float PRECISION = 0.001;

struct Surface {
    float sd; // signed distance value
    vec3 col; // color
};

Surface sdBox( vec3 p, vec3 b, vec3 offset, vec3 col, mat3 transform)
{
  p = (p - offset) * transform;
  vec3 q = abs(p) - b;
  float d = length(max(q,0.0)) + min(max(q.x,max(q.y,q.z)),0.0);
  return Surface(d, col);
}

Surface sdFloor(vec3 p, vec3 col) {
  float d = p.y + 1.;
  return Surface(d, col);
}

Surface minWithColor(Surface obj1, Surface obj2) {
  if (obj2.sd < obj1.sd) return obj2;
  return obj1;
}

Surface sdScene(vec3 p) {
  vec3 floorColor = vec3(1. + 0.7*mod(floor(p.x) + floor(p.z), 2.0));
  Surface co = sdFloor(p, floorColor);
  co = minWithColor(co, sdBox(
      p,
      vec3(1),
      vec3(0, 0.5, -4),
      vec3(1, 0, 0),
      rotateX(iTime)*rotateY(iTime)*rotateZ(iTime) // Combine rotation matrices
  ));
  return co;
}

Surface rayMarch(vec3 ro, vec3 rd, float start, float end) {
  float depth = start;
  Surface co; // closest object

  for (int i = 0; i < MAX_MARCHING_STEPS; i++) {
    vec3 p = ro + depth * rd;
    co = sdScene(p);
    depth += co.sd;
    if (co.sd < PRECISION || depth > end) break;
  }

  co.sd = depth;

  return co;
}

vec3 calcNormal(in vec3 p) {
    vec2 e = vec2(1.0, -1.0) * 0.0005; // epsilon
    return normalize(
      e.xyy * sdScene(p + e.xyy).sd +
      e.yyx * sdScene(p + e.yyx).sd +
      e.yxy * sdScene(p + e.yxy).sd +
      e.xxx * sdScene(p + e.xxx).sd);
}

void mainImage( out vec4 fragColor, in vec2 fragCoord )
{
  vec2 uv = (fragCoord-.5*iResolution.xy)/iResolution.y;
  vec3 backgroundColor = vec3(0.835, 1, 1);

  vec3 col = vec3(0);
  vec3 ro = vec3(0, 0, 3); // ray origin that represents camera position
  vec3 rd = normalize(vec3(uv, -1)); // ray direction

  Surface co = rayMarch(ro, rd, MIN_DIST, MAX_DIST); // closest object

  if (co.sd > MAX_DIST) {
    col = backgroundColor; // ray didn't hit anything
  } else {
    vec3 p = ro + rd * co.sd; // point on cube or floor we discovered from ray marching
    vec3 normal = calcNormal(p);
    vec3 lightPosition = vec3(2, 2, 7);
    vec3 lightDirection = normalize(lightPosition - p);

    float dif = clamp(dot(normal, lightDirection), 0.3, 1.); // diffuse reflection

    col = dif * co.col + backgroundColor * .2; // Add a bit of background color to the diffuse color
  }

  // Output to screen
  fragColor = vec4(col, 1.0);
}
Rotation around a Pivot Point
If we wanted to make it seem like the cube is rotating around an external pivot point that is not the cube's center, then we'd have to modify the sdBox function to move the cube a certain distance after the transformation.
Surface sdBox( vec3 p, vec3 b, vec3 offset, vec3 col, mat3 transform)
{
  p = (p - offset) * transform - vec3(3, 0, 0); // Move the cube as it is rotating
  vec3 q = abs(p) - b;
  float d = length(max(q,0.0)) + min(max(q.x,max(q.y,q.z)),0.0);
  return Surface(d, col);
}
If we use rotateY(iTime) inside the sdScene function, the cube appears to be rotating around the y-axis along a pivot point that is a certain distance away from the cube. In this example, we use vec3(3, 0, 0) to keep the cube 3 units away while it is rotating around the pivot point located at (0, 0.5, -4), which is the offset we assigned to sdBox inside the sdScene function.
Here is the full code used to create the image above:
// Rotation matrix around the X axis.
mat3 rotateX(float theta) {
    float c = cos(theta);
    float s = sin(theta);
    return mat3(
        vec3(1, 0, 0),
        vec3(0, c, -s),
        vec3(0, s, c)
    );
}

// Rotation matrix around the Y axis.
mat3 rotateY(float theta) {
    float c = cos(theta);
    float s = sin(theta);
    return mat3(
        vec3(c, 0, s),
        vec3(0, 1, 0),
        vec3(-s, 0, c)
    );
}

// Rotation matrix around the Z axis.
mat3 rotateZ(float theta) {
    float c = cos(theta);
    float s = sin(theta);
    return mat3(
        vec3(c, -s, 0),
        vec3(s, c, 0),
        vec3(0, 0, 1)
    );
}

// Identity matrix.
mat3 identity() {
    return mat3(
        vec3(1, 0, 0),
        vec3(0, 1, 0),
        vec3(0, 0, 1)
    );
}

const int MAX_MARCHING_STEPS = 255;
const float MIN_DIST = 0.0;
const float MAX_DIST = 100.0;
const float PRECISION = 0.001;

struct Surface {
    float sd; // signed distance value
    vec3 col; // color
};

Surface sdBox( vec3 p, vec3 b, vec3 offset, vec3 col, mat3 transform)
{
  p = (p - offset) * transform - vec3(3, 0, 0); // Move the cube as it is rotating
  vec3 q = abs(p) - b;
  float d = length(max(q,0.0)) + min(max(q.x,max(q.y,q.z)),0.0);
  return Surface(d, col);
}

Surface sdFloor(vec3 p, vec3 col) {
  float d = p.y + 1.;
  return Surface(d, col);
}

Surface minWithColor(Surface obj1, Surface obj2) {
  if (obj2.sd < obj1.sd) return obj2;
  return obj1;
}

Surface sdScene(vec3 p) {
  vec3 floorColor = vec3(1. + 0.7*mod(floor(p.x) + floor(p.z), 2.0));
  Surface co = sdFloor(p, floorColor);
  co = minWithColor(co, sdBox(p, vec3(1), vec3(0, 0.5, -4), vec3(1, 0, 0), rotateY(iTime)));
  return co;
}

Surface rayMarch(vec3 ro, vec3 rd, float start, float end) {
  float depth = start;
  Surface co; // closest object

  for (int i = 0; i < MAX_MARCHING_STEPS; i++) {
    vec3 p = ro + depth * rd;
    co = sdScene(p);
    depth += co.sd;
    if (co.sd < PRECISION || depth > end) break;
  }

  co.sd = depth;

  return co;
}

vec3 calcNormal(in vec3 p) {
    vec2 e = vec2(1.0, -1.0) * 0.0005; // epsilon
    return normalize(
      e.xyy * sdScene(p + e.xyy).sd +
      e.yyx * sdScene(p + e.yyx).sd +
      e.yxy * sdScene(p + e.yxy).sd +
      e.xxx * sdScene(p + e.xxx).sd);
}

void mainImage( out vec4 fragColor, in vec2 fragCoord )
{
  vec2 uv = (fragCoord-.5*iResolution.xy)/iResolution.y;
  vec3 backgroundColor = vec3(0.835, 1, 1);

  vec3 col = vec3(0);
  vec3 ro = vec3(0, 0, 3); // ray origin that represents camera position
  vec3 rd = normalize(vec3(uv, -1)); // ray direction

  Surface co = rayMarch(ro, rd, MIN_DIST, MAX_DIST); // closest object

  if (co.sd > MAX_DIST) {
    col = backgroundColor; // ray didn't hit anything
  } else {
    vec3 p = ro + rd * co.sd; // point on cube or floor we discovered from ray marching
    vec3 normal = calcNormal(p);
    vec3 lightPosition = vec3(2, 2, 7);
    vec3 lightDirection = normalize(lightPosition - p);

    float dif = clamp(dot(normal, lightDirection), 0.3, 1.); // diffuse reflection

    col = dif * co.col + backgroundColor * .2; // Add a bit of background color to the diffuse color
  }

  // Output to screen
  fragColor = vec4(col, 1.0);
}
Conclusion
In this tutorial, we learned how to rotate our cube across each axis in 3D space. We also learned how to rotate cubes around an external pivot point to make it look like they're orbiting around a point in space. What you learned today can be applied to all other 3D objects as well. We chose a cube instead of a sphere because it's easier to check if our rotation matrices work against cubes rather than spheres 🙂.