Shadertoy Tutorial Part 7 - Unique Colors and Multiple 3D Objects
Greetings, friends! Welcome to Part 7 of my Shadertoy tutorial series. Let's add some color to our 3D scene and learn how to add multiple 3D objects to our scene such as a floor!
Drawing Multiple 3D Shapes
In the last tutorial, we learned how to draw a sphere using Shadertoy, but our scene was only set up to handle drawing one shape.
Let's restructure our code so that a function called sdScene is responsible for returning the closest shape in our scene.
const int MAX_MARCHING_STEPS = 255;
const float MIN_DIST = 0.0;
const float MAX_DIST = 100.0;
const float PRECISION = 0.001;

float sdSphere(vec3 p, float r )
{
  vec3 offset = vec3(0, 0, -2);
  return length(p - offset) - r;
}

float sdScene(vec3 p) {
  return sdSphere(p, 1.);
}

float rayMarch(vec3 ro, vec3 rd, float start, float end) {
  float depth = start;

  for (int i = 0; i < MAX_MARCHING_STEPS; i++) {
    vec3 p = ro + depth * rd;
    float d = sdScene(p);
    depth += d;
    if (d < PRECISION || depth > end) break;
  }

  return depth;
}

vec3 calcNormal(in vec3 p) {
    vec2 e = vec2(1.0, -1.0) * 0.0005; // epsilon
    float r = 1.; // radius of sphere
    return normalize(
      e.xyy * sdScene(p + e.xyy) +
      e.yyx * sdScene(p + e.yyx) +
      e.yxy * sdScene(p + e.yxy) +
      e.xxx * sdScene(p + e.xxx));
}

void mainImage( out vec4 fragColor, in vec2 fragCoord )
{
  vec2 uv = (fragCoord-.5*iResolution.xy)/iResolution.y;
  vec3 backgroundColor = vec3(0.835, 1, 1);

  vec3 col = vec3(0);
  vec3 ro = vec3(0, 0, 3); // ray origin that represents camera position
  vec3 rd = normalize(vec3(uv, -1)); // ray direction

  float d = rayMarch(ro, rd, MIN_DIST, MAX_DIST); // distance to sphere

  if (d > MAX_DIST) {
    col = backgroundColor; // ray didn't hit anything
  } else {
    vec3 p = ro + rd * d; // point on sphere we discovered from ray marching
    vec3 normal = calcNormal(p);
    vec3 lightPosition = vec3(2, 2, 7);
    vec3 lightDirection = normalize(lightPosition - p);

    // Calculate diffuse reflection by taking the dot product of
    // the normal and the light direction.
    float dif = clamp(dot(normal, lightDirection), 0.3, 1.);

    // Multiply the diffuse reflection value by an orange color and add a bit
    // of the background color to the sphere to blend it more with the background.
    col = dif * vec3(1, 0.58, 0.29) + backgroundColor * .2;
  }

  // Output to screen
  fragColor = vec4(col, 1.0);
}
Notice how every instance of sdSphere has been replaced with sdScene. If we want to add more objects to the scene, we can use the min function to get the nearest object in our scene.
float sdScene(vec3 p) {
  float sphereLeft = sdSphere(p, 1.);
  float sphereRight = sdSphere(p, 1.);
  return min(sphereLeft, sphereRight);
}
Currently, the spheres are on top of each other though. Let's add an offset parameter to our sdSphere function:
float sdSphere(vec3 p, float r, vec3 offset )
{
  return length(p - offset) - r;
}
Then, we can add offsets to each of our spheres:
float sdScene(vec3 p) {
  float sphereLeft = sdSphere(p, 1., vec3(-2.5, 0, -2));
  float sphereRight = sdSphere(p, 1., vec3(2.5, 0, -2));
  return min(sphereLeft, sphereRight);
}
The completed code should look like the following:
const int MAX_MARCHING_STEPS = 255;
const float MIN_DIST = 0.0;
const float MAX_DIST = 100.0;
const float PRECISION = 0.001;

float sdSphere(vec3 p, float r, vec3 offset )
{
  return length(p - offset) - r;
}

float sdScene(vec3 p) {
  float sphereLeft = sdSphere(p, 1., vec3(-2.5, 0, -2));
  float sphereRight = sdSphere(p, 1., vec3(2.5, 0, -2));
  return min(sphereLeft, sphereRight);
}

float rayMarch(vec3 ro, vec3 rd, float start, float end) {
  float depth = start;

  for (int i = 0; i < MAX_MARCHING_STEPS; i++) {
    vec3 p = ro + depth * rd;
    float d = sdScene(p);
    depth += d;
    if (d < PRECISION || depth > end) break;
  }

  return depth;
}

vec3 calcNormal(in vec3 p) {
    vec2 e = vec2(1.0, -1.0) * 0.0005; // epsilon
    float r = 1.; // radius of sphere
    return normalize(
      e.xyy * sdScene(p + e.xyy) +
      e.yyx * sdScene(p + e.yyx) +
      e.yxy * sdScene(p + e.yxy) +
      e.xxx * sdScene(p + e.xxx));
}

void mainImage( out vec4 fragColor, in vec2 fragCoord )
{
  vec2 uv = (fragCoord-.5*iResolution.xy)/iResolution.y;
  vec3 backgroundColor = vec3(0.835, 1, 1);

  vec3 col = vec3(0);
  vec3 ro = vec3(0, 0, 3); // ray origin that represents camera position
  vec3 rd = normalize(vec3(uv, -1)); // ray direction

  float d = rayMarch(ro, rd, MIN_DIST, MAX_DIST); // distance to sphere

  if (d > MAX_DIST) {
    col = backgroundColor; // ray didn't hit anything
  } else {
    vec3 p = ro + rd * d; // point on sphere we discovered from ray marching
    vec3 normal = calcNormal(p);
    vec3 lightPosition = vec3(2, 2, 7);
    vec3 lightDirection = normalize(lightPosition - p);

    // Calculate diffuse reflection by taking the dot product of
    // the normal and the light direction.
    float dif = clamp(dot(normal, lightDirection), 0.3, 1.);

    // Multiply the diffuse reflection value by an orange color and add a bit
    // of the background color to the sphere to blend it more with the background.
    col = dif * vec3(1, 0.58, 0.29) + backgroundColor * .2;
  }

  // Output to screen
  fragColor = vec4(col, 1.0);
}
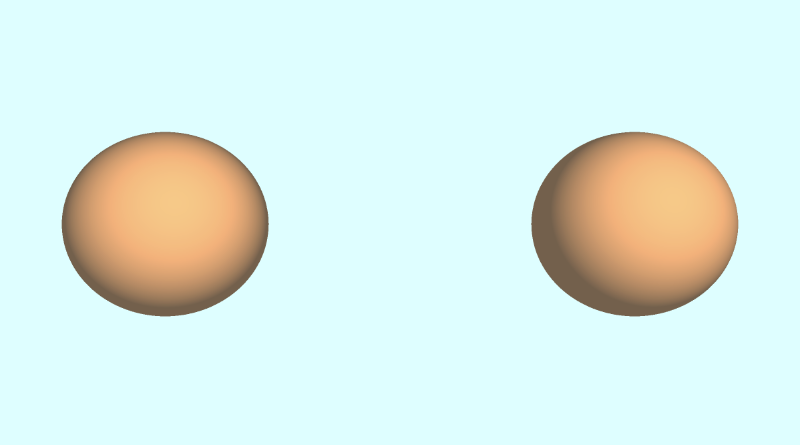
After running our code, we should see two orange spheres slightly apart from each other.
Adding a Floor
We can add a floor that will sit one unit below our spheres through the following function:
float sdFloor(vec3 p) {
  return p.y + 1.;
}
By writing p.y + 1, it's like saying p.y - (-1), which means we're subtracting an offset from the floor and pushing it down one unit.
We can then add the floor to our sdScene function by using the min function again:
float sdScene(vec3 p) {
  float sphereLeft = sdSphere(p, 1., vec3(-2.5, 0, -2));
  float sphereRight = sdSphere(p, 1., vec3(2.5, 0, -2));
  float res = min(sphereLeft, sphereRight);
  res = min(res, sdFloor(p));
  return res;
}
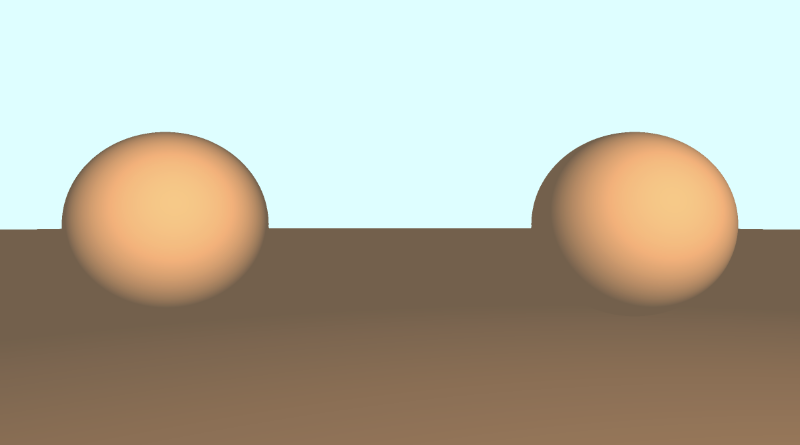
When we run our code, the floor looks brown because it's using the same orange color as the spheres and not much light is hitting the surface of the floor.
Adding Unique Colors - Method 1
There are multiple techniques people across Shadertoy use to add colors to 3D shapes. One way would be to modify our SDFs to return both the distance to our shape and a color. Therefore, we'd have to modify multiple places in our code to return a vec4 datatype instead of a float. The first value of the vec4 variable would hold the "signed distance" value we normally return from an SDF, and the last three values will hold our color value.
The finished code should look something like this:
const int MAX_MARCHING_STEPS = 255;
const float MIN_DIST = 0.0;
const float MAX_DIST = 100.0;
const float PRECISION = 0.001;
vec4 sdSphere(vec3 p, float r, vec3 offset, vec3 col )
{
float d = length(p - offset) - r;
return vec4(d, col);
}
vec4 sdFloor(vec3 p, vec3 col) {
float d = p.y + 1.;
return vec4(d, col);
}
vec4 minWithColor(vec4 obj1, vec4 obj2) {
if (obj2.x < obj1.x) return obj2; // The x component of the object holds the "signed distance" value
return obj1;
}
vec4 sdScene(vec3 p) {
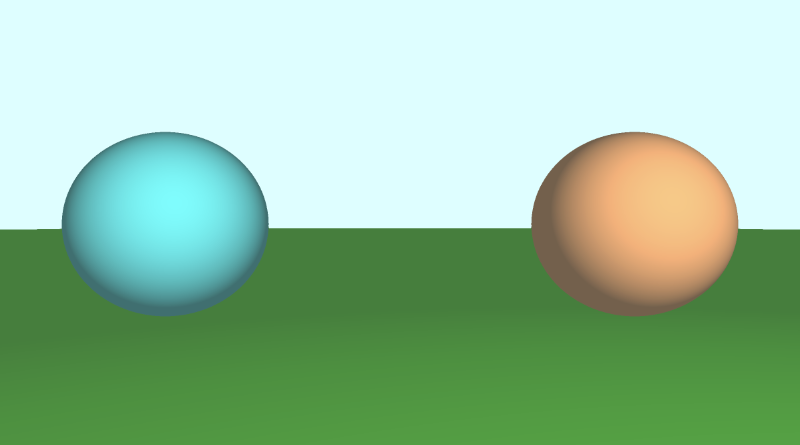
vec4 sphereLeft = sdSphere(p, 1., vec3(-2.5, 0, -2), vec3(0, .8, .8));
vec4 sphereRight = sdSphere(p, 1., vec3(2.5, 0, -2), vec3(1, 0.58, 0.29));
vec4 co = minWithColor(sphereLeft, sphereRight); // co = closest object containing "signed distance" and color
co = minWithColor(co, sdFloor(p, vec3(0, 1, 0)));
return co;
}
vec4 rayMarch(vec3 ro, vec3 rd, float start, float end) {
float depth = start;
vec4 co; // closest object
for (int i = 0; i < MAX_MARCHING_STEPS; i++) {
vec3 p = ro + depth * rd;
co = sdScene(p);
depth += co.x;
if (co.x < PRECISION || depth > end) break;
}
vec3 col = vec3(co.yzw);
return vec4(depth, col);
}
vec3 calcNormal(in vec3 p) {
vec2 e = vec2(1.0, -1.0) * 0.0005; // epsilon
return normalize(
e.xyy * sdScene(p + e.xyy).x +
e.yyx * sdScene(p + e.yyx).x +
e.yxy * sdScene(p + e.yxy).x +
e.xxx * sdScene(p + e.xxx).x);
}
void mainImage( out vec4 fragColor, in vec2 fragCoord )
{
vec2 uv = (fragCoord-.5*iResolution.xy)/iResolution.y;
vec3 backgroundColor = vec3(0.835, 1, 1);
vec3 col = vec3(0);
vec3 ro = vec3(0, 0, 3); // ray origin that represents camera position
vec3 rd = normalize(vec3(uv, -1)); // ray direction
vec4 co = rayMarch(ro, rd, MIN_DIST, MAX_DIST); // closest object
if (co.x > MAX_DIST) {
col = backgroundColor; // ray didn't hit anything
} else {
vec3 p = ro + rd * co.x; // point on sphere or floor we discovered from ray marching
vec3 normal = calcNormal(p);
vec3 lightPosition = vec3(2, 2, 7);
vec3 lightDirection = normalize(lightPosition - p);
// Calculate diffuse reflection by taking the dot product of
// the normal and the light direction.
float dif = clamp(dot(normal, lightDirection), 0.3, 1.);
// Multiply the diffuse reflection value by an orange color and add a bit
// of the background color to the sphere to blend it more with the background.
col = dif * co.yzw + backgroundColor * .2;
}
// Output to screen
fragColor = vec4(col, 1.0);
}
There are multiple places in our code where we had to make adjustments to satisfy the compiler. The first thing we changed was modifying the SDFs to return a vec4 value instead of a float.
vec4 sdSphere(vec3 p, float r, vec3 offset, vec3 col )
{
  float d = length(p - offset) - r;
  return vec4(d, col);
}

vec4 sdFloor(vec3 p, vec3 col) {
  float d = p.y + 1.;
  return vec4(d, col);
}
Both of these functions now accept a new parameter for color. However, that breaks the min function we were using inside the sdScene function, so we had to modify that too and create our own min function.
vec4 minWithColor(vec4 obj1, vec4 obj2) {
  if (obj2.x < obj1.x) return obj2;
  return obj1;
}

vec4 sdScene(vec3 p) {
  vec4 sphereLeft = sdSphere(p, 1., vec3(-2.5, 0, -2), vec3(0, .8, .8));
  vec4 sphereRight = sdSphere(p, 1., vec3(2.5, 0, -2), vec3(1, 0.58, 0.29));
  vec4 co = minWithColor(sphereLeft, sphereRight); // co = closest object containing "signed distance" and color
  co = minWithColor(co, sdFloor(p, vec3(0, 1, 0)));
  return co;
}
The minWithColor function performs the same operation as the min function, except it returns a vec4 that holds both the "signed distance" value and the color of the object that is closest during the ray marching loop. Speaking of ray marching, we had to modify our rayMarch function to satisfy the compiler as well.
vec4 rayMarch(vec3 ro, vec3 rd, float start, float end) {
  float depth = start;
  vec4 co; // closest object

  for (int i = 0; i < MAX_MARCHING_STEPS; i++) {
    vec3 p = ro + depth * rd;
    co = sdScene(p);
    depth += co.x;
    if (co.x < PRECISION || depth > end) break;
  }

  vec3 col = vec3(co.yzw);

  return vec4(depth, col);
}
We also had to modify the calcNormal function to extract out the x-component of the object we get back from the sdScene function:
vec3 calcNormal(in vec3 p) {
    vec2 e = vec2(1.0, -1.0) * 0.0005; // epsilon
    return normalize(
      e.xyy * sdScene(p + e.xyy).x +
      e.yyx * sdScene(p + e.yyx).x +
      e.yxy * sdScene(p + e.yxy).x +
      e.xxx * sdScene(p + e.xxx).x);
}
Finally, we modified the mainImage function to use the changes as well.
void mainImage( out vec4 fragColor, in vec2 fragCoord )
{
  vec2 uv = (fragCoord-.5*iResolution.xy)/iResolution.y;
  vec3 backgroundColor = vec3(0.835, 1, 1);

  vec3 col = vec3(0);
  vec3 ro = vec3(0, 0, 3); // ray origin that represents camera position
  vec3 rd = normalize(vec3(uv, -1)); // ray direction

  vec4 co = rayMarch(ro, rd, MIN_DIST, MAX_DIST); // closest object

  if (co.x > MAX_DIST) {
    col = backgroundColor; // ray didn't hit anything
  } else {
    vec3 p = ro + rd * co.x; // point on sphere or floor we discovered from ray marching
    vec3 normal = calcNormal(p);
    vec3 lightPosition = vec3(2, 2, 7);
    vec3 lightDirection = normalize(lightPosition - p);

    // Calculate diffuse reflection by taking the dot product of
    // the normal and the light direction.
    float dif = clamp(dot(normal, lightDirection), 0.3, 1.);

    // Multiply the diffuse reflection value by an orange color and add a bit
    // of the background color to the sphere to blend it more with the background.
    col = dif * co.yzw + backgroundColor * .2;
  }

  // Output to screen
  fragColor = vec4(col, 1.0);
}
We extract out the "signed distance" value using col.x, and we get the color by using col.yzw.
Using this method allowed you to store values inside vec4 as if they were arrays in other languages. GLSL lets you use arrays as well, but they're not as flexible as languages such as JavaScript. You have to know how many values are in the arrays, and you can only store the same type of values in the arrays.
Adding Unique Colors - Method 2
If using vec4 to store both the distance and color felt like a dirty solution, another option would be to use structs. Structs are a great way to organize your GLSL code. Structs are defined similar to C++ syntax. If you're not familiar with C++ and are more familiar with JavaScript, then you can think of structs as like a combination of objects and classes. Let's see what I mean by that.
A struct can have properties on them. Let's create a struct called "Surface."
struct Surface {
  float signedDistance;
  vec3 color;
};
You can create functions that return "Surface" structs, and you can create new instances of a struct:
// This function's return value is of type "Surface"
Surface sdSphere(vec3 p, float r, vec3 offset, vec3 col)
{
  float d = length(p - offset) - r;
  return Surface(d, col); // We're initializing a new "Surface" struct here and then returning it
}
You can access properties of the struct using the dot syntax:
Surface minWithColor(Surface obj1, Surface obj2) {
  if (obj2.sd < obj1.sd) return obj2; // The sd component of the struct holds the "signed distance" value
  return obj1;
}
With our new knowledge of structs, we can modify our code to use structs instead of using vec4.
const int MAX_MARCHING_STEPS = 255;
const float MIN_DIST = 0.0;
const float MAX_DIST = 100.0;
const float PRECISION = 0.001;

struct Surface {
    float sd; // signed distance value
    vec3 col; // color
};

Surface sdSphere(vec3 p, float r, vec3 offset, vec3 col)
{
  float d = length(p - offset) - r;
  return Surface(d, col);
}

Surface sdFloor(vec3 p, vec3 col) {
  float d = p.y + 1.;
  return Surface(d, col);
}

Surface minWithColor(Surface obj1, Surface obj2) {
  if (obj2.sd < obj1.sd) return obj2; // The sd component of the struct holds the "signed distance" value
  return obj1;
}

Surface sdScene(vec3 p) {
  Surface sphereLeft = sdSphere(p, 1., vec3(-2.5, 0, -2), vec3(0, .8, .8));
  Surface sphereRight = sdSphere(p, 1., vec3(2.5, 0, -2), vec3(1, 0.58, 0.29));
  Surface co = minWithColor(sphereLeft, sphereRight); // co = closest object containing "signed distance" and color
  co = minWithColor(co, sdFloor(p, vec3(0, 1, 0)));
  return co;
}

Surface rayMarch(vec3 ro, vec3 rd, float start, float end) {
  float depth = start;
  Surface co; // closest object

  for (int i = 0; i < MAX_MARCHING_STEPS; i++) {
    vec3 p = ro + depth * rd;
    co = sdScene(p);
    depth += co.sd;
    if (co.sd < PRECISION || depth > end) break;
  }

  co.sd = depth;

  return co;
}

vec3 calcNormal(in vec3 p) {
    vec2 e = vec2(1.0, -1.0) * 0.0005; // epsilon
    return normalize(
      e.xyy * sdScene(p + e.xyy).sd +
      e.yyx * sdScene(p + e.yyx).sd +
      e.yxy * sdScene(p + e.yxy).sd +
      e.xxx * sdScene(p + e.xxx).sd);
}

void mainImage( out vec4 fragColor, in vec2 fragCoord )
{
  vec2 uv = (fragCoord-.5*iResolution.xy)/iResolution.y;
  vec3 backgroundColor = vec3(0.835, 1, 1);

  vec3 col = vec3(0);
  vec3 ro = vec3(0, 0, 3); // ray origin that represents camera position
  vec3 rd = normalize(vec3(uv, -1)); // ray direction

  Surface co = rayMarch(ro, rd, MIN_DIST, MAX_DIST); // closest object

  if (co.sd > MAX_DIST) {
    col = backgroundColor; // ray didn't hit anything
  } else {
    vec3 p = ro + rd * co.sd; // point on sphere or floor we discovered from ray marching
    vec3 normal = calcNormal(p);
    vec3 lightPosition = vec3(2, 2, 7);
    vec3 lightDirection = normalize(lightPosition - p);

    // Calculate diffuse reflection by taking the dot product of
    // the normal and the light direction.
    float dif = clamp(dot(normal, lightDirection), 0.3, 1.);

    // Multiply the diffuse reflection value by an orange color and add a bit
    // of the background color to the sphere to blend it more with the background.
    col = dif * co.col + backgroundColor * .2;
  }

  // Output to screen
  fragColor = vec4(col, 1.0);
}
This code should behave the same as when we used vec4 earlier. In my opinion, structs are easier to reason about and look much cleaner. You're also not limited to four values like you were in vec4 vectors. Choose whichever approach you prefer.
Making a Tiled Floor
If you want to make a fancy tiled floor, you can adjust the color of the floor like so:
Surface sdScene(vec3 p) {
  Surface sphereLeft = sdSphere(p, 1., vec3(-2.5, 0, -2), vec3(0, .8, .8));
  Surface sphereRight = sdSphere(p, 1., vec3(2.5, 0, -2), vec3(1, 0.58, 0.29));
  Surface co = minWithColor(sphereLeft, sphereRight);

  vec3 floorColor = vec3(1. + 0.7*mod(floor(p.x) + floor(p.z), 2.0));
  co = minWithColor(co, sdFloor(p, floorColor));
  return co;
}
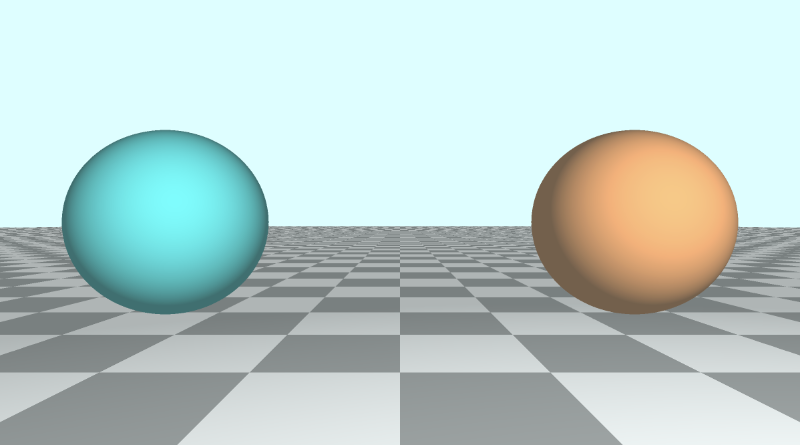
Tiled floors helps people visualize depth and make your 3D scenes stand out more. The mod function is commonly used to create checkered patterns or to divide a piece of the scene into repeatable chunks that can be colored or styled differently.
Adding Unique Colors - Method 3
When viewing shaders on Shadertoy, you may see code that uses identifiers or IDs to color each unique object in your scene. It's common to see people use a map function instead of a sdScene function. You may also see a render function used to handle assigning colors to each object by looking at the ID of the closest object returned from the ray marching algorithm. Let's see how the code looks using this more conventional approach.
const int MAX_MARCHING_STEPS = 255;
const float MIN_DIST = 0.0;
const float MAX_DIST = 100.0;
const float PRECISION = 0.001;
const vec3 COLOR_BACKGROUND = vec3(0.835, 1, 1);

float sdSphere(vec3 p, float r)
{
  float d = length(p) - r;
  return d;
}

float sdFloor(vec3 p) {
  float d = p.y + 1.;
  return d;
}

vec2 opU( vec2 d1, vec2 d2 )
{
  return (d1.x < d2.x) ? d1 : d2; // the x-component is the signed distance value
}

vec2 map(vec3 p) {
  vec2 res = vec2(1e10, 0.); // ID = 0
  vec2 flooring = vec2(sdFloor(p), 0.5); // ID = 0.5
  vec2 sphereLeft = vec2(sdSphere(p - vec3(-2.5, 0, -2), 1.), 1.5); // ID = 1.5
  vec2 sphereRight = vec2(sdSphere(p - vec3(2.5, 0, -2), 1.), 2.5); // ID = 2.5

  res = opU(res, flooring);
  res = opU(res, sphereLeft);
  res = opU(res, sphereRight);
  return res; // the y-component is the ID of the object hit by the ray
}

vec2 rayMarch(vec3 ro, vec3 rd) {
  float depth = MIN_DIST;
  vec2 res = vec2(0.0); // initialize result to zero for signed distance value and ID
  float id = 0.;

  for (int i = 0; i < MAX_MARCHING_STEPS; i++) {
    vec3 p = ro + depth * rd;
    res = map(p); // find resulting target hit by ray
    depth += res.x;
    id = res.y;
    if (res.x < PRECISION || depth > MAX_DIST) break;
  }

  return vec2(depth, id);
}

vec3 calcNormal(in vec3 p) {
    vec2 e = vec2(1.0, -1.0) * 0.0005; // epsilon
    return normalize(
      e.xyy * map(p + e.xyy).x +
      e.yyx * map(p + e.yyx).x +
      e.yxy * map(p + e.yxy).x +
      e.xxx * map(p + e.xxx).x);
}

vec3 render(vec3 ro, vec3 rd) {
    vec3 col = COLOR_BACKGROUND;

    vec2 res = rayMarch(ro, rd);
    float d = res.x; // signed distance value
    if (d > MAX_DIST) return col; // render background color since ray hit nothing

    float id = res.y; // id of object

    vec3 p = ro + rd * d; // point on sphere or floor we discovered from ray marching
    vec3 normal = calcNormal(p);
    vec3 lightPosition = vec3(2, 2, 7);
    vec3 lightDirection = normalize(lightPosition - p);

    float dif = clamp(dot(normal, lightDirection), 0.3, 1.);

    if (id > 0.) col = dif * vec3(1. + 0.7*mod(floor(p.x) + floor(p.z), 2.0));
    if (id > 1.) col = dif * vec3(0, .8, .8);
    if (id > 2.) col = dif * vec3(1, 0.58, 0.29);

    col += COLOR_BACKGROUND * 0.2; // add a bit of the background color to blend objects more with the scene

    return col;
}

void mainImage( out vec4 fragColor, in vec2 fragCoord )
{
  vec2 uv = (fragCoord-.5*iResolution.xy)/iResolution.y;

  vec3 ro = vec3(0, 0, 3); // ray origin that represents camera position
  vec3 rd = normalize(vec3(uv, -1)); // ray direction

  vec3 col = render(ro, rd);

  // Output to screen
  fragColor = vec4(col, 1.0);
}
You'll notice that the minWithColor function is now called opU which stands for "operation, union" because it is a union operation that adds shapes to the scene. We'll learn more about 3D SDF operations in Part 14 of my tutorial series. The opU function is comparing the signed distance values of two objects to see which object is closer to the ray during the ray marching algorithm.
The map function is used to add or "map" objects to our scene. We use a vec2 to store a value of the signed distance value in the x-component and an ID in the y-component. You'll typically see a fractional value used for the ID. This is because we can check the ID in the render function by seeing if this fractional value is greater than a whole number. You may be wondering why we don't use whole numbers for the ID and then use a == operator to check if the ID is equal to the ID of the closest object found from ray marching. This might work for you and your compiler, but it might not for everyone. Using fractional values and a greater than (>) check ensures the scene is guaranteed to render correctly. When using floats such as 1. or 2., you could find weird issues where id == 1. or id == 2. don't behave as you'd expect. By checking if id > 1. or id > 2. when the ID is either 0.5 or 1.5, we can be sure that the code behaves predictably for everyone.
It's important to understand this method for adding unique colors to the scene because you'll likely see it used by many developers in the Shadertoy community.
Conclusion
In this article, we learned how to draw multiple 3D objects to the scene and give each of them a unique color. We learned three techniques for adding colors to each object in our scene, but there are definitely other approaches out there! Use whatever method works best for you. I find working with structs gives my code a more "structured" approach 🙂.