Shadertoy Tutorial Part 1 - Intro
Greetings, friends! I've recently been fascinated with shaders and how amazing they are. Today, I will talk about how we can create pixel shaders using an amazing online tool called Shadertoy, created by Inigo Quilez and Pol Jeremias, two extremely talented people.
What are Shaders?
Shaders are powerful programs that were originally meant for shading objects in a 3D scene. Nowadays, shaders serve multiple purposes. Shader programs typically run on your computer's graphics processing unit (GPU) where they can run in parallel.
Shader languages such as the High-Level Shading Language (HLSL) and OpenGL Shading Language (GLSL) are the most common languages used to program the GPU's rendering pipeline. These languages have syntax similar to the C programming language.
When you're playing a game such as Minecraft, shaders are used to make the world seem 3D as you're viewing it from a 2D screen (i.e. your computer monitor or your phone's screen). Shaders can also drastically change the look of a game by adjusting how light interacts with objects or how objects are rendered to the screen. This YouTube video showcases 10 shaders that can make Minecraft look totally different and demonstrate the beauty of shaders.
You'll mostly see shaders come in two forms: vertex shaders and fragment shaders. The vertex shader is used to create vertices of 3D meshes of all kinds of objects such as sphere, cubes, elephants, protagonists of a 3D game, etc. The information from the vertex shader is passed to the geometry shader which can then manipulate these vertices or perform extra operations before the fragment shader. You typically won't hear geometry shaders being discussed much. The final part of the pipeline is the fragment shader. The fragment shader calculates the final color of the pixel and determines if a pixel should even be shown to the user or not.
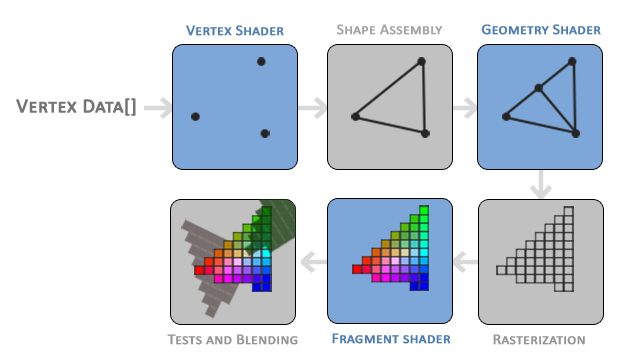
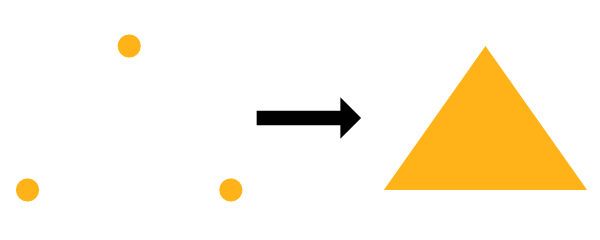
As an example, suppose we have a vertex shader that draws three points/vertices to the screen in the shape of a triangle. Once those vertices pass to the fragment shader, the pixel color between each vertex can be filled in automatically. The GPU understands how to interpolate values extremely well. Assuming a color is assigned to each vertex in the vertex shader, the GPU can interpolate colors between each vertex to fill in the triangle.
In game engines like Unity or Unreal, vertex shaders and fragment shaders are used heavily for 3D games. Unity provides an abstraction on top of shaders called ShaderLab, which is a language that sits on top of HLSL to help write shaders easier for your games. Additionally, Unity provides a visual tool called Shader Graph that lets you build shaders without writing code. If you search for "Unity shaders" on Google, you'll find hundreds of shaders that perform lots of different functions. You can create shaders that make objects glow, make characters become translucent, and even create "image effects" that apply a shader to the entire view of your game. There are an infinite number of ways you can use shaders.
You may often hear fragment shaders be referred to as pixel shaders. The term, "fragment shader," is more accurate because shaders can prevent pixels from being drawn to the screen. In some applications such as Shadertoy, you're stuck drawing every pixel to the screen, so it makes more sense to call them pixel shaders in that context.
Shaders are also responsible for rendering the shading and lighting in your game, but they can be used for more than that. A shader program can run on the GPU, so why not take advantage of the parallelization it offers? You can create a compute shader that runs heavy calculations in the GPU instead of the CPU. In fact, Tensorflow.js takes advantage of the GPU to train machine learning models faster in the browser.
Shaders are powerful programs indeed!
What is Shadertoy?
In the next series of posts, I will be talking about Shadertoy. Shadertoy is a website that helps users create pixel shaders and share them with others, similar to Codepen with HTML, CSS, and JavaScript.
Shadertoy leverages the WebGL API to render graphics in the browser using the GPU. WebGL lets you write shaders in GLSL and supports hardware acceleration. That is, you can leverage the GPU to manipulate pixels on the screen in parallel to speed up rendering. Remember how you had to use ctx.getContext('2d') when working with the HTML Canvas API? Shadertoy uses a canvas with the webgl context instead of 2d, so you can draw pixels to the screen with higher performance using WebGL.
Modern 3D game engines such as Unity and the Unreal Engine and 3D modelling software such as Blender run very quickly because they use both a vertex and fragment shader, and they perform a lot of optimizations for you. In Shadertoy, you don't have access to a vertex shader. You have to rely on algorithms such as ray marching and signed distance fields/functions (SDFs) to render 3D scenes which can be computationally expensive.
Please note that writing shaders in Shadertoy does not guarantee they will work in other environments such as Unity. You may have to translate the GLSL code to syntax supported by your target environment such as HLSL. Shadertoy also provides global variables that may not be supported in other environments. Don't let that stop you though! It's entirely possible to make adjustments to your Shadertoy code and use them in your games or modelling software. It just requires a bit of extra work. In fact, Shadertoy is a great way to experiment with shaders before using them in your preferred game engine or modelling software.
Shadertoy is a great way to practice creating shaders with GLSL and helps you think more mathematically. Drawing 3D scenes requires a lot of vector arithmetic. It's intellectually stimulating and a great way to show off your skills to your friends. If you browse across Shadertoy, you'll see tons of beautiful creations that were drawn with just math and code! Once you get the hang of Shadertoy, you'll find it's really fun!
Introduction to Shadertoy
Shadertoy takes care of setting up an HTML canvas with WebGL support, so all you have to worry about is writing the shader logic in the GLSL programming language. As a downside, Shadertoy doesn't let you write vertex shaders and only lets you write pixel shaders. It essentially provides an environment for experimenting with the fragment side of shaders, so you can manipulate all pixels on the canvas in parallel.
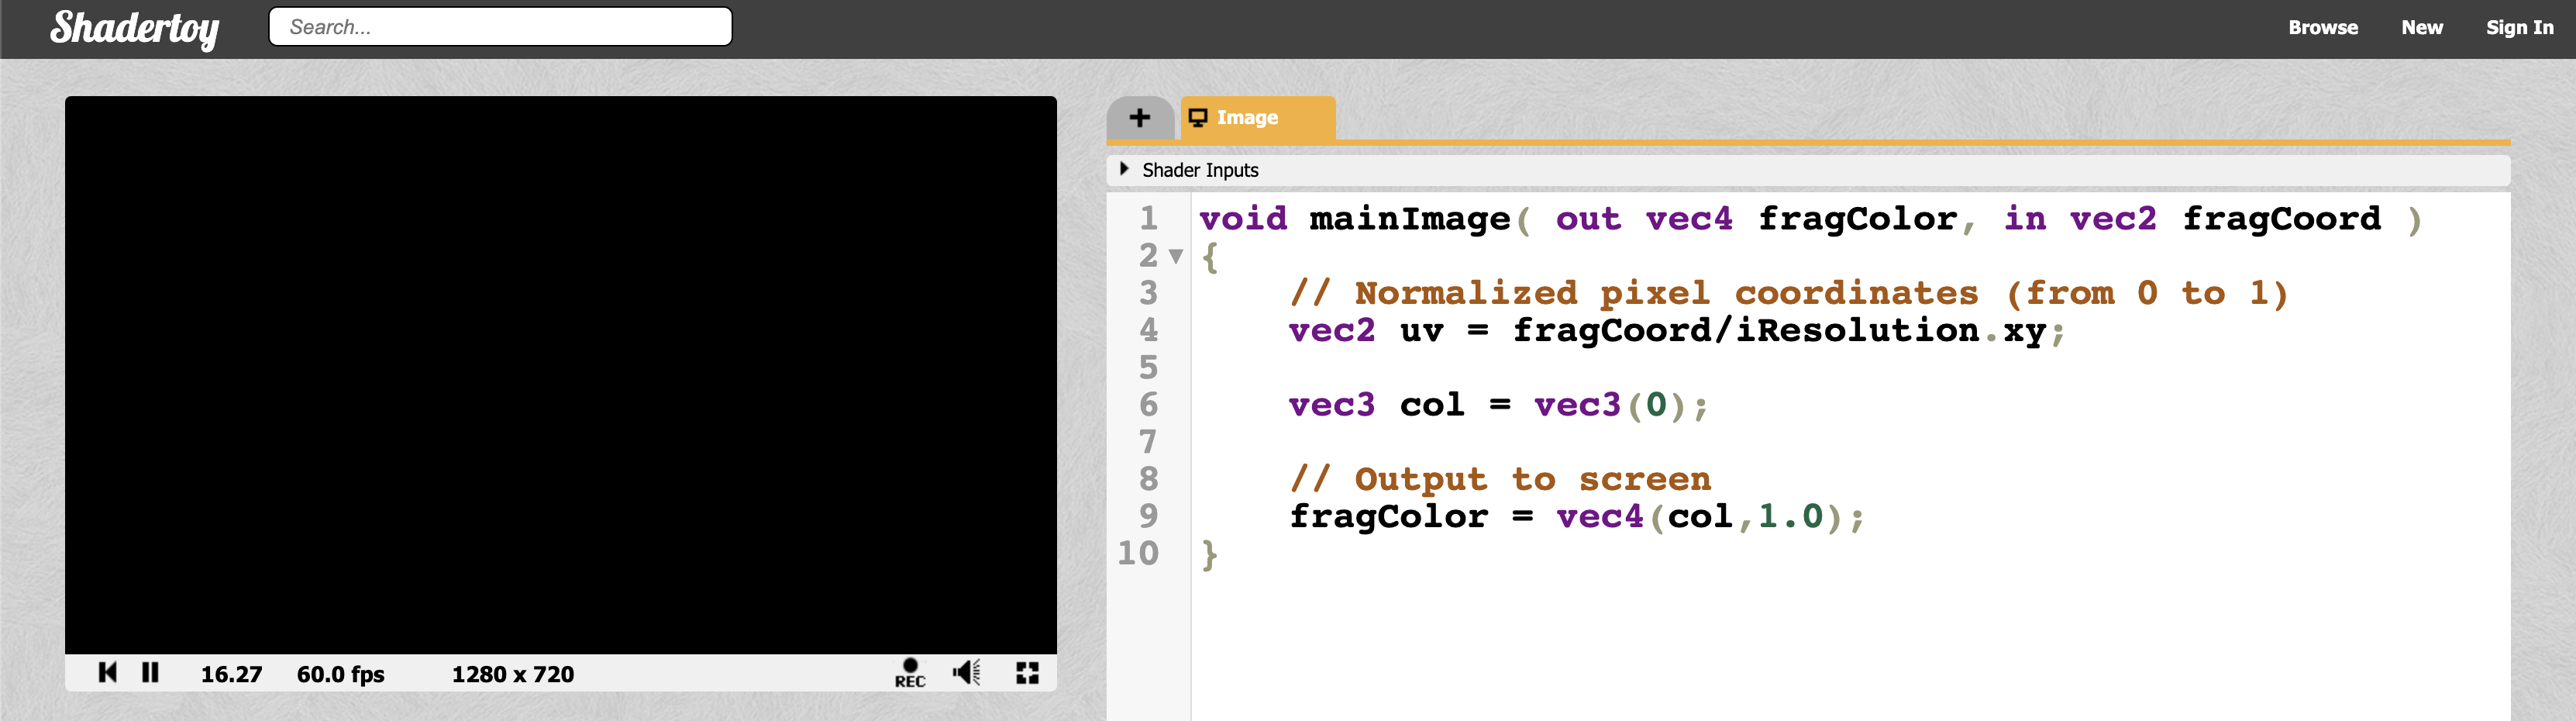
On the top navigation bar of Shadertoy, you can click on New to start a new shader.
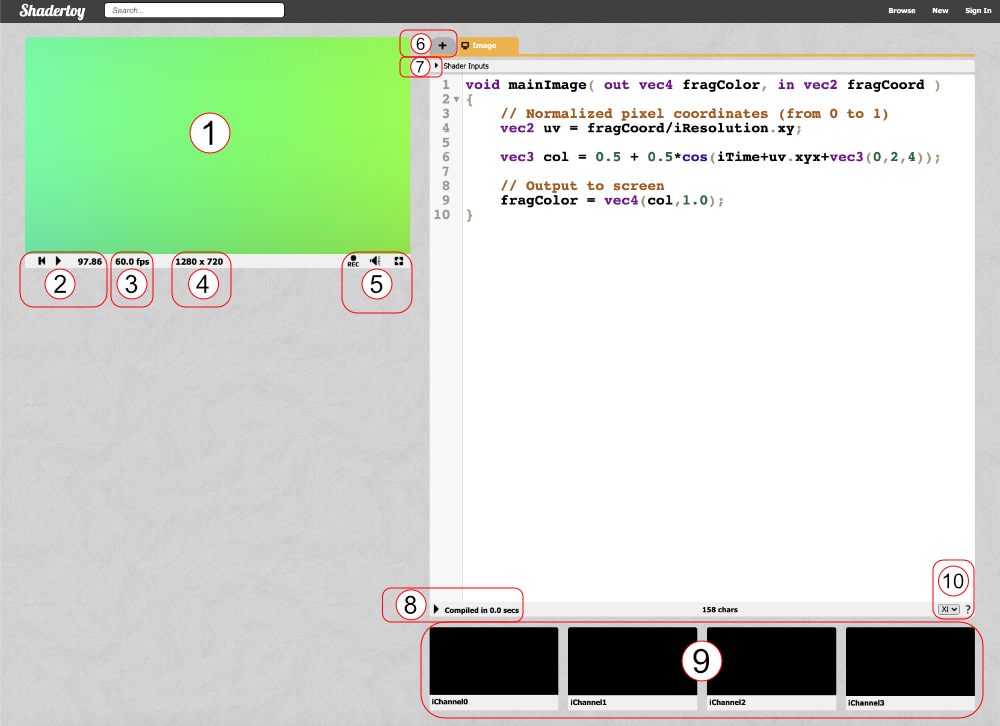
Let's analyze everything we see on the screen. Obviously, we see a code editor on the right-hand side for writing our GLSL code, but let me go through most of the tools available as they are numbered in the image above.
- The canvas for displaying the output of your shader code. Your shader will run for every pixel in the canvas in parallel.
- Left: rewind time back to zero. Center: play/pause the shader animations. Right: Time in seconds since page loaded.
- The frames per second (fps) will let you know how well your computer can handle the shader. Typically runs around 60fps or lower.
- Canvas resolution in width by height. These values are given to you in the "iResolution" global variable.
- Left: record an html video by pressing it, recording, and pressing it again. Middle: Adjust volume for audio playing in your shader. Right: Press the symbol to expand the canvas to full screen mode.
- Click the plus icon to add additional scripts. The buffers (A, B, C, D) can be accessed using "channels" Shadertoy provides. Use "Common" to share code between scripts. Use "Sound" when you want to write a shader that generates audio. Use "Cubemap" to generate a cubemap.
- Click on the small arrow to see a list of global variables that Shadertoy provides. You can use these variables in your shader code.
- Click on the small arrow to compile your shader code and see the output in the canvas. You can use Alt+Enter or Option+Enter to quickly compile your code. You can click on the "Compiled in ..." text to see the compiled code.
- Shadertoy provides four channels that can be accessed in your code through global variables such as "iChannel0", "iChannel1", etc. If you click on one of the channels, you can add textures or interactivity to your shader in the form of keyboard, webcam, audio, and more.
- Shadertoy gives you the option to adjust the size of your text in the code window. If you click the question mark, you can see information about the compiler being used to run your code. You can also see what functions or inputs were added by Shadertoy.
Shadertoy provides a nice environment to write GLSL code, but keep in mind that it injects variables, functions, and other utilities that may make it slightly different from GLSL code you may write in other environments. Shadertoy provides these as a convenience to you as you're developing your shader. For example, the variable, "iTime", is a global variable given to you to access the time (in seconds) that has passed since the page loaded.
Understanding Shader Code
When you first start a new shader in Shadertoy, you will find the following code:
void mainImage( out vec4 fragColor, in vec2 fragCoord )
{
  // Normalized pixel coordinates (from 0 to 1)
  vec2 uv = fragCoord/iResolution.xy;

  vec3 col = 0.5 + 0.5*cos(iTime+uv.xyx+vec3(0,2,4));

  // Output to screen
  fragColor = vec4(col,1.0);
}
You can run the code by pressing the small arrow as mentioned in section 8 in the image above or you by pressing Alt+Center or Option+Enter as a keyboard shortcut.
If you've never worked with shaders before, that's okay! I'll try my best to explain the GLSL syntax you use to write shaders in Shadertoy. Right away, you will notice that this is a statically typed language like C, C++, Java, and C#. GLSL uses the concept of types too. Some of these types include: bool (boolean), int (integer), float (decimal), and vec (vector). GLSL also requires semicolons to be placed at the end of each line. Otherwise, the compiler will throw an error.
In the code snippet above, we are defining a mainImage function that must be present in our Shadertoy shader. It returns nothing, so the return type is void. It accepts two parameters: fragColor and fragCoord.
You may be scratching your head at the in and out. For Shadertoy, you generally have to worry about these keywords inside the mainImage function only. Remember how I said that the shaders allow us to write programs for the GPU rendering pipeline? Think of the in and out as the input and output. Shadertoy gives us an input, and we are writing a color as the output.
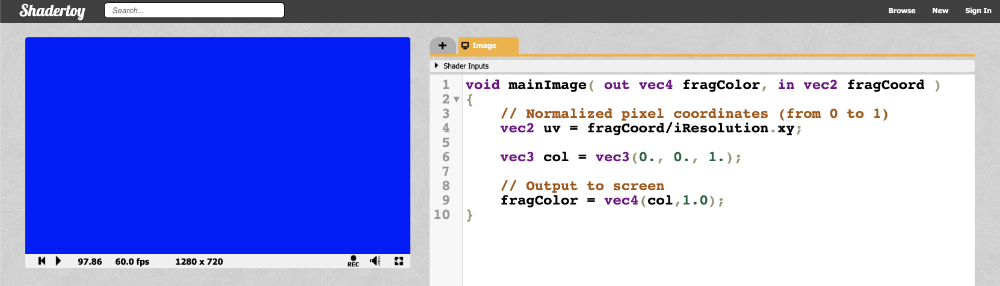
Before we continue, let's change the code to something a bit simpler:
void mainImage( out vec4 fragColor, in vec2 fragCoord )
{
  // Normalized pixel coordinates (from 0 to 1)
  vec2 uv = fragCoord/iResolution.xy;

  vec3 col = vec3(0., 0., 1.); // RGB values

  // Output to screen
  fragColor = vec4(col,1.0);
}
When we run the shader program, we should end up with a completely blue canvas. The shader program runs for every pixel on the canvas IN PARALLEL. This is extremely important to keep in mind. You have to think about how to write code that will change the color of the pixel depending on the pixel coordinate. It turns out we can create amazing pieces of artwork with just the pixel coordinates!
In shaders, we specify RGB (red, green, blue) values using a range between zero and one. If you have color values that are between 0 and 255, you can normalize them by dividing by 255.
So we've seen how to change the color of the canvas, but what's going on inside our shader program? The first line inside the mainImage function declares a variable called uv that is of type vec2. If you remember your vector arithmetic in school, this means we have a vector with an "x" component and a "y" component. A variable with the type, vec3, would have an additional "z" component.
You may have learned in school about the 3D coordinate system. It lets us graph 3D coordinates on pieces of paper or some other flat surface. Obviously, visualizing 3D on a 2D surface is a bit difficult, so brilliant mathematicians of old created a 3D coordinate system to help us visualize points in 3D space.
However, you should think of vectors in shader code as "arrays" that can hold between one and four values. Sometimes, vectors can hold information about the XYZ coordinates in 3D space or they can contain information about RGB values. Therefore, the following are equivalent in shader programs:
color.r = color.x
color.g = color.y
color.b = color.z
color.a = color.w
Yes, there can be variables with the type, vec4, and the letter, w or a, is used to represent a fourth value. The a stands for "alpha", since colors can have an alpha channel as well as the normal RGB values. I guess they chose w because it's before x in the alphabet, and they already reached the last letter 🤷.
The uv variable doesn't really represent an acronym for anything. It refers to the topic of UV Mapping that is commonly used to map pieces of a texture (such as an image) on 3D objects. The concept of UV mapping is more applicable to environments that give you access to a vertex shader unlike Shadertoy, but you can still leverage texture data in Shadertoy.
The fragCoord variable represents the XY coordinate of the canvas. The bottom-left corner starts at (0, 0) and the top-right corner is (iResolution.x, iResolution.y). By dividing fragCoord by iResolution.xy, we are able to normalize the pixel coordinates between zero and one.
Notice that we can perform arithmetic quite easily between two variables that are the same type, even if they are vectors. It's the same as performing operations on the individual components:
uv = fragCoord/iResolution.xy

// The above is the same as:
uv.x = fragCoord.x/iResolution.x
uv.y = fragCoord.y/iResolution.y
When we say something like iResolution.xy, the .xy portion refers to only the XY component of the vector. This lets us strip off only the components of the vector we care about even if iResolution happens to be of type vec3.
According to this Stack Overflow post, the z-component represents the pixel aspect ratio, which is usually 1.0. A value of one means your display has square pixels. You typically won't see people using the z-component of iResolution that often, if at all.
We can also perform shortcuts when defining vectors. The following code snippet below will set the color of the entire canvas to black.
void mainImage( out vec4 fragColor, in vec2 fragCoord )
{
  // Normalized pixel coordinates (from 0 to 1)
  vec2 uv = fragCoord/iResolution.xy;

  vec3 col = vec3(0); // Same as vec3(0, 0, 0)

  // Output to screen
  fragColor = vec4(col,1.0);
}
When we define a vector, the shader code is smart enough to apply the same value across all values of the vector if you only specify one value. Therefore vec3(0) gets expanded to vec3(0,0,0).
It's important to keep in mind that debugging in Shadertoy and in most shader environments, in general, is mostly visual. You don't have anything like console.log to come to your rescue. You have to use color to help you debug.
Let's try visualizing the pixel coordinates on the screen with the following code:
void mainImage( out vec4 fragColor, in vec2 fragCoord )
{
  // Normalized pixel coordinates (from 0 to 1)
  vec2 uv = fragCoord/iResolution.xy;

  vec3 col = vec3(uv, 0); // This is the same as vec3(uv.x, uv.y, 0)

  // Output to screen
  fragColor = vec4(col,1.0);
}
We should end up with a canvas that is a mixture of black, red, green, and yellow.
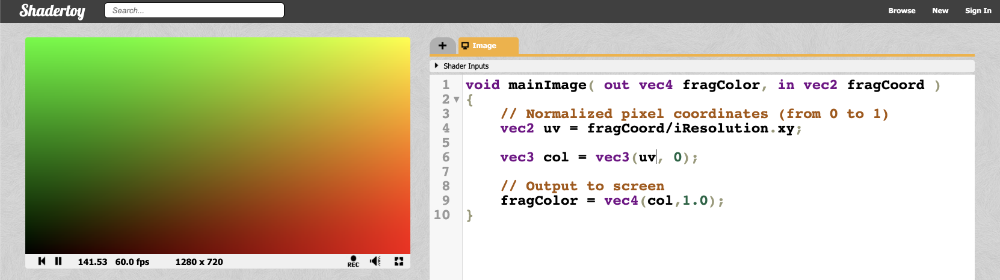
This looks pretty, but how does it help us? The uv variable represents the normalized canvas coordinates between zero and one on both the x-axis and the y-axis. The bottom-left corner of the canvas has the coordinate (0, 0). The top-right corner of the canvas has the coordinate (1, 1).
Inside the col variable, we are setting it equal to (uv.x, uv.y, 0), which means we shouldn't expect any blue color in the canvas. When uv.x and uv.y equal zero, then we get black. When they are both equal to one, then we get yellow because in computer graphics, yellow is a combination of red and green values. The top-left corner of the canvas is (0, 1), which would mean the col variable would be equal to (0, 1, 0) which is the color green. The bottom-right corner has the coordinate of (1, 0), which means col equals (1, 0, 0) which is the color red.
Let the colors guide you in your debugging process!
Conclusion
Phew! I covered quite a lot about shaders and Shadertoy in this article. I hope you're still with me! When I was learning shaders for the first time, it was like entering a completely new realm of programming. It's completely different from what I'm used to, but it's exciting and challenging! In the next series of posts, I'll discuss how we can create shapes on the canvas and make animations!