HTML5 Canvas API Tutorial Part 5 - Inserting Images
Greetings, friends! Welcome to Part 5 of my HTML5 Canvas API tutorial. In this tutorial, I will discuss how to insert images into an HTML canvas.
Canvas Setup
Create a file called index.html with the following contents:
<!DOCTYPE html>
<html lang="en">
<head>
  <meta charset="UTF-8">
  <meta name="viewport" content="width=device-width, initial-scale=1.0">
  <title>Canvas API Tutorial</title>
</head>
<body>
  <h1>Canvas API Tutorial</h1>
  <canvas id="canvas" width="500" height="500" style="border: 1px solid black;"></canvas>
  <img
    id="source"
    src="https://mdn.mozillademos.org/files/5397/rhino.jpg"
    width="300"
    height="227"
    style="display: none;"
  />
  <script src="canvas.js"></script>
</body>
</html>
Create a script called canvas.js with the following contents in the same directory:
const canvas = document.getElementById('canvas')
const ctx = canvas.getContext('2d')
Inserting Images into the Canvas
Notice that the HTML snippet I provided you looks a bit different than the previous tutorials. I have added an image element that grabs a picture of a rhino that MDN uses in their examples. I have set the display CSS property to "none" so that it doesn't appear on the screen. Otherwise, we would be drawing the rhino image twice in this tutorial: one to the canvas and one from the <img> element next to the canvas. So why do we need this element if we're making it invisible?
When we load an image into an HTML canvas, we first must retrieve it from somewhere and load it into memory, so we can access it from within the canvas. There are multiple locations where we can retrieve the image. The image can come from an image already loaded in the DOM (i.e. an <img> element), from a resource on your website, from a resource on an external website (i.e. Imgur or Unsplash), or even from other canvas elements. Additionally, you can create your own image using JavaScript alongside Data URLs with Base64 encoded strings.
In the HTML snippet I provided, we are grabbing an image from an external source using an <img> attribute with an ID of source. Let's create a reference to this element inside our canvas.js file:
const image = document.getElementById('source')
There is one issue though. Loading an image takes a bit of time, and we can't predict how long it takes for this image to load. Luckily, Web APIs provide a load event that we can hook into. In the documentation, it shows how to add a load event listener to the window object, but you can also add this event to DOM elements such as the <img> element.
image.addEventListener('load', () => {
  console.log('Hi! The image is loaded and ready to go!')
})
The next step is to draw the image into the canvas using the ctx.drawImage method. If you look at the documentation, you'll notice that this method is an overloaded function. There are three different ways we can use this method depending on how many parameters we use!
void ctx.drawImage(image, dx, dy)
void ctx.drawImage(image, dx, dy, dWidth, dHeight)
void ctx.drawImage(image, sx, sy, sWidth, sHeight, dx, dy, dWidth, dHeight)
You need either 3, 5, or 9 parameters to satisfy the method requirements. It takes some getting used to. I find myself constantly looking back at the MDN documentation to remember how to use this function. Let's look at the first ctx.drawImage function declaration. It takes three parameters: the image reference, the x-axis coordinate of the destination canvas (dx), and the y-axis coordinate of the destination canvas (dy).
Let's see this method in action. Replace the contents of canvas.js with the following:
const canvas = document.getElementById('canvas')
const ctx = canvas.getContext('2d')
const image = document.getElementById('source')
image.addEventListener('load', () => {
// ctx.drawImage(image, dx, dy);
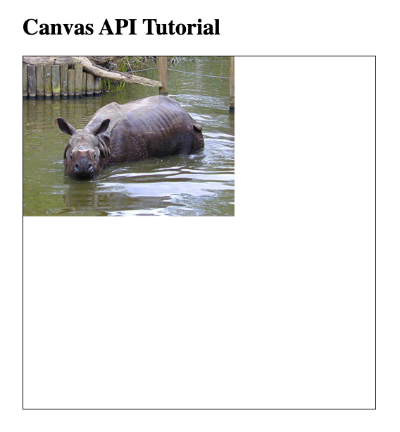
ctx.drawImage(image, 0, 0)
})
You should see the image appear at the top-left corner of the canvas. The source image has a width of 300 pixels and height of 227 pixels.
If you want to scale the image and have it to stretch to fit the entire canvas, then we need to use the second ctx.drawImage function declaration:
void ctx.drawImage(image, dx, dy, dWidth, dHeight)
The dWidth and dHeight parameters represent the width and height of the image in the destination canvas, respectively. You can use these parameters to control how you want to scale the image when you draw the image to the canvas.
Let's look at an example. Replace the contents of canvas.js with the following:
const canvas = document.getElementById('canvas')
const ctx = canvas.getContext('2d')
const image = document.getElementById('source')

image.addEventListener('load', () => {
  // ctx.drawImage(image, dx, dy, dWidth, dHeight);
  ctx.drawImage(image, 0, 0, canvas.width, canvas.height)
})
You should now see the image take up the entire canvas.
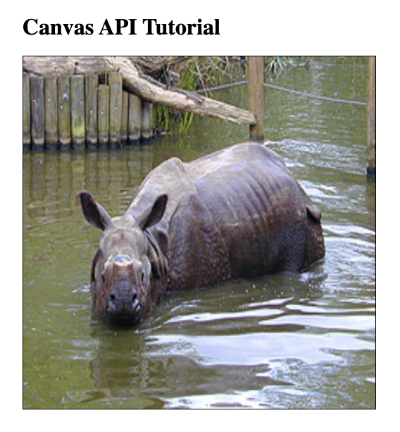
The rhino may look a little bit squished now, but that's due to the incorrect aspect ratio. The original image was 300px by 227px. The canvas is 500px by 500px. Therefore, the aspect ratio changes slightly. Keep this in mind when you're scaling images.
If you want to crop the image and place the cropped image anywhere on the canvas, then you need to use the third and final ctx.drawImage function declaration:
void ctx.drawImage(image, sx, sy, sWidth, sHeight, dx, dy, dWidth, dHeight)
This declaration adds 4 more parameters: sx, sy, sWidth, and sHeight. These parameters refer to dimensions of the source image before we move it to the destination canvas. They allow us to grab a piece of the source image and place it anywhere in the destination canvas using dx, dy, dWidth, and dHeight.
We use sx and sy parameters to get the x-axis and y-axis coordinates of the top-left corner of where we want to start cropping our image. Then we use sWidth and sHeight to specify how wide and high our cropping area should be.
Let's look at an example. Suppose I want to grab a 50px by 50px chunk of the image starting at the top-left corner of the image, located at (0, 0). I will then choose to draw this cropped image to the canvas such that it is placed at the coordinate (100, 100) on the canvas. We should have the following code in canvas.js:
const canvas = document.getElementById('canvas')
const ctx = canvas.getContext('2d')
const image = document.getElementById('source')

image.addEventListener('load', () => {
  // ctx.drawImage(image, sx, sy, sWidth, sHeight, dx, dy, dWidth, dHeight);
  ctx.drawImage(image, 0, 0, 50, 50, 100, 100, 50, 50)
})
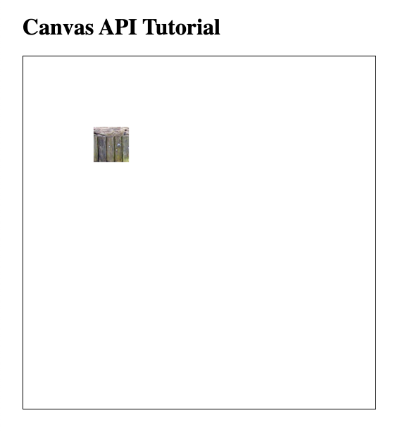
The cropped image seems a bit small. Let's scale it up using the dWidth and dHeight parameters.
image.addEventListener('load', () => {
  // ctx.drawImage(image, sx, sy, sWidth, sHeight, dx, dy, dWidth, dHeight);
  ctx.drawImage(image, 0, 0, 50, 50, 100, 100, 200, 200)
})
That looks like the fence that we see in the top-left corner of the original image, doesn't it? Maybe I want to move the scaled cropped image to the top-left corner of the destination canvas. I can do this by adjusting the dx and dy parameters.
image.addEventListener('load', () => {
  // ctx.drawImage(image, sx, sy, sWidth, sHeight, dx, dy, dWidth, dHeight);
  ctx.drawImage(image, 0, 0, 50, 50, 0, 0, 200, 200)
})
If you need help figuring out the numbers you need for sx, sy, sWidth, and sHeight, I suggest drawing a stroked rectangle around the area you want to crop from the image.
const canvas = document.getElementById('canvas')
const ctx = canvas.getContext('2d')
const image = document.getElementById('source')

image.addEventListener('load', () => {
  // ctx.drawImage(image, dx, dy);
  ctx.drawImage(image, 0, 0)

  // draw rectangular outline around rhino's head
  ctx.strokeStyle = 'red'
  ctx.strokeRect(33, 71, 104, 124) // These numbers can be used to clip our image!
})

Once you have played around with the numbers in strokeRect, you can then use them to crop your image.
image.addEventListener('load', () => {
  // ctx.drawImage(image, sx, sy, sWidth, sHeight, dx, dy, dWidth, dHeight);
  ctx.drawImage(image, 33, 71, 104, 124, 0, 0, canvas.width, canvas.height)
})
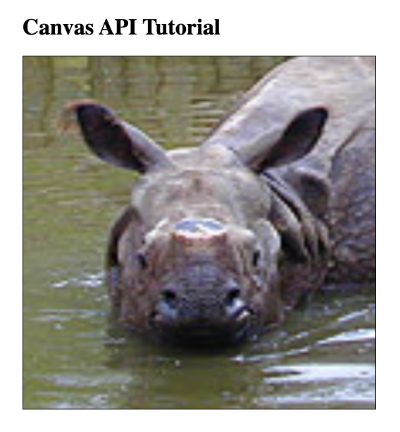
Voilà! You now have a rhino looking directly at you! On closer inspection, it appears that the rhino is missing its horn. Poor rhino 😢.
As you can see, the ctx.drawImage method is quite powerful!
Conclusion
The ctx.drawImage method is extremely useful for zooming in/out of an image, cropping images, and moving them around anywhere in the canvas. With the knowledge you learned today, you can grab images from a sprite sheet to animate 2D characters in your HTML canvas! Incredible! In the next article, I'll discuss how to apply filters to images so you can turn them black and white or make other cool image effects.