Interactive Hexagon Grid Tutorial Part 2 - Color Fade Hover Effects
Greetings, friends! Still can't get enough of hexagons, huh? In this tutorial, we'll learn how to add a cool color fade effect when the user hovers over hexagons within our hexagon grid. Let's get started!
Review
In the previous tutorial, we used the HTML canvas API to draw hexagons in a grid pattern using JavaScript. We ended up with the following code.
/** @type {HTMLCanvasElement} */
const canvas = document.getElementById('canvas')
const ctx = canvas.getContext('2d')

const r = 50 // radius

function drawHexagon(a, b) {
  ctx.beginPath()
  for (let i = 0; i < 6; i++) {
    ctx.lineTo(
      a + r * Math.cos(i * Math.PI / 3),
      b + r * Math.sin(i * Math.PI / 3)
    )
  }
  ctx.closePath()
  ctx.stroke()

  ctx.beginPath()
  ctx.arc(a, b, r * 0.1, 0, 2 * Math.PI)
  ctx.fill()
}

function drawHexagonGrid(sizeX, sizeY) {
  for (let i = 0; i < sizeX; i++) {
    for (let j = 0; j < sizeY; j++) {
      if (i % 2 === j % 2) {
        const x = i * 1.5 * r
        const y = j * 0.5 * r * Math.sqrt(3)
        drawHexagon(x, y);
      }
    }
  }
}

drawHexagonGrid(8, 12)
The index.html file contained the following code:
<!DOCTYPE html>
<html lang="en">
<head>
  <meta charset="UTF-8">
  <meta name="viewport" content="width=device-width, initial-scale=1.0">
  <title>Interactive Hexagon Grid</title>
</head>
<body>
  <h1>Canvas API Tutorial</h1>
  <canvas id="canvas" width="500" height="500" style="border: 1px solid black;"></canvas>
  <script src="canvas.js"></script>
</body>
</html>
With a grid size of 500 pixels by 500 pixels, our canvas should look like the following image.
Adding Mouse Interaction
In order to have our mouse interact with the canvas, we first need to add an event listener.
canvas.addEventListener('mousemove', (e) => {
  console.log(`(${e.clientX}, ${e.clientY})`)
})
Alternatively, you can opt to add the event listener to the whole page instead of just the canvas element. I do this for the interactive hexagon grid on the front page of this website. The reason is that the hexagon grid might have pieces of hexagons that are hard to see depending on the canvas size. By letting the user hover a bit outside the canvas, I give them extra leeway. It's up to your preference if you want to choose the canvas or document.
document.addEventListener('mousemove', (e) => {
  console.log(`(${e.clientX}, ${e.clientY})`)
})
We should normalize our mouse coordinates such that they are relative to the canvas element's coordinate system. The mouse coordinates should be (0, 0) at the top-left corner of the canvas element. Since the canvas width and height are equal to 500, the mouse coordinates should be (500, 500) at the bottom-right corner of the canvas element.
Let's update our event listener to the following code:
const canvas = document.getElementById('canvas')

// ...rest of the code...

// Get an object that contains info about the canvas's positioning with respect to the page
const canvasRect = canvas.getBoundingClientRect()

let mouseX = null
let mouseY = null

document.addEventListener('mousemove', (e) => {
  mouseX = e.clientX - canvasRect.left
  mouseY = e.clientY - canvasRect.top

  console.log(`(${mouseX}, ${mouseY})`)
})
The getBoundingClientRect method is a special function that returns an object containing information about the size and position of a DOM element on the page.
We can treat DOM elements as rectangles on the page. Therefore, we can get the (x, y) coordinate of the canvas element as well as the width and height. This coordinate will be relative to the top-left corner of the page, (0, 0). The DOM has a coordinate system similar to the HTML canvas where the y-axis increases as you go down.
Now that we have mouse events setup, let's add mouse-hexagon interactions!
Adding State to Hexagons
Instead of simply drawing hexagons to the canvas, let's add some state to each hexagon, so we can track whether or not the user has interacted with it. I'm going to go with an object-oriented programming (OOP) approach, so hopefully you don't mind 😅
I find working with OOP in JavaScript to be useful in developing art programs and games, but of course it's just one style of programming.
First, create an array called hexagons. This will be used to store a list of hexagons and their state.
const hexagons = []
We'll then create a new class called Hexagon with some properties about its position.
class Hexagon {
  constructor(a, b) {
    this.a = a
    this.b = b
  }
}
Next, we're going to rearrange some of our code logic. Instead of using the drawHexagon method to draw a hexagon, we'll give each hexagon a draw method.
class Hexagon {
  constructor(a, b) {
    this.a = a
    this.b = b
  }

  draw() {
    ctx.beginPath()
    for (let i = 0; i < 6; i++) {
      ctx.lineTo(
        a + r * Math.cos(i * Math.PI / 3),
        b + r * Math.sin(i * Math.PI / 3)
      )
    }
    ctx.closePath()
    ctx.stroke()

    ctx.beginPath()
    ctx.arc(a, b, r * 0.1, 0, 2 * Math.PI)
    ctx.fill()
  }
}
We'll create a new function outside the Hexagon class called setup. This will replace the drawHexagonGrid function. The setup function will be in charge of initializing an array of hexagons and their state.
function setup() {
  const sizeX = 8;
  const sizeY = 12;

  for (let i = 0; i < sizeX; i++) {
    for (let j = 0; j < sizeY; j++) {
      if (i % 2 === j % 2) {
        const x = i * 1.5 * r;
        const y = j * 0.5 * r * Math.sqrt(3);
        hexagons.push(new Hexagon(x, y));
      }
    }
  }
}
I have made sizeX and sizeY variables within the setup function. We'll revisit these variables later when I discuss how to handle dynamic canvas sizes. For now, we'll set them equal to 8 and 12 because these values fill up the 500px by 500px canvas when r = 50.
Re-rendering the Hexagon Grid
To make the grid update whenever the user moves the mouse, we'll need to trigger re-renders many times per second. Let's create a render function in charge of drawing every hexagon to the screen and making updates to the canvas every frame.
function render() {
  ctx.clearRect(0, 0, canvas.width, canvas.height)

  for (const hexagon of hexagons) {
    hexagon.draw();
  }

  requestAnimationFrame(render)
}
By calling requestAnimationFrame, we tell the browser to run the render function over and over. Modern browsers typically run the callback function passed into requestAnimationFrame 60 frames per second (fps), but it's possible to go higher depending on your monitor's refresh rate and your computer hardware. The browser is also smart enough to pause execution of the callback function when the current browser tab becomes inactive to help save on performance and battery life.
At the beginning of the render function, we call ctx.clearRect to clear the canvas before drawing the hexagon grid again. This will be useful when we want to render color changes on each hexagon.
Our code should look like the following so far:
/** @type {HTMLCanvasElement} */
const canvas = document.getElementById("canvas")
const ctx = canvas.getContext("2d")
const canvasRect = canvas.getBoundingClientRect();

const r = 50 // radius
const hexagons = []
let mouseX = null
let mouseY = null


document.addEventListener("mousemove", (e) => {
  mouseX = e.clientX - canvasRect.left
  mouseY = e.clientY - canvasRect.top

  console.log(`(${mouseX}, ${mouseY})`)
})

class Hexagon {
  constructor(a, b) {
    this.a = a
    this.b = b
  }

  draw() {
    ctx.beginPath();
    for (let i = 0; i < 6; i++) {
      ctx.lineTo(
        this.a + r * Math.cos((i * Math.PI) / 3),
        this.b + r * Math.sin((i * Math.PI) / 3)
      )
    }
    ctx.closePath()
    ctx.stroke()

    ctx.beginPath()
    ctx.arc(this.a, this.b, r * 0.1, 0, 2 * Math.PI)
    ctx.fill()
  }
}

function setup() {
  const sizeX = 8
  const sizeY = 12

  for (let i = 0; i < sizeX; i++) {
    for (let j = 0; j < sizeY; j++) {
      if (i % 2 === j % 2) {
        const x = i * 1.5 * r
        const y = j * 0.5 * r * Math.sqrt(3)
        hexagons.push(new Hexagon(x, y))
      }
    }
  }
}

function render() {
  ctx.clearRect(0, 0, canvas.width, canvas.height)

  for (const hexagon of hexagons) {
    hexagon.draw()
  }

  requestAnimationFrame(render)
}

setup()
render()
We call the setup function to create an array of hexagons with their own state. Then, we call the render function to constantly update the canvas. After running these functions, the hexagon grid should show up again, but now the grid is being drawn many times per second.
Coloring Hexagons with the Mouse
We've reached the point where we can finally start adding color to the hexagon grid when the mouse moves over the canvas element.
First, let's add some additional state to our Hexagon class:
class Hexagon {
  constructor(a, b) {
    this.a = a
    this.b = b
    this.currentColor = '#ffffff'
    this.isHovered = false
  }

  // ...rest of the Hexagon code...
}
As the name implies, the currentColor will hold the current color of the hexagon. It will later change over time, but for now, it will start as white (#ffffff) and shift to a different solid color.
We'll add the color fade effect later. For now, the hexagon color will change when the mouse hovers over the hexagon. The isHovered property will change to true when the mouse has hovered over the hexagon. We'll use this property to determine whether the hexagon's color should change.
Let's then update the draw method inside the Hexagon class. We'll remove the small center circle points (unless you want to keep them), so we can let the new color shine through ✨. Then, we'll add the following two lines:
ctx.fillStyle = this.currentColor
ctx.fill()
Our Hexagon class should now look like the following:
class Hexagon {
  constructor(a, b) {
    this.a = a
    this.b = b
    this.currentColor = '#ffffff'
    this.isHovered = false
  }

  draw() {
    ctx.beginPath();
    for (let i = 0; i < 6; i++) {
      ctx.lineTo(
        this.a + r * Math.cos((i * Math.PI) / 3),
        this.b + r * Math.sin((i * Math.PI) / 3)
      )
    }
    ctx.closePath()
    ctx.stroke()
    ctx.fillStyle = this.currentColor
    ctx.fill()
  }
}
Next, we need to make a method that will detect whether the mouse was inside a hexagon or not. It should do this check for every hexagon in our grid. Don't worry! It's still really fast! We will create a new method called checkHover inside the Hexagon class.
class Hexagon {
  // ...rest of the Hexagon code...

  checkHover() {
    if (mouseX == null || mouseY == null) {
      return
    }

    this.isHovered = ctx.isPointInPath(mouseX, mouseY)
  }
}
To prevent errors, we simply return from the method if the mouseX or mouseY values are null. Then, we set the isHovered property equal to the result of the ctx.isPointInPath method. This method returns either true or false based on whether a point is inside a particular path.
When we draw each hexagon, we are beginning and closing a path. The isPointInPath method will look at the last path that was closed when determining if a point is inside it or not. This is a really cool way of detecting if the mouse is hovering over a hexagon without using a bunch of extra math. We will call the checkHover method after every hexagon's draw call is invoked.
During every frame, we perform a check against every hexagon in the canvas to see if the mouse is hovering over a particular hexagon. It may seem like it gets computationally expensive, but the operation happens very fast. If you really want speed, then read a later part of this tutorial series when I discuss how to implement an interactive hexagon grid using WebGL and Three.js 🤓
The next step is to make another method inside the Hexagon class to actually update the color of the hexagon when this.isHovered equals true:
class Hexagon {
  // ...rest of the Hexagon code...

  update() {
    if (this.isHovered) {
      this.color = '#93e0f0'
    }
  }
}
Our code should look like the following so far:
/** @type {HTMLCanvasElement} */
const canvas = document.getElementById("canvas")
const ctx = canvas.getContext("2d")
const canvasRect = canvas.getBoundingClientRect();

const r = 50 // radius
const hexagons = []
let mouseX = null
let mouseY = null


document.addEventListener("mousemove", (e) => {
  mouseX = e.clientX - canvasRect.left
  mouseY = e.clientY - canvasRect.top

  console.log(`(${mouseX}, ${mouseY})`)
})

class Hexagon {
  constructor(a, b) {
    this.a = a
    this.b = b
    this.isHovered = false
    this.color = '#ffffff'
  }

  draw() {
    ctx.beginPath();
    for (let i = 0; i < 6; i++) {
      ctx.lineTo(
        this.a + r * Math.cos((i * Math.PI) / 3),
        this.b + r * Math.sin((i * Math.PI) / 3)
      )
    }
    ctx.closePath()
    ctx.stroke()
    ctx.fillStyle = this.color
    ctx.fill()
  }

  checkHover() {
    if (mouseX == null || mouseY == null) {
      return
    }

    this.isHovered = ctx.isPointInPath(mouseX, mouseY)
  }

  update() {
    if (this.isHovered) {
      this.color = '#93e0f0'
    }
  }
}

function setup() {
  const sizeX = 8
  const sizeY = 13

  for (let i = 0; i < sizeX; i++) {
    for (let j = 0; j < sizeY; j++) {
      if (i % 2 === j % 2) {
        const x = i * 1.5 * r
        const y = j * 0.5 * r * Math.sqrt(3)
        hexagons.push(new Hexagon(x, y))
      }
    }
  }
}

function render() {
  ctx.clearRect(0, 0, canvas.width, canvas.height)

  for (const hexagon of hexagons) {
    hexagon.draw()
    hexagon.checkHover()
    hexagon.update()
  }

  requestAnimationFrame(render)
}

setup()
render()
After running this code, you should be able to hover over the hexagons to light them up!
Creating a Color Fade Effect
Finally, we've made it to the actual color fade effect. This is the moment you've been waiting for, huh? Did you know that hexagons are the bestagons? Even bees think so. They make hexagons in their beehives because the hexagon uses the least amount of material to hold the most weight. Be like a hexagon and bee strong 😉
Oh, I'm rambling again when you want me to show you the code! Sorry, I write these articles late at night sometimes and my mind wonders 😅
Anyways! Let's continue! We're trying to make a color fade effect which means making the color transition over time from one color to a new color. The new color can be the original color or some other arbitrary color.
If you've hovered over the hexagons in the interactive hexagon grid on my home page, then you might have noticed that I purposely transition the hexagon color to a different color than the original color. This is to give the user feedback that the hexagons have been interacted with already.
Let's add a few new properties to our Hexagon class:
class Hexagon {
  constructor(x, y) {
    this.a = a
    this.b = b
    this.originalColor = '#ffffff'
    this.hoverColor = '#48bb78'
    this.targetColor = '#93e0f0'
    this.currentColor = this.originalColor
    this.isHovered = false
    this.isTouched = false
    this.lerpValue = 0
  }

  // ...rest of the hexagon code...
}
The currentColor is now set to the originalColor property by default. When the mouse is hovered over a hexagon, it will change to the hoverColor. When the mouse moves away from the hexagon, it will gradually transition to a different color determined by a custom lerp function we will define. Once the lerpValue goes to one, then the color should settle at targetColor.
In HLSL, a common shader language used in the Unity game engine and Direct3D applications, a lerp function is used to linearly interpolate between one value to another value. In GLSL, we use the mix function instead.
We will create our own custom lerp function that transitions between one color in hexadecimal to another color in hexadecimal. This is the secret sauce that really makes the color fade effect happen. Oops, I guess it's no longer secret anymore 😅
function lerp(color1, color2, percent) {
  // Clamp the percentage between zero and one (both inclusive)
  const t = Math.max(0, Math.min(1, percent));

  // Convert hexadecimal colors to RGB values
  const r1 = Number.parseInt(color1.substring(1, 3), 16)
  const g1 = Number.parseInt(color1.substring(3, 5), 16)
  const b1 = Number.parseInt(color1.substring(5, 7), 16)

  const r2 = Number.parseInt(color2.substring(1, 3), 16)
  const g2 = Number.parseInt(color2.substring(3, 5), 16)
  const b2 = Number.parseInt(color2.substring(5, 7), 16)

  // Linearly Interpolate RGB values
  const r = Math.round(r1 + (r2 - r1) * t)
  const g = Math.round(g1 + (g2 - g1) * t)
  const b = Math.round(b1 + (b2 - b1) * t)

  // Convert interpolated values back to hexadecimal
  return `#${((1 << 24) + (r << 16) + (g << 8) + b).toString(16).slice(1)}`
}
The lerp function is designed to accept two colors in the form of hexadecimal strings and a percentage between 0 (inclusive) and 1 (inclusive). It converts each RGB value into a number and then linearly interpolates them with the RGB values of the other color.
Then, we use left bit shifting combined with the Number.toString method, using a radix of 16, to convert the values back into hexadecimal.
Let's try using the lerp function to get a feel for how it works.
const white = '#ffffff'
const black = '#000000'

const lerpedColor1 = lerp(white, black, 0)
const lerpedColor2 = lerp(white, black, 1)
const lerpedColor3 = lerp(white, black, 0.5)
const lerpedColor4 = lerp(white, black, -1)
const lerpedColor5 = lerp(white, black, 2)

console.log(lerpedColor1) // #ffffff = rgb(255, 255, 255)
console.log(lerpedColor2) // #000000 = rgb(0, 0, 0)
console.log(lerpedColor3) // #808080 = rgb(128, 128, 128)
console.log(lerpedColor4) // #000000 = rgb(0, 0, 0)
console.log(lerpedColor5) // #ffffff = rgb(255, 255, 255)
Notice how a value of 0 (0%) shifts the color to black, and a value of 1 (100%) shifts the value to white. A value of 0.5 (50%) makes the color gray, about halfway between black and white. In this sense, think of the third parameter of the lerp function as a knob on a control "slider" that lets you choose values between one color and another color. Negative values are clamped to zero and values greater than one are clamped to one.
Inside the Hexagon class, we initialized the lerpValue property to zero. When the mouse is over a hexagon, the currentColor should change to the hoverColor. When the mouse leaves the hexagon, the hexagon's currentColor should gradually shift toward a targetColor using the lerp function we defined.
Let's make changes to the Hexagon class methods to implement our color fade effect.
class Hexagon {
  constructor(x, y) {
    this.a = a
    this.b = b
    this.originalColor = '#ffffff'
    this.hoverColor = '#48bb78'
    this.targetColor = '#93e0f0'
    this.currentColor = this.originalColor
    this.isHovered = false
    this.isTouched = false
    this.lerpValue = 0
  }

  draw() {
    ctx.beginPath()
    for (let i = 0; i < 6; i++) {
      ctx.lineTo(
        this.a + r * Math.cos((i * Math.PI) / 3),
        this.b + r * Math.sin((i * Math.PI) / 3)
      )
    }
    ctx.closePath()
    ctx.stroke()
    ctx.fillStyle = this.currentColor
    ctx.fill()
  }

  checkHover() {
    if (mouseX == null || mouseY == null)
      return
    this.isHovered = ctx.isPointInPath(mouseX, mouseY)
    if (this.isHovered)
      this.isTouched = true
  }

  update() {
    if (this.isHovered) {
      this.currentColor = this.hoverColor
      this.lerpValue = 0
    }

    // Gradual transition from the hover color to target color
    if (this.isTouched) {
      this.lerpValue = Math.min(1, this.lerpValue + 0.02)
      this.currentColor = lerp(
        this.hoverColor,
        this.targetColor,
        this.lerpValue
      )
    }
  }
}
The main changes happen in the checkHover and update methods. In the checkHover method, we are setting the new isTouched property to true when the user has hovered over the hexagon. By keeping track of what hexagons have been touched by the mouse, we can start changing the color using the lerp function. Otherwise, we'd see all hexagons have an initial color transition happen when the hexagon grid is first drawn.
We can also leverage the isTouched properties of all hexagons to play an animation or do something special when the user has hovered over all the hexagons.
After the hexagon is touched by the mouse, the hexagon's lerpValue property will increase by 0.02 (2%) every frame. I chose 0.02 as an arbitrary value because I liked how smooth and quick the color fades, but you can change it to whatever number you like. To reach a lerpValue of one, it would take about 50 frames or roughly 0.83 seconds to reach the targetColor if your browser runs at 60 fps.
Even if the user's refresh rate was 120 fps, they should still see a color transition effect, although slightly faster than users with slower refresh rates. It's entirely possible to re-render the canvas at a speed that is independent of the user's refresh rate. This is commonly referred to as "delta time" and uses the time stamp between the current frame and previous frame to keep the update rate similar across different monitor refresh rates. I'll keep this tutorial simple though 😅
Let's now look at our finished code. I have removed the console.log statement from the mousemove event listener callback function, but feel free to continue using it if it helps you.
/** @type {HTMLCanvasElement} */
const canvas = document.getElementById("canvas")
const ctx = canvas.getContext("2d")
const canvasRect = canvas.getBoundingClientRect();

const r = 50 // radius
const hexagons = []
let mouseX = null
let mouseY = null


document.addEventListener("mousemove", (e) => {
  mouseX = e.clientX - canvasRect.left
  mouseY = e.clientY - canvasRect.top
})

function lerp(color1, color2, percent) {
  // Clamp the percentage between zero and one
  const t = Math.max(0, Math.min(1, percent));

  // Convert hexadecimal colors to RGB values
  const r1 = Number.parseInt(color1.substring(1, 3), 16)
  const g1 = Number.parseInt(color1.substring(3, 5), 16)
  const b1 = Number.parseInt(color1.substring(5, 7), 16)

  const r2 = Number.parseInt(color2.substring(1, 3), 16)
  const g2 = Number.parseInt(color2.substring(3, 5), 16)
  const b2 = Number.parseInt(color2.substring(5, 7), 16)

  // Linearly Interpolate RGB values
  const r = Math.round(r1 + (r2 - r1) * t)
  const g = Math.round(g1 + (g2 - g1) * t)
  const b = Math.round(b1 + (b2 - b1) * t)

  // Convert interpolated values back to hexadecimal
  return `#${((1 << 24) + (r << 16) + (g << 8) + b).toString(16).slice(1)}`
}

class Hexagon {
  constructor(a, b) {
    this.a = a
    this.b = b
    this.originalColor = '#ffffff'
    this.hoverColor = '#48bb78'
    this.targetColor = '#93e0f0'
    this.currentColor = this.originalColor
    this.isHovered = false
    this.isTouched = false
    this.lerpValue = 0
  }

  draw() {
    ctx.beginPath();
    for (let i = 0; i < 6; i++) {
      ctx.lineTo(
        this.a + r * Math.cos((i * Math.PI) / 3),
        this.b + r * Math.sin((i * Math.PI) / 3)
      )
    }
    ctx.closePath()
    ctx.stroke()
    ctx.fillStyle = this.currentColor
    ctx.fill()
  }

  checkHover() {
      if (mouseX == null || mouseY == null)
        return
      this.isHovered = ctx.isPointInPath(mouseX, mouseY)
      if (this.isHovered)
        this.isTouched = true
    }

  update() {
    if (this.isHovered) {
      this.currentColor = this.hoverColor
      this.lerpValue = 0
    }

    if (this.isTouched) {
      this.lerpValue += 0.02
      this.currentColor = lerp(
        this.hoverColor,
        this.targetColor,
        this.lerpValue
      )
    }
  }
}

function setup() {
  const sizeX = 8
  const sizeY = 13

  for (let i = 0; i < sizeX; i++) {
    for (let j = 0; j < sizeY; j++) {
      if (i % 2 === j % 2) {
        const x = i * 1.5 * r
        const y = j * 0.5 * r * Math.sqrt(3)
        hexagons.push(new Hexagon(x, y))
      }
    }
  }
}

function render() {
  ctx.clearRect(0, 0, canvas.width, canvas.height)

  for (const hexagon of hexagons) {
    hexagon.draw()
    hexagon.checkHover()
    hexagon.update()
  }

  requestAnimationFrame(render)
}

setup()
render()
After running the code, you should see a cool color fade effect! Yay! Progress! 🚀
Bonus: Rainbow Colored Hexagon Grid
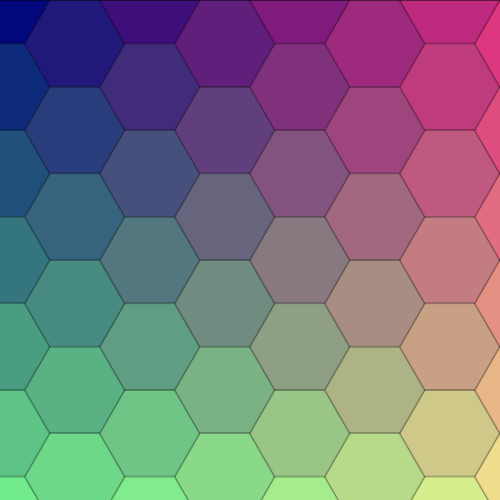
As a bonus for making it this far in this tutorial, let me discuss how to make a cool rainbow colored hexagon grid. We can leverage our lerp function to interpolate between colors based on the (a, b) coordinate of each hexagon's center point. Then, we can color each hexagon a different color such that the hexagon grid forms a rainbow-like gradient.
Let's create a new function called rgbToHex that utilizes the same logic as the end of the lerp function.
function rgbToHex(r, g, b) {
  return `#${((1 << 24) + (r << 16) + (g << 8) + b).toString(16).slice(1)}`
}
Then, we'll update the the Hexagon class's targetColor such that its color depends on both the x-coordinate and y-coordinate of the hexagon's center point.
class Hexagon {
  constructor(a, b) {
    this.a = a
    this.b = b
    this.originalColor = '#ffffff'
    this.hoverColor = '#48bb78'
    this.targetColor = rgbToHex(
      this.a / (canvas.width + r) * 255,
      this.b / (canvas.height + r) * 255,
      128
    )
    this.currentColor = this.originalColor
    this.isHovered = false
    this.isTouched = false
    this.lerpValue = 0
  }

  // ...rest of the Hexagon code...
}
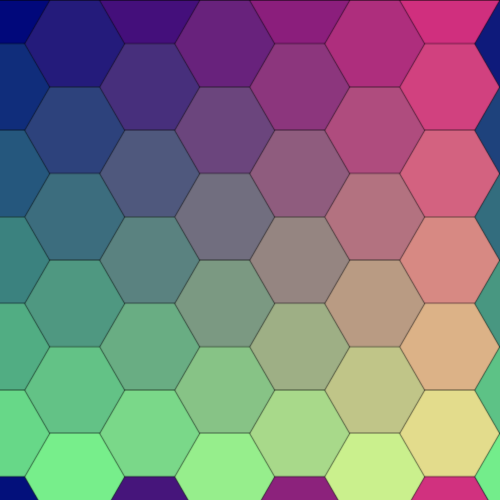
After running your code, hover over all the hexagons, and you should see a rainbow pattern! 🌈
Let me explain the following code:
this.targetColor = rgbToHex(
  this.a / (canvas.width + r) * 255,
  this.b / (canvas.height + r) * 255,
  128
)
The rgbToHex function accepts three values: red, green, and blue. Each of these values can range between 0 and 255. We are keeping the blue value constant at 128, about halfway between the min and max values.
The a property will range between zero and the width of the canvas. The b property will likewise range between zero and the height of the canvas. Therefore, we normalize these values by the canvas's width and height to keep the values between zero and one. We multiply by 255 to obtain an RGB color value.
However, notice that I added the radius, r, to both the width and height. Since the hexagons drawn at the edge of the canvas might have center points that are outside the canvas, I added the radius to make sure to capture them. The center points of those hexagons are at least one radius away from the edge of the canvas.
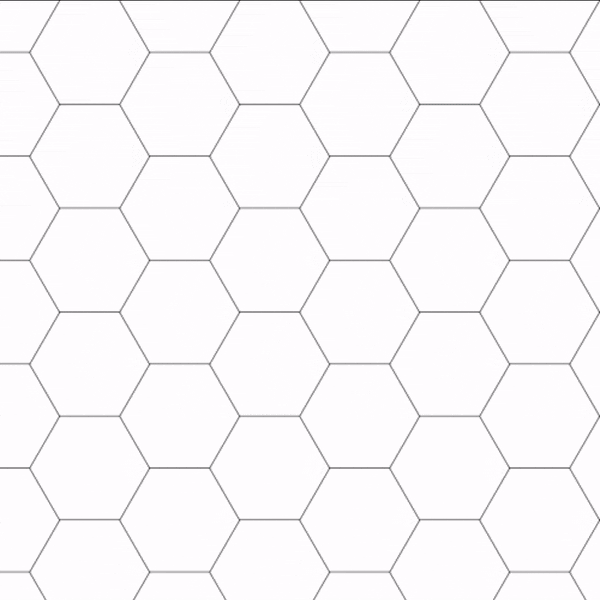
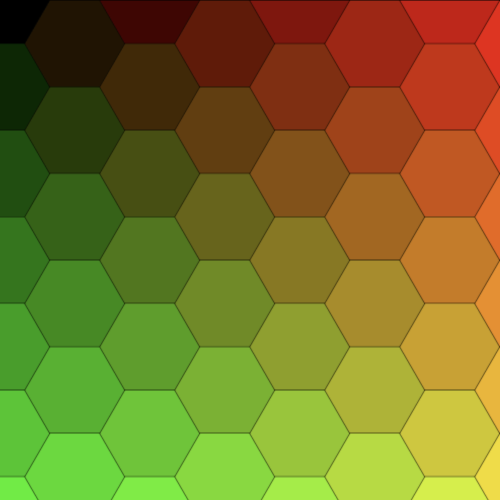
If we didn't add r to the canvas width and height, the hexagon grid would have looked like the following image.
Please find the finished code below:
/** @type {HTMLCanvasElement} */
const canvas = document.getElementById("canvas")
const ctx = canvas.getContext("2d")
const canvasRect = canvas.getBoundingClientRect();

const r = 50 // radius
const hexagons = []
let mouseX = null
let mouseY = null


document.addEventListener("mousemove", (e) => {
  mouseX = e.clientX - canvasRect.left
  mouseY = e.clientY - canvasRect.top
})

function rgbToHex(r, g, b) {
  return `#${((1 << 24) + (r << 16) + (g << 8) + b).toString(16).slice(1)}`
}

function lerp(color1, color2, percent) {
  // Clamp the percentage between zero and one
  const t = Math.max(0, Math.min(1, percent));

  // Convert hexadecimal colors to RGB values
  const r1 = Number.parseInt(color1.substring(1, 3), 16)
  const g1 = Number.parseInt(color1.substring(3, 5), 16)
  const b1 = Number.parseInt(color1.substring(5, 7), 16)

  const r2 = Number.parseInt(color2.substring(1, 3), 16)
  const g2 = Number.parseInt(color2.substring(3, 5), 16)
  const b2 = Number.parseInt(color2.substring(5, 7), 16)

  // Linearly Interpolate RGB values
  const r = Math.round(r1 + (r2 - r1) * t)
  const g = Math.round(g1 + (g2 - g1) * t)
  const b = Math.round(b1 + (b2 - b1) * t)

  // Convert interpolated values back to hexadecimal
  return rgbToHex(r, g, b)
}

class Hexagon {
  constructor(a, b) {
    this.a = a
    this.b = b
    this.originalColor = '#ffffff'
    this.hoverColor = '#48bb78'
    this.targetColor = rgbToHex(
      this.a / (canvas.width + r) * 255,
      this.b / (canvas.height + r) * 255,
      128
    )
    this.currentColor = this.originalColor
    this.isHovered = false
    this.isTouched = false
    this.lerpValue = 0
  }

  draw() {
    ctx.beginPath();
    for (let i = 0; i < 6; i++) {
      ctx.lineTo(
        this.a + r * Math.cos((i * Math.PI) / 3),
        this.b + r * Math.sin((i * Math.PI) / 3)
      )
    }
    ctx.closePath()
    ctx.stroke()
    ctx.fillStyle = this.currentColor
    ctx.fill()
  }

  checkHover() {
      if (mouseX == null || mouseY == null)
        return
      this.isHovered = ctx.isPointInPath(mouseX, mouseY)
      if (this.isHovered)
        this.isTouched = true
    }

  update() {
    if (this.isHovered) {
      this.currentColor = this.hoverColor
      this.lerpValue = 0
    }

    if (this.isTouched) {
      this.lerpValue += 0.02
      this.currentColor = lerp(
        this.hoverColor,
        this.targetColor,
        this.lerpValue
      )
    }
  }
}

function setup() {
  const sizeX = 8
  const sizeY = 13

  for (let i = 0; i < sizeX; i++) {
    for (let j = 0; j < sizeY; j++) {
      if (i % 2 === j % 2) {
        const x = i * 1.5 * r
        const y = j * 0.5 * r * Math.sqrt(3)
        hexagons.push(new Hexagon(x, y))
      }
    }
  }
}

function render() {
  ctx.clearRect(0, 0, canvas.width, canvas.height)

  for (const hexagon of hexagons) {
    hexagon.draw()
    hexagon.checkHover()
    hexagon.update()
  }

  requestAnimationFrame(render)
}

setup()
render()
Have fun experimenting with different colors! Inside the targetColor property, try changing the blue value of 128 to different numbers to see how the hexagon grid looks!
Another cool trick we can do is to use nested interpolations by using a lerp inside a lerp. You've heard of loop de loop, but get ready for lerp de lerp!
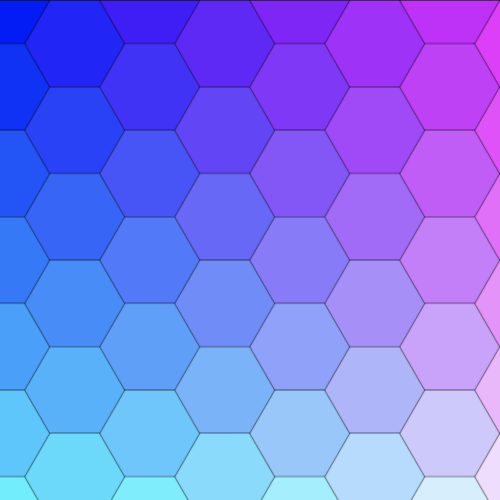
Inside the Hexagon class's constructor method, we can assign the targetColor property to a color that linearly interpolates between red and blue across the x-axis and toward green on the y-axis.
this.targetColor = lerp(
  lerp(
    '#ff0000',
    '#0000ff',
    this.a / (canvas.height + r)
  ),
  '#00ff00',
  this.b / (canvas.width + r)
)
This lets us create a similar pattern as before, but now we can clearly specify which colors we want at the edges of the canvas. Pretty cool 😎
Conclusion
In this tutorial, we learned how to add a color fade effect using the HTML canvas API and JavaScript! We created our own custom lerp function that can linearly interpolate between colors in our hexagon grid. Lerp de lerp! 🌈
In the next lesson, we'll learn how to update the canvas when its width changes to make our interactive hexagon grid responsive and look better on mobile devices. We'll also handle weird edge cases (literally edge cases!) that may impact the user experience as the width of the canvas changes. Til next time, happy coding!