Rainbow Flag Shader in Shadertoy
Greetings, friends! It's Pride Month in the United States, and that means you'll likely see rainbows everywhere 🌈
Some History
Pride Month is an important celebration for the LGBT community. You'll see celebrations and parades in a lot of major cities across the country. Millions of people across the world are members of the LGBT community and millions have been for centuries. This includes one of my favorite historical mathematicians, Alan Turing, considered the "father of computer science," for his remarkable work in codebreaking during World War II. If you haven't watched The Imitation Game, I would highly recommend it! Alan Turing is played by Benedict Cumberbatch, who you may know now as Doctor Strange. It's unfortunate that most of the world during that time was against the LGBT community. This would ultimately lead to Alan Turing's untimely death. The world loss a brilliant mind that day...
By supporting your fellow humans who are part of the LGBT community, brilliant minds will live longer and contribute more greatness to society. It's important for humans to work together, so that we can create innovative technology that alleviates or prevents pain and suffering. Don't you want flying cars or ships that can travel to other planets faster than the speed of light? Be nice, so these cool technologies can become real! You never know who might be the one to invent them!
Introduction
In this article, I will discuss how to make a fragment shader of a rainbow flag in Shadertoy.

Shadertoy is an online tool that lets you practice shader programming using the GLSL language. I have a whole tutorial series dedicated to Shadertoy for those who want to get started!
Making a Rainbow Flag
There are multiple ways to create a rainbow flag in Shadertoy. Our objective is to fill the screen with equal sections that have these colors in order: red, orange, yellow, green, indigo, violet. There are many shades of each of these colors though. How do we know which shades to use?
I will be selecting colors from flagcolorcodes.com. Each color in the rainbow flag isn't necessarily a fully saturated color. In HTML and CSS, every color is defined by an RGB (red, green, blue) value that goes between 0 and 255. Let's look at the RGB values for each color of the rainbow flag.
- Red: (209, 34, 41)
- Orange: (246, 138, 30)
- Yellow: (253, 224, 26)
- Green: (0, 121, 64)
- Indigo: (36, 64, 142)
- Violet: (115, 41, 130)
Creating the Rainbow Flag Shader
Let's create a new shader in Shadertoy by going to https://www.shadertoy.com/new.
In Shadertoy, we can create a function that converts these colors to a normalized value between 0 and 1. The final output color for red, green, and blue channels must be between 0 and 1.
vec3 normalizeRGB(vec3 col) {
    return col / 255.;
}
Next, we will create our UV coordinates and multiply them by 6 in order to remap the pixel coordinates to a range of 0 to 6. This will make it easier to write the rest of the code.
void mainImage(out vec4 fragColor, in vec2 fragCoord)
{
    // Normalized pixel coordinates (from 0 to 1)
    vec2 uv = fragCoord/iResolution.xy;

    // Remap coordinates (from 0 to 6)
    uv *= 6.;
}
Let's take a look at how are canvas is divided now using the remapped pixel coordinates.
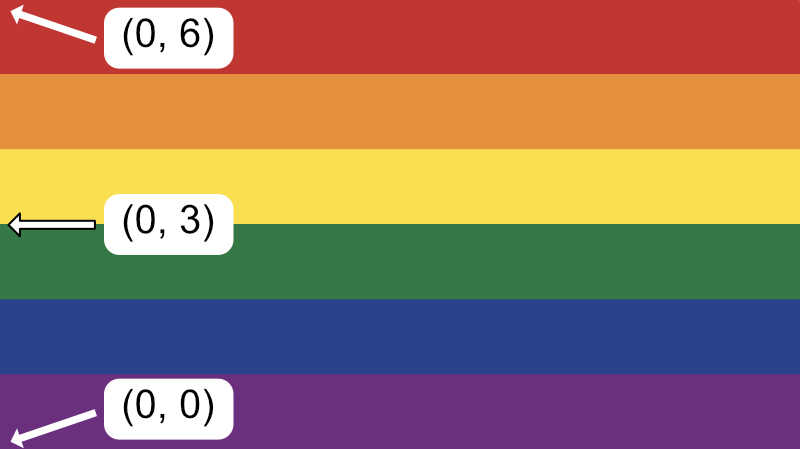
If uv.y is greater than 0 but less than 1, then we know that the color must be violet. If uv.y is greater than 1 but less than 2, then the color must be indigo. We can continue this pattern until we reach red.
// Initialize color
vec3 col = vec3(0);

// Make rainbow flag
if(uv.y > 0. && uv.y <= 1.) col = normalizeRGB(vec3(115, 41, 130)); // violet
if(uv.y > 1. && uv.y <= 2.) col = normalizeRGB(vec3(36, 64, 142)); // indigo
if(uv.y > 2. && uv.y <= 3.) col = normalizeRGB(vec3(0, 121, 64)); // green
if(uv.y > 3. && uv.y <= 4.) col = normalizeRGB(vec3(253, 224, 26)); // yellow
if(uv.y > 4. && uv.y <= 5.) col = normalizeRGB(vec3(246, 138, 30)); // orange
if(uv.y > 5. && uv.y <= 6.) col = normalizeRGB(vec3(209, 34, 41)); // red
Putting this altogether, and we get the following code.
// Normalize the color value to be between 0 and 1
vec3 normalizeRGB(vec3 col) {
    return col/255.;
}

void mainImage(out vec4 fragColor, in vec2 fragCoord)
{
    // Normalized pixel coordinates (from 0 to 1)
    vec2 uv = fragCoord/iResolution.xy;

    // Remap coordinates (from 0 to 6)
    uv *= 6.;

    // Initialize color
    vec3 col = vec3(0);

    // Make rainbow flag
    if(uv.y > 0. && uv.y <= 1.) col = normalizeRGB(vec3(115, 41, 130)); // violet
    if(uv.y > 1. && uv.y <= 2.) col = normalizeRGB(vec3(36, 64, 142)); // indigo
    if(uv.y > 2. && uv.y <= 3.) col = normalizeRGB(vec3(0, 121, 64)); // green
    if(uv.y > 3. && uv.y <= 4.) col = normalizeRGB(vec3(253, 224, 26)); // yellow
    if(uv.y > 4. && uv.y <= 5.) col = normalizeRGB(vec3(246, 138, 30)); // orange
    if(uv.y > 5. && uv.y <= 6.) col = normalizeRGB(vec3(209, 34, 41)); // red

    // Output to screen
    fragColor = vec4(col,1.0);
}
When you run this shader, you should see a rainbow flag appear! 🏳️🌈
Code Refactors
There are multiple ways we can refactor or clean up our code. We could have used preprocessor directives at the top of our code to define each color. Then, we can divide each color by 255 to make sure they're normalized between 0 and 1 instead of using a function.
#define RED vec3(209, 34, 41)/255.
#define ORANGE vec3(246, 138, 30)/255.
#define YELLOW vec3(253, 224, 26)/255.
#define GREEN vec3(0, 121, 64)/255.
#define INDIGO vec3(36, 64, 142)/255.
#define VIOLET vec3(115, 41, 130)/255.

void mainImage(out vec4 fragColor, in vec2 fragCoord)
{
    // Normalized pixel coordinates (from 0 to 1)
    vec2 uv = fragCoord/iResolution.xy;

    // Remap coordinates (from 0 to 6)
    uv *= 6.;

    // Initialize color
    vec3 col = vec3(0);

    // Make rainbow flag
    if(uv.y > 0. && uv.y <= 1.) col = VIOLET;
    if(uv.y > 1. && uv.y <= 2.) col = INDIGO;
    if(uv.y > 2. && uv.y <= 3.) col = GREEN;
    if(uv.y > 3. && uv.y <= 4.) col = YELLOW;
    if(uv.y > 4. && uv.y <= 5.) col = ORANGE;
    if(uv.y > 5. && uv.y <= 6.) col = RED;

    // Output to screen
    fragColor = vec4(col,1.0);
}
We also could have used the mix function with the step function to replace the if statements.
#define RED vec3(209, 34, 41)/255.
#define ORANGE vec3(246, 138, 30)/255.
#define YELLOW vec3(253, 224, 26)/255.
#define GREEN vec3(0, 121, 64)/255.
#define INDIGO vec3(36, 64, 142)/255.
#define VIOLET vec3(115, 41, 130)/255.

void mainImage(out vec4 fragColor, in vec2 fragCoord)
{
    // Normalized pixel coordinates (from 0 to 1)
    vec2 uv = fragCoord/iResolution.xy;

    // Remap coordinates (from 0 to 6)
    uv *= 6.;

    // Initialize color
    vec3 col = vec3(0);

    // Make rainbow flag
    col = mix(col, VIOLET, step(0., uv.y));
    col = mix(col, INDIGO, step(1., uv.y));
    col = mix(col, GREEN, step(2., uv.y));
    col = mix(col, YELLOW, step(3., uv.y));
    col = mix(col, ORANGE, step(4., uv.y));
    col = mix(col, RED, step(5., uv.y));

    // Output to screen
    fragColor = vec4(col,1.0);
}
Finally, we can replace a lot of duplicate logic with a for loop that iterates through an array holding each color. We can use a backslash \ to write out definitions over multiple lines. In languages that support preprocessor directives such as GLSL and C++, this backslash is known as a preprocessor line continuation character.
#define RAINBOW_LENGTH 6
#define RAINBOW_COLORS vec3[RAINBOW_LENGTH](  \
vec3(209, 34, 41)/255.,    \
vec3(246, 138, 30)/255.,   \
vec3(253, 224, 26)/255.,   \
vec3(0, 121, 64)/255.,     \
vec3(36, 64, 142)/255.,    \
vec3(115, 41, 130)/255.)   \

void mainImage(out vec4 fragColor, in vec2 fragCoord)
{
    // Normalized pixel coordinates (from 0 to 1)
    vec2 uv = fragCoord/iResolution.xy;

    // Remap coordinates (from 0 to 6)
    uv *= 6.;

    // Initialize color
    vec3 col = vec3(0);

    // Make rainbow flag
    for(int i = 0; i < RAINBOW_LENGTH; i++) {
        col = mix(col, RAINBOW_COLORS[RAINBOW_LENGTH - i - 1], step(float(i), uv.y));
    }

    // Output to screen
    fragColor = vec4(col,1.0);
}
Conclusion
In this tutorial, we have created a fragment shader of a rainbow flag using GLSL code in Shadertoy. We looked at multiple ways to refactor our code to make it cleaner and more succinct. Hope you found this tutorial enjoyable. Happy pride! 🏳️🌈