Get inspired by RxJS
Greetings, friends! Let's learn about RxJS! RxJS is a powerful library that implements reactive programming concepts. It is the ReactiveX extension for JavaScript. ReactiveX combines concepts from the Observer pattern, the Iterator pattern, and functional programming. Yeah, yeah, fancy words, but what does this all mean?
RxJS uses the concept of Observables to make it easy to handle asynchronous (async) data, especially streams of continuous data or events, that flow over time. You may be thinking, "Well, I can use Promises to handle async data!" And yes, you'd be right, but imagine complex forms where you need to transform and process data a user enters into a bunch of input fields as they are typing. Imagine you have incoming binary data from the Web Bluetooth API and need to process the data in chunks. You can achieve this with some native JavaScript APIs, but why suffer when some awesome people over at RxJS maintain an awesome library for these kind of event-driven situations?
To get started with RxJS, we need to learn about the most basic building block of RxJS: the Observable. Quite simply, it's a function that accepts one parameter, a callback known as subscribe, that will be called when we run Observable.subscribe(). Yes, there are two "subscribes" in the example below. One is a function we assign to a variable and the other is a method that is called on an Observable instance. Below is a simple example of a custom Observable. Don't worry. RxJS has lots of cool Observables already built for us! We'll see them later. 😎
function subscribe(subscriber) {
  let counter = 0
  // Keep track of the interval resource
  const intervalId = setInterval(() => {
    subscriber.next(counter++)
  }, 1000)

  // Provide a way of canceling and disposing the interval resource
  const unsubscribe = () => {
    clearInterval(intervalId)
  }
  return unsubscribe
}

const observer = {
  next(x) { console.log(`got value ${x}`) },
  error(err) { console.error(`something wrong occurred: ${err}`) },
  complete() { console.log('done') }
}

// Main formula for using Observables in RxJS
const subscription = new rxjs.Observable(subscribe).subscribe(observer)
Option+Cmd+J (on Macs) or Ctrl+Shift+J (on Windows). You'll see that the kind developers have already loaded RxJS into the browser. Paste the code into the developer console and hit Enter to run the code!Notice that this now runs setInterval forever. This could definitely lead to a memory leak if we're too careless! 😱 Luckily, we returned an unsubscribe method in our subscribe function we defined at the top of our code. It's always good practice to return an unsubscribe method if you suspect resources to be consumed in the subscribe method. Let's quickly stop setInterval by running the unsubscribe() method on our subscription:
subscription.unsubscribe()
TA-DA! The setInterval has stopped firing because we used the native JavaScript function, clearInterval, in our unsubscribe method. See! That wasn't so bad! 😃
Now, let's go through the code and understand what everything does. Let's start with this line:
const subscription = new rxjs.Observable(subscribe).subscribe(observer)
First, we create a new Observable and pass it a method that will be invoked by calling Observable.subscribe(). The method we pass to rxjs.Observable() is what we use to emit values or events over time (though you could simply run synchronous code as well). It creates a stream of data that can be listened to by the observer object we pass into the Observable.subscribe() method, hence the name, "observer." The Observer observes values emitted by an Observable. Think of the Observable as an event emitter and think of the Observer as an event listener that reacts to data emitted by the Observable. The subscribe method is the trigger that starts the Observable and connects it with an Observer. In our code, our Observer looks like this:
const observer = {
  next(x) { console.log(`got value ${x}`) },
  error(err) { console.error(`something wrong occurred: ${err}`) },
  complete() { console.log('done') }
}
The Observer is simply an object that implements three methods: next, error, and complete. These methods are called in the subscribe method you pass to your Observable. In the example above, we didn't really make use of the error() and complete() methods. If you only care about the next() method, we could have used a shorthand notation:
const subscription = new rxjs.Observable(subscribe).subscribe(x => console.log(`got value ${x}`))
After we create an Observable instance and pass a subscribe callback using rxjs.Observable(subscribe), we then subscribe to the Observable, which will call the very same subscribe method you passed into the Observable. RxJS is using method chaining to make it easier for us, the users of the RxJS library, to quickly develop applications.
I hope that wasn't a heavy introduction to RxJS! 😮 Still with me? Let's look at a simple example of using Observables that RxJS already provides for us.
rxjs.interval(1000).pipe(rxjs.operators.take(4)).subscribe(console.log)
This will be your output when you run the code:
0
1
2
3
So what's happening here? RxJS comes with a helpful method called interval() that automatically creates an Observable for us with setInterval (when subscribing) and clearInterval (when unsubscribing). In our example, interval(1000) means we start at the value, zero, and increase the value by one every 1000ms (one second). Then, we use the pipe() operator to "pipe" each value emitted by the Observable into a set of RxJS operators. In this case, there's only one operator: the take() operator. The take(4) operator will create a new Observable from our input Observable, interval(1000), and take the first 4 values emitted by interval(1000) and then complete once it has received 4 values.
Now, lets look at an example where we don't use any operator with the interval() utility:
rxjs.interval(1000).subscribe(console.log)
What will happen? This output would go on forever:
0
1
2
3
4
5
6
7
...
Remember though! Internally, RxJS already built this Observable with the intention of calling clearInterval() when you unsubscribe. When you call the Observable.subscribe() method, it returns a subscription. You can then use this subscription to terminate an Observable, which is perfect for cancelling timers or even Promises that don't need to be called should an earlier request fail. Let's terminate the interval() Observable by calling unsubscribe():
const subscription = rxjs.interval(1000).subscribe(console.log)
// Let the code run for a little bit...then call this:
subscription.unsubscribe()
Have I lost you yet? Are you still confused on what an Observable is? Maybe an illustration taken from the RxJS operators page will help:
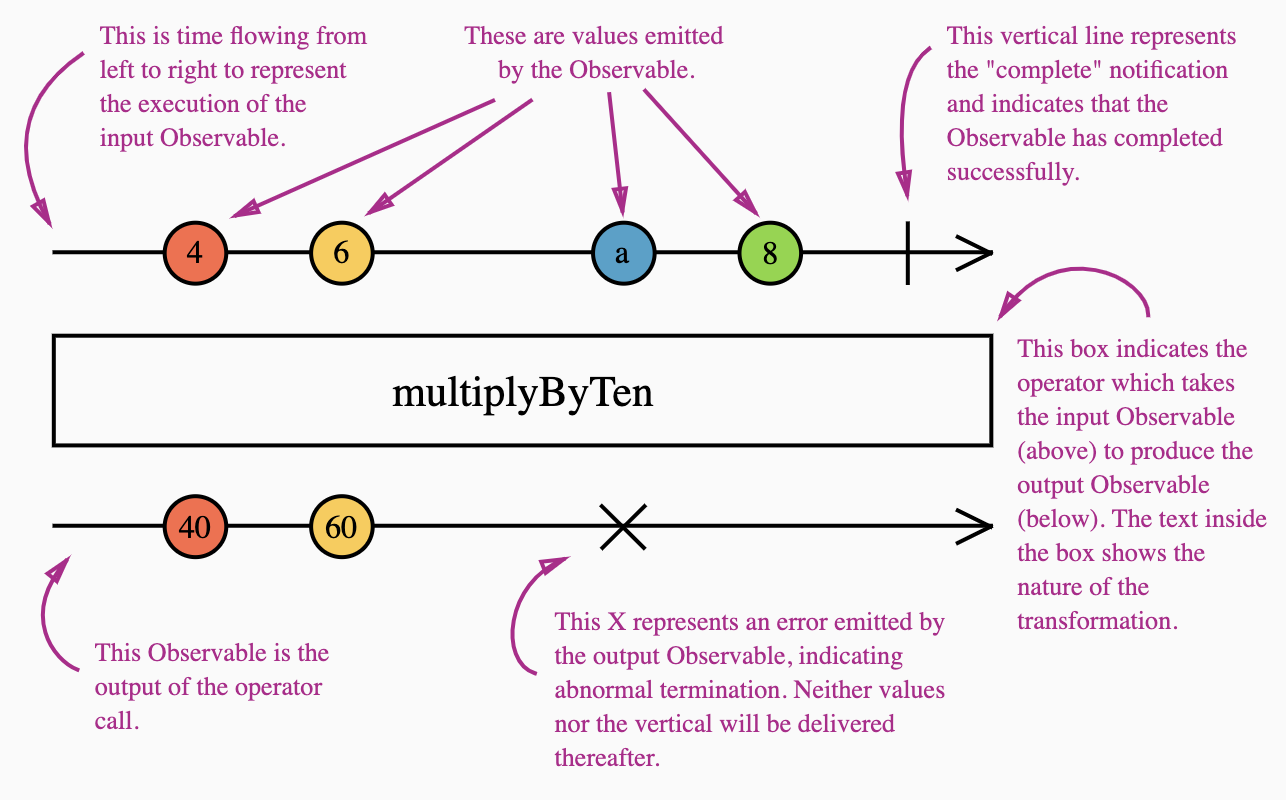
Imagine you have an Observable operator called "multiplyByTen." Wait... why imagine it? Let's see this operator for real and learn how to create a custom RxJS Operator.
function multiplyByTen(input) {
  const output = new rxjs.Observable((observer) => {
    input.subscribe({
      next(v) {
        if (typeof v === 'number')
          observer.next(10 * v)
        else
          observer.error('X')
      },
      error(err) { observer.error(err) },
      complete() { observer.complete() }
    })
  })

  return output
}

const input = rxjs.from([4, 6, 'a', 8])
const output = multiplyByTen(input)
output.subscribe(x => console.log(x), err => console.log(`ERROR: ${err}`))
You should see the following output just like the illustration above:
40
60
ERROR: X
subscribe() method. This is possible because RxJS implements method overloading on it and understands whether you use an object containing the next(), error(), and complete() methods, or you use simple parameters where each parameter represents the respective callback. I could have easily done the following instead:output.subscribe({
next(x) { console.log(x) },
error(err) { console.log(`ERROR: ${err}`) }
})
Phew, a lot going on here. The "multiplyByTen" operator is an example on how to create a custom Observable operator. A custom operator is simply a function that accepts an Observable and returns another Observable. In our example, the job of the "multiplyByTen" operator is to take every value in the Observable and multiply it by 10. However, it's not as simple as taking the value from the input/source Observable and multiplying it by 10. What you subscribe to on the last line is actually a new Observable, the "output" Observable. This is why our data is like a stream. It flows out from the source Observable into a transformer that then pipes the transformed data into a new Observable. In some languages such as dart, the input stream of data (an "Observable" in the RxJS world) is considered a "source" and the output is considered a "sink." The terminology of "source" and "sink" is prevalent in circuit design, geology, fluid mechanics, and other subjects.
Let's take a closer look at our input Observable. The from() method is provided by RxJS and can create an Observable from an array of values that emits synchronously.
const input = rxjs.from([4, 6, 'a', 8])
We then create an output Observable that accepts one parameter: our input Observable.
const output = multiplyByTen(input)
Inside the multiplyByTen method, we are subscribing to the input Observable to start emitting values. The output Observable will automatically call the next(v) method for every value inside the input Observable until the Observable is exhausted/completed and has no more values or an error occurs. Inside our next(v) method, we are checking to see if the value is a number. If so, then emit a value that is ten times that value. If it's not a number, then call observer.error('X'). This will then trigger the error() method inside of the observer we pass to output.subscribe(). In other words, this line will be run:
error(err) { console.log('ERROR: ' + err); }
When an error is encountered, then the Observable will end and will stop delivering new values. This is why we see "ERROR: X" appear in the console log after running the "multiplyByTen" code. If you're interested, RxJS does provide an operator for resubscribing to an Observable. Check out the Retry operator to learn more.
I should mention that the last few lines of the "multiplyByTen" code could have been written a little differently using the RxJs pipe() method. When using RxJS, you'll see how often this method is used. Many languages implement a "pipe" method or operator in some form or fashion. Even operating systems utilize the concepts of pipes for interprocess communication. The popular utility library, Lodash, has a flow() method that is reminiscent of a "pipe" operator. Pipes are everywhere. They can be a very performant solution as well depending on how a library implements them.
Let's look back at the last few lines of the "multiplyByTen" example:
const input = rxjs.from([4, 6, 'a', 8])
const output = multiplyByTen(input)
output.subscribe(x => console.log(x), err => console.log(`ERROR: ${err}`))
We could have used pipes to make the code not only slightly easier to read, but also prepare our input Observable to pass through additional operators. The output will remain the same.
rxjs
  .from([4, 6, 'a', 8])
  .pipe(multiplyByTen)
  .subscribe(x => console.log(x), err => console.log(`ERROR: ${err}`))
For example, let's pipe our inital input Observable into the "multiplyByTen" method three times instead:
rxjs
  .from([4, 6, 'a', 8])
  .pipe(multiplyByTen, multiplyByTen, multiplyByTen)
  .subscribe(x => console.log(x), err => console.log(`ERROR: ${err}`))
The output will be the following:
4000
6000
ERROR: X
Do you see how powerful this is?!!! This is really cool stuff. I hope this inspires you to try to make your own custom Observable operators with RxJS.
map() to create a "multiplyByTen" operator.rxjs.from([4, 6, 8, 10]).pipe(rxjs.operators.map(x => x * 10)).subscribe(console.log)
If you're interested in seeing a real-world example of RxJS, I built a small app where a user can enter their favorite color and favorite animal, and it creates a band name.
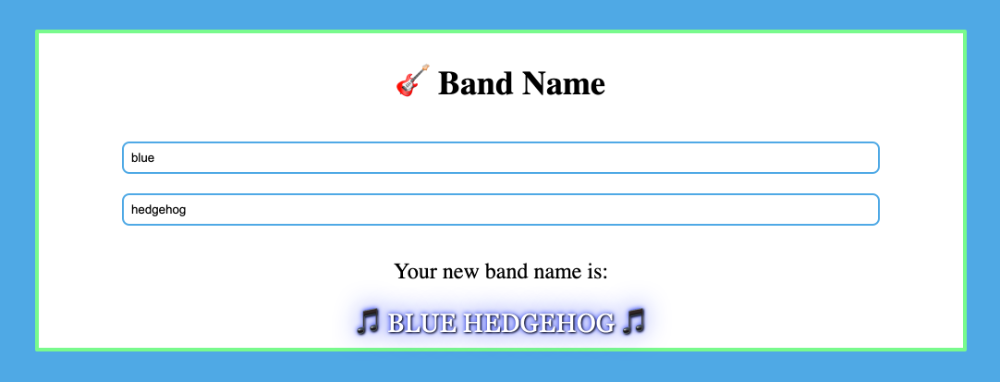
This project utilizes multiple RxJS operators and utility methods to show you how powerful reactive programming can be. You can clone the repo using the following command:
git clone https://github.com/inspirnathan/rxjs-tutorial-band-name.git
You can see from the image above that there are two input fields. RxJS provides a utility method for reading events from the DOM using fromEvent(eventTarget, eventName). This will create an Observable that emits values whenever the user causes the event specified by eventName to fire.
fromEvent() works in both Node and the browser. However, it's more commonly used in the browser. See the official fromEvent page for more details.The heart of this application is the main.js script. Let's take a closer look at what it's doing.
import { combineLatest, fromEvent, interval } from 'rxjs'
import {
  debounce,
  distinctUntilChanged,
  filter,
  map,
  pluck,
} from 'rxjs/operators'

const favoriteColor = document.getElementById('favorite-color')
const favoriteAnimal = document.getElementById('favorite-animal')
const bandName = document.getElementById('band-name')

const favorites$ = [favoriteColor, favoriteAnimal].map(el =>
  fromEvent(el, 'keydown').pipe(
    debounce(() => interval(500)),
    filter(e => e.key !== ' '),
    pluck('target', 'value'),
    map(val => val.toUpperCase()),
    distinctUntilChanged()
  )
)

const combined$ = combineLatest(favorites$[0], favorites$[1])

combined$.subscribe((val) => {
  console.log(val)
  bandName.textContent = `🎵 ${val.join(' ')} 🎵`
  bandName.style.textShadow = `1px 1px 2px black, 0 0 1em ${val[0]}, 0 0 0.2em ${val[0]}`
})
Let me explain at a high level what is happening in this app. There are two input Observables, one for each input field. When a user starts typing, it fires native keydown events that are captured by RxJS. Every time a key is pressed, an event is fired and piped into five operators: debounce, filter, pluck, map, and distinctUntilChanged. This results in two output Observables, one for each input field, that contains transformed values. These two output Observables are then combined into a new Observable using the combineLatest utility method. We subscribe to this new combined output Observable and format the HTML with the values obtained from both input fields. We then add some colored text shadow for some pizzazz. 😎
Now, let's talk about each operator to understand how they're transforming each keystroke a user enters. Then, we'll discuss the "combineLatest" utility RxJS provides.
debounce(() => interval(500))
If you're familiar with debouncing button switches in electronics, then you probably have a good guess of what this does. The debounce() operator delays each keystroke by 500ms (half a second) and won't let any keystrokes pass until 500ms have elapsed. When I type the letters, "blu" really fast (under 500ms) and stop typing, then the Observable will only emit the letter, "u" because it only emits the last keystroke that let 500ms pass. Why is this helpful? Imagine you need to make an API call after a user finishes typing in an input field. Maybe it's for an analytics or logging script. If you made API calls for every keystroke, then you'd be wasting resources in your application. It's important not to make too many API calls, so your server isn't overloaded. Perhaps, your company uses a vendor that allocates a certain number of API calls a month. By debouncing the input, you can reduce how often these API calls occur while still capturing what the user types.
filter(e => e.key !== ' ')
The RxJS filter() operator behaves in a similar manner to the native Array.filter() method you may be familiar with in vanilla JavaScript. It only lets values pass to the next operator if the condition provided in the callback is true. It's important to keep in mind that we're not just passing the keystroke itself through these operators, but instead the DOM event that contains the keystroke the user enters. In our scenario, we are checking the "key" property of the event object. We don't emit values to the next operator if the user presses the spacebar.
pluck('target', 'value')
As mentioned above, we were passing the entire event object through these operators. That means we have access to event.target.value. The pluck() operator allows us to pluck properties off the values that passes through this operator. By calling pluck('target', 'value'), we are extracting e.target.value where "e" is the variable we chose to stand for "event." This allows us to get the entire value the user has entered in the input field. If they have entered "blue," then we will pass "blue" to the next operator.
map(val => val.toUpperCase())
The RxJS map() operator is very similar to the native Array.map() method in vanilla JavaScript. It allows you to take the value emitted from the previous operator or Observable and apply an operation on it. In our case, we are taking the value emitted from pluck() and capitalizing the whole value that the user currently has entered in the input field.
distinctUntilChanged()
This operator has a long name, but it's really cool. The distinctUntilChanged() operator won't let values pass until it is different than the last value. This means that if the user copies and pastes the same value into the input field over and over, then this operator won't emit any new values for our observer to hear. Since we use a debounce() operator, we get the added benefit of blocking quick changes the user makes. Imagine that they have already typed, "blue," in an input field, but they change it to "bluez" and then back to "blue", all within 500ms. Since the input is debounced, only the letter "e" would make it pass the debouncer. Since "e" is not a space, it makes it past the filter() operator just fine. Then, we pluck the whole word the user has entered to get "blue". This would pass through our map() operator and become "BLUE." If the user changes the input really fast, but the content in the input field ends up being the same, regardless, then distinctUntilChanged() will just pretend nothing happened.
const combined$ = combineLatest(favorites$[0], favorites$[1])
The combineLatest() utility method allows us to create an Observable whose values are calculated from the latest values of each of its input Observables. What does this mean? If we look at the following illustration from the official RxJS documentation, we'll see that the output Observable uses the last emitted value from each input Observable.
<br/
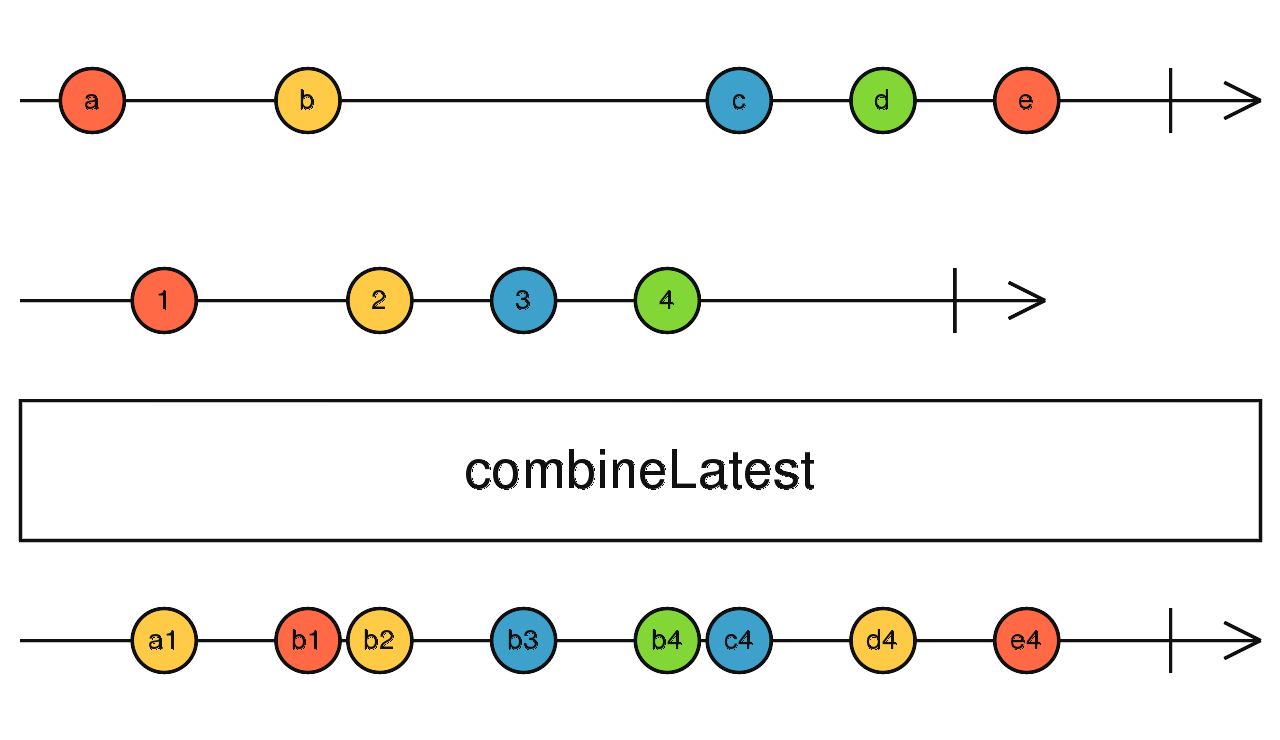
In this project, the capitalized version of the value in the first input field is combined with the capitalized version of the value in the second input field. If I entered, "blue," in the first input field, then the output, after passing through all five operators, will be "BLUE." If I entered "hedgehog," in the second input field, then the output will be "HEDGEHOG". The combineLatest() method creates an Observable that now emits an array, ["BLUE", "HEDGEHOG"]. If you're running this project on your computer, then you'll notice that this appears in the developer console. I have logged this value for you.
In the last few lines of main.js, you can see that we only subscribe to the combined Observable.
combined$.subscribe((val) => {
  console.log(val)
  bandName.textContent = `🎵 ${val.join(' ')} 🎵`
  bandName.style.textShadow = `1px 1px 2px black, 0 0 1em ${val[0]}, 0 0 0.2em ${val[0]}`
})
Once we subscribe, the output value is logged to the console. This should happen 500ms after we stop typing thanks to our debouncer. We then set the textContent of the "bandName" element to be "BLUE HEDGEHOG" by joining the first and second element in the emitted value, ["BLUE", "HEDGEHOG"], together by a space. We add music notes around the newly created band name to add some flair and let everyone know we sing about RxJS. Finally, we add a text shadow that changes color if the user enters a valid CSS color to add some flair.
RxJS is filled with an even greater variety of tools that we haven't discussed in this post. We haven't even scratched the surface on how powerful it can be. There are dozens of operators you can use in RxJS plus a bunch of utilities such as Subjects and Schedulers that can make it easier to deal with multiple streams of asynchronous data in large applications.
I hope this post has inspired you to try out RxJS. 🎉