Connect Android Device to Computer over Wi-Fi or Cord
Greetings, friends! Connecting an Android device to a computer seems like a simple task, but it's actually a bit tedious process. In this article, I discuss two ways of connecting an Android device to a computer: over Wi-Fi and via a USB cord.
The Android Debug Bridge
Before we get started, it's important to understand the Android Debug Bridge (adb) program. It serves as the "bridge" between Android devices and your computer. This program is normally installed automatically when you download Android Studio with the Android SDK Platform-Tools package.
If you're using a Mac, then you'll likely find this program installed in:
~/Library/Android/sdk/platform-tools/
If you're using Windows, then the adb program will be installed in:
C:\Users\YOUR_USERNAME\AppData\Local\Android\sdk\platform-tools
Once you know the location of the adb program, you can run it to make sure it's working correctly. On a Mac, you would take the following steps:
# Navigate to the directory
~/Library/Android/sdk/platform-tools

# Run the program
./adb
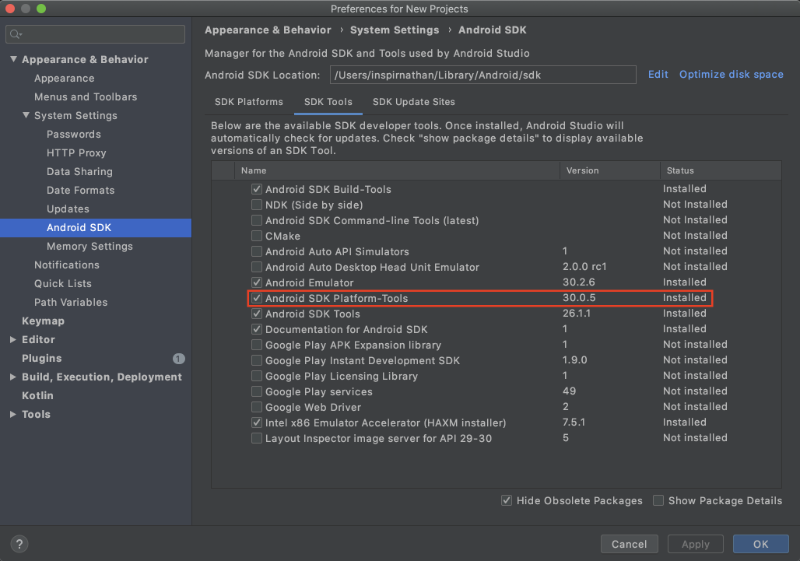
If you see any issues, make sure you're in the correct directory and make sure you have installed the Android SDK Platform-Tools package in Android Studio by going to Tools -> SDK Manager -> SDK Tools:
We'll be using the adb program in later sections, so make sure you're still in the directory this program is installed in.
Enabling USB Debugging
You need to make sure USB Debugging is enabled in order to connect a physical Android device to your computer regardless of whether you're using Wi-Fi or a cord.
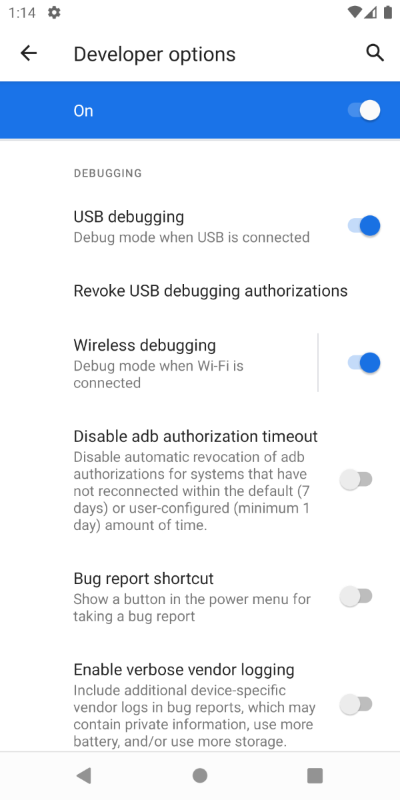
First, navigate to the bottom of the settings page until you find an "About ... device" option. Click on that option, scroll to the bottom of the page, and tap on the "Build number" seven times. This will enable the Developer Options. Go back to the settings page and click on the "System" option. If you click on the "Advanced" option, you should now see "Developer options." Click on this option and scroll down until you see "USB Debugging." Click on the toggle to enable it.
Below is a gif that runs through the entire process. I'm using an emulator in this example, but the same steps apply for a physical device.
With USB Debugging enabled, you're now allowed to transfer data between your physical Android device and a computer.
If you're having trouble getting USB Debugging enabled, please refer to the instructions in the official Android Developer Options guide.
Connecting to a Physical Device through Wi-Fi
In this section, I'll discuss how to connect your Android device to your computer over Wi-Fi. As a disclaimer, these steps only work for Android devices running Android 11 or higher. If you are running Android 10 or lower, then check out the official Android documentation. Connecting a device over Wi-Fi requires a bit more setup than using a USB cord. If you prefer to use a physical connection via a USB cord, then you can skip this section and proceed to the next one.
To connect your device to your computer over Wi-Fi, you need enable "Wireless debugging" by clicking on the toggle switch next to this option in the "Developer options" page we were looking at in the previous section.
After you've enabled Wireless debugging using the toggle switch, click on the actual words, "Wireless debugging," to take you to a page with more options.
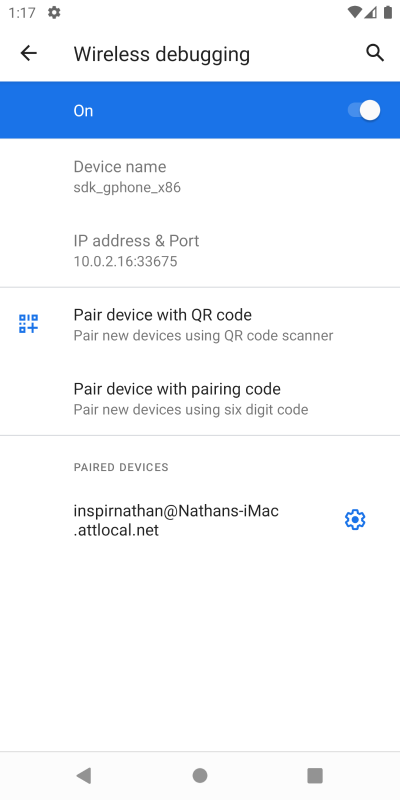
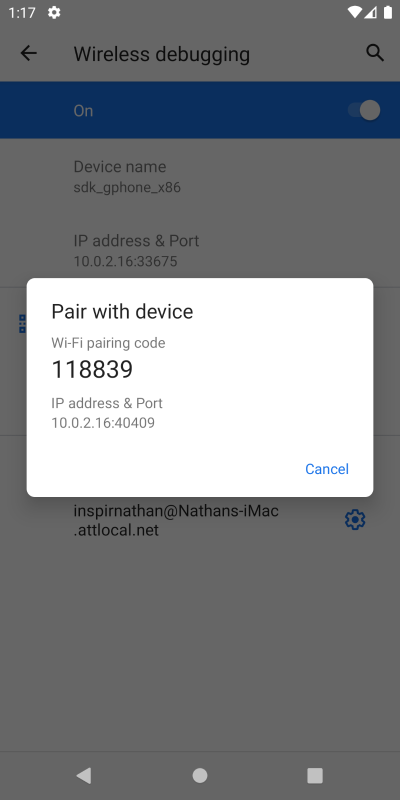
Next, click on "Pair device with pairing code" which should bring up a modal with a Wi-Fi pairing code, IP address, and port number.
Go back to your computer and get ready to use the adb program again. In your terminal, make sure you're in the directory this program resides in.
cd ~/Library/Android/sdk/platform-tools
Then, we're going to use adb to run the following command:
./adb pair ipaddr:port
Where ipaddr and port are the IP address and port number, respectively, that you see in the modal in the above image.
If you're using Windows outside of Windows PowerShell, then you might not need the period and slash to run the adb program:
adb pair ipaddr:port
Once you run the command appropriate to your operating system, you'll be asked to enter a pairing code. This pairing code is again found in the modal on the "Wireless debugging" page of the Android device.
If things go well, you'll see a message similar to the following:
Successfully paired to ipaddr:port
Where ipaddr and port are the IP address and port number, respectively, that you saw in the modal.
Finally, we need to run another command to actually connect the device to the computer through the adb debugger.
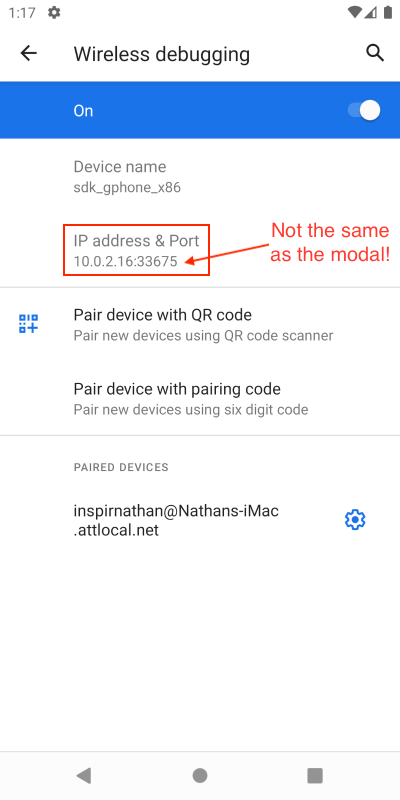
Go back to the "Wireless debugging" page and close out of the modal. On this page, you should see another IP address and port number. The IP address will likely be the same, but the port number will be different from what you saw in the modal.
On Mac and Linux, run the following command:
./adb connect ipaddr:port
Where ipaddr and port are the IP address and port number, respectively, that you saw on the "Wireless debugging" page, not the modal.
On Windows (non-PowerShell environment):
adb connect ipaddr:port
If the command runs successfully, it should say that adb connected to the IP address and port you specified.
You can verify that the device is connected by running the following command:
./adb devices -l
This command will show a list of all devices that are connected to your computer through the Android Debug Bridge (adb). You should see output similar to the following:
List of devices attached
emulator-5554          device product:sdk_gphone_x86 model:sdk_gphone_x86 device:generic_x86_arm transport_id:2
In my case, I have connected an emulated Android device to my computer for demonstration purposes, but I have verified that these instructions work on real devices as well!
Connecting to a Physical Device with a USB cord
To connect a physical Android device to your computer through a cord instead of Wi-Fi, you'll need a USB cord that is compatible with your device and the computer you're connecting to. For example, if you're using a Pixel phone, you'll likely need a USB-C to USB-A cord or a USB-C to USB-C cord depending on what USB ports your computer supports.
You'll also need to make sure that this cord transfers data. Some USB cords only transfer power and thus will only charge your phone instead of being able to transfer data between your phone and computer.
Let's make sure that your phone is transferring data to your computer. When you connect the USB cord to your phone and computer, you should see an "Allow USB Debugging" prompt appear on your Android device. If you followed the instructions in the "Enabling USB Debugging" section earlier in this article, then you should be good to go!
We can verify that the computer sees the Android device by using the adb program:
./adb devices -l
You should see your device on the list if you have USB Debugging enabled and your cord is transferring data correctly.
Conclusion
Phew! Quite a bit of work just to connect an Android device to a computer, huh? With this article, you'll never have worry about forgetting how to do this again! 😃 May your coding skills bring you lifelong success on your journey!