Install Oh My Zsh with Agnoster Theme
Greetings, friends! Whenever I get a new machine running macOS, one of the first things I do is install Oh My Zsh. Oh My Zsh is a powerful open source framework for managing your Zsh configuration. What is Zsh? It stands for Z shell and is a Unix shell that can be used on Unix-based operating systems including macOS. Oh My Zsh comes with thousands of helpful functions, plugins, and themes to improve the developer experience for a variety of programming languages and projects. It helps with Git autocompletion, Node.js autocompletion, and a ton more!
Today, I'll go through how to install Oh My Zsh on macOS and how to install the Agnoster Theme, a personal favorite among a lot of developers. I'll also describe how to get the Agnoster theme working correctly with iTerm2 and VS Code's terminal.
Please note that once you update your shell from bash to Zsh, you'll need to make sure that scripts found in your .bash_profile and .bashrc files are transferred over to your .zshrc file. This is common for people who have downloaded tools like Anaconda, which place scripts inside your .bash_profile file. If you use a shell other than bash, then you'll need to transfer scripts from the config files associated with the shell you were using before the Zsh installation to your .zshrc file.
Let's begin! First, navigate to the Oh My Zsh website and click on the install button. You will be taken to a page that describes how to install the program with either a curl or wget command. Choose whichever you prefer.
To install with curl:
sh -c "$(curl -fsSL https://raw.github.com/ohmyzsh/ohmyzsh/master/tools/install.sh)"
To install with wget:
sh -c "$(wget https://raw.github.com/ohmyzsh/ohmyzsh/master/tools/install.sh -O -)"
Once you've run either command in your terminal, it will ask you if you want to change your default shell to zsh. Oh my zsh! Of course!
It's possible that Oh My Zsh will complain about insecure completion-dependent directories. Follow the instructions it suggests to fix file and ownership permissions. Typically, it'll ask you to run this command:
compaudit | xargs chmod g-w,o-w
This command will disable the write permissions of "group" and "others", making sure that the owner of these directories is either root or your current user.
Once you have Oh My Zsh installed, it's time to add the Agnoster theme! Simply open up the .zshrc configuration file:
vi ~/.zshrc
If you prefer to use VS Code instead of Vim and have the code command installed, you can simply do:
code ~/.zshrc
Look for the line containing ZSH_THEME and set it equal to agnoster like so:
ZSH_THEME="agnoster"
Now, if you restart the terminal, the Agnoster theme should be installed! Wait...kinda looks odd. Why are there question marks?

The reason this happens is because the terminal doesn't understand how to display the unicode properly. We need to install a Powerline-patched font to display the symbols correctly in the terminal. The Agnoster theme uses lots of symbols to add flair to our terminal.
The quickest way to install the Powerline fonts is to clone the repo:
git clone https://github.com/powerline/fonts.git
Then navigate to the fonts directory:
cd fonts
And run the installation script:
./install.sh
As a clean-up step, you may remove the fonts directory after installation if you prefer:
cd .. && rm -rf fonts
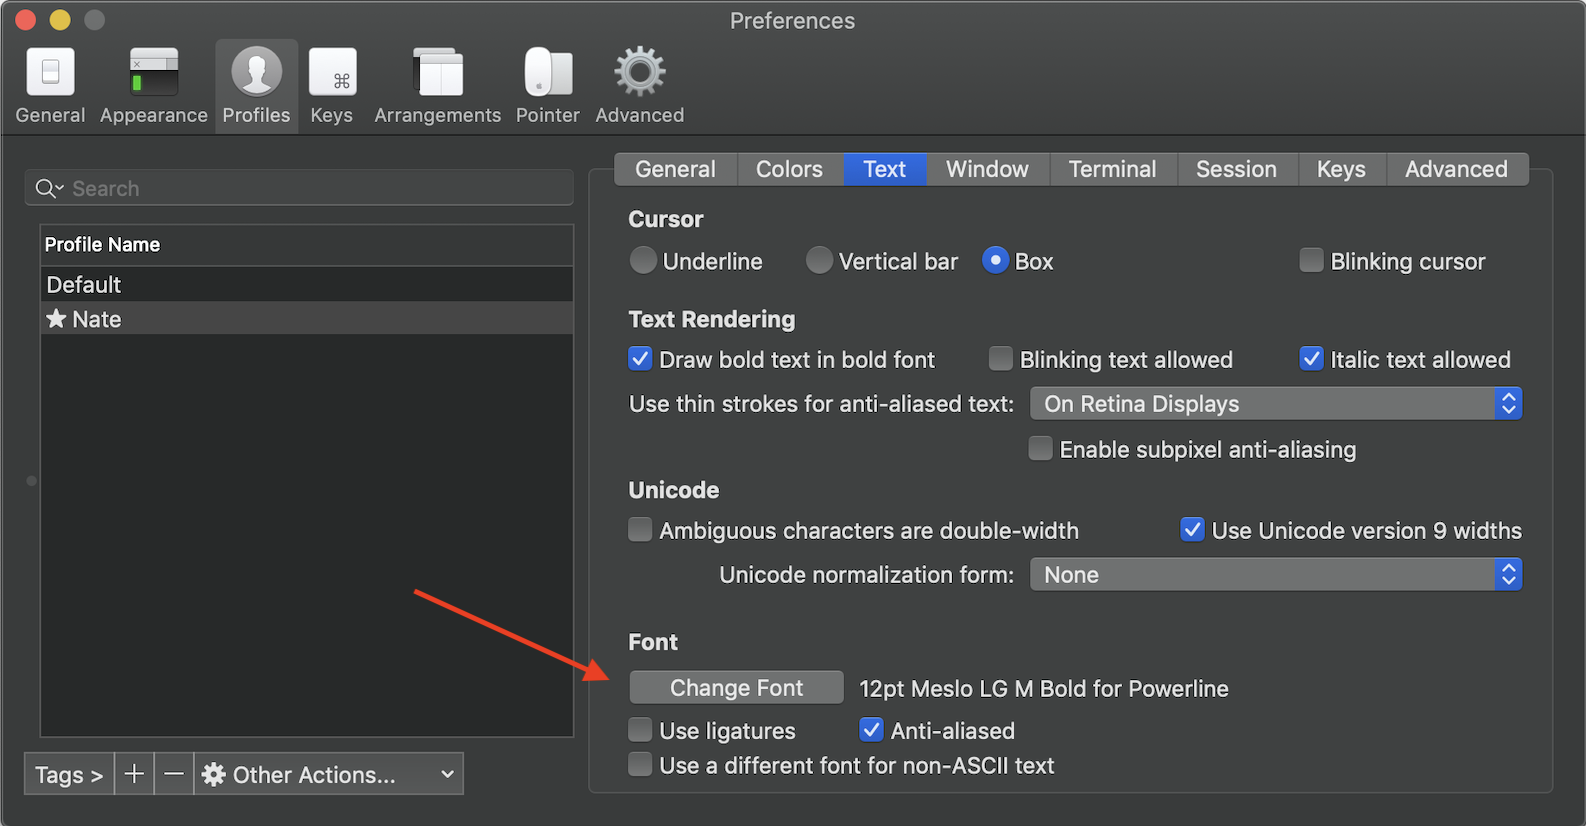
If you're using iTerm2, then you may need to perform some extra steps. According to this Github issue, we need to change the font in iTerm2 -> Preferences->Profile and navigate to the "Text" tab to make sure we are using a Powerline font.
We have fixed iTerm2, but we still need to fix the terminal in VS Code. First, we need to make sure that your default shell is set to "zsh" instead of "bash". Open up the Command Palette with Cmd+Shift+P and navigate to "Terminal: Select Default Shell". Choose the "zsh" option. If you currently have a terminal open, you made need to close it and reopen it for the changes to take effect.
You may see issues with the symbols that we experienced with iTerm2. To resolve this issue in VS Code, we need to open up the Command Palette again and navigate to "Preferences: Open Settings (JSON)". Then, you need to add the following line somewhere in this file:
"terminal.integrated.fontFamily": "Source Code Pro for Powerline"
Once you're done, the VS Code terminal should look similar to this

Looks so cool now! In my example, I have navigated to a project that is version controlled using Git, which is why you see the "master" branch being displayed in the terminal. You have the freedom to change the color scheme, font color, and more by adjusting your terminal settings. Each colored section you see in the image above is known as a "segment." The entire group of segments is known as a "prompt view." You can add/remove segments to your prompt view by following instructions on the Agnoster theme Github page.
With Oh My Zsh, you get support out of the box for autocompletion for a variety of tools such as Git and Node.js. For example, if you have a branch named my_cool_branch and want to checkout that branch, you can use the Tab key to autocomplete this:
git checkout my
After pressing Tab, Oh My Zsh will autocomplete it to the best of its ability to:
git checkout my_cool_branch
If you have a project with a package.json file, then you can autocomplete certain scripts you have available. Suppose you have the following package.json file:
{
  "name": "my-awesome-project",
  "version": "1.0.0",
  "description": "",
  "main": "index.js",
  "scripts": {
    "start": "node server",
    "start:inspect": "node --inspect server",
    "test": "jest"
  },
  "keywords": [],
  "author": "",
  "license": "ISC"
}
You can start typing out npm run s

Hit Tab once to autocomplete based on the first script that starts with "s"

Hit Tab a second time to list all npm scripts available in your package.json file that starts with start

Hit Tab a third time to begin tabbing through your scripts and hit Enter/Return to select that script. You can use Shift+Tab to tab backwards through your listed scripts

Quite handy when you can't remember the name of a particular script or don't feel like typing the whole name out!
The flexibility and customizations of Oh My Zsh and the Agnoster theme greatly helps improve the developer experience! I hope you see how useful they can be! Please dive into the Oh My Zsh docs to learn more about the plugins and themes that are available!